Tag: source edit |
m (minor) |
||
| Line 7: | Line 7: | ||
| caption = The Zariman as seen in the [[The New War]] cinematic quest |
| caption = The Zariman as seen in the [[The New War]] cinematic quest |
||
| system = [[Sol]] |
| system = [[Sol]] |
||
| − | | ruler = {{Faction|Tenno}} (contested) |
+ | | ruler = {{Faction|Tenno}} (contested)<br /> |
| − | {{Faction|Grineer}} |
+ | {{Faction|Grineer}}<br /> |
{{Faction|Corpus}}<br /> |
{{Faction|Corpus}}<br /> |
||
[[The Holdfasts]] |
[[The Holdfasts]] |
||
Revision as of 22:22, 17 May 2022

 Zariman Ten Zero
The Zariman Ten Zero was an Orokin colony ship that disappeared into the Void when a Void-Jump Accident occurred. After the incident, its survivors received mysterious powers from the Void and later became the Tenno that control the Warframes and fight for the Origin System.
Following the events of The New War and Angels of the Zariman, the Zariman appeared back into real space without warning, stuck between realities. A song coming from aboard the ship called out to the inhabitants of the Origin System and both Grineer and Corpus immediately attempted to gain control of the legendary vessel. It soon became a top priority for the Tenno to reclaim their home, the birthplace of all their power and misery. There, The Holdfasts, survivors who have been sustained by the mysterious powers of the Void, work to prevent the Zariman from falling into the wrong hands.
It was introduced as a location in Update 31.5 (2022-04-27). Permanent access to the Zariman Ten Zero is gained after completion of the Angels of the Zariman quest. It uses a unique tileset.
Enemies
Missions
| Target | Name | Type | Level | Credit Reward | Additional Credit Reward | Tile Set | Mastery EXP | Internal Name | Hidden Node |
|---|---|---|---|---|---|---|---|---|---|

|
Chrysalith | Hub | 0 - 0 | 0 | 0 | Chrysalith | 0 | ZarimanHub
|
❌ |
|
|
Dormizone | Hub | 0 - 0 | 0 | 0 | Dormizone | 0 | SolNode234
|
❌ |
|
The Circuit | Open World | 20 - 20 | 0 | 0 | Duviri | 0 | SolNode238
|
✔️ |
|
|
The Duviri Experience | Open World | 20 - 20 | 0 | 0 | Duviri | 0 | SolNode236
|
✔️ |
|
|
The Lone Story (Duviri) | Open World | 20 - 20 | 0 | 0 | Duviri | 0 | SolNode237
|
✔️ |

|
Everview Arc | Void Flood | 50 - 55 | 5,900 | 0 | Zariman (Tileset) | 0 | SolNode230
|
❌ |
|
|
Tuvul Commons | Void Cascade | 50 - 55 | 5,900 | 0 | Zariman (Tileset) | 0 | SolNode232
|
❌ |
|
|
Oro Works | Void Armageddon | 50 - 55 | 5,900 | 0 | Zariman (Tileset) | 0 | SolNode233
|
❌ |
|
|
Halako Perimeter | Exterminate | 50 - 55 | 5,900 | 0 | Zariman (Tileset) | 0 | SolNode231
|
❌ |
|
|
The Greenway | Mobile Defense | 50 - 55 | 5,900 | 0 | Zariman (Tileset) | 0 | SolNode235
|
❌ |
Rewards
| Rewards | |
|---|---|
| 40% | |
| 17.5% | |
| 10% | |
| 10% | |
| 5% | |
| 2.5% | |
| 2.5% | |
| 2.5% | |
| 2.5% | |
| 2.5% | |
| 2.5% | |
| 2.5% | |
Locations:
- Halako Perimeter, Zariman Ten Zero
Drop tables outdated? Readers can update Module:DropTables/data and cross reference with official drop tables on https://www.warframe.com/droptables.
| Rewards | |
|---|---|
| 40% | |
| 17.5% | |
| 10% | |
| 10% | |
| 5% | |
| 2.5% | |
| 2.5% | |
| 2.5% | |
| 2.5% | |
| 2.5% | |
| 2.5% | |
| 2.5% | |
Locations:
- The Greenway, Zariman Ten Zero
Drop tables outdated? Readers can update Module:DropTables/data and cross reference with official drop tables on https://www.warframe.com/droptables.
| A | B | C | |||
|---|---|---|---|---|---|
| 50% | 50% | 16% | |||
| 18.75% | 20% | 16% | |||
| 9.38% | 6.67% | 16% | |||
| 3.13% | 3.33% | 16% | |||
| 3.13% | 3.33% | 16% | |||
| 3.13% | 3.33% | 10% | |||
| 3.13% | 3.33% | 10% | |||
| 3.13% | 3.33% | ||||
| 3.13% | 3.33% | ||||
| 3.13% | 3.33% | ||||
Locations:
- Oro Works, Zariman Ten Zero
Drop tables outdated? Readers can update Module:DropTables/data and cross reference with official drop tables on https://www.warframe.com/droptables.
| A | B | C | |||
|---|---|---|---|---|---|
| 50% | 50% | 16% | |||
| 18.75% | 20% | 16% | |||
| 9.38% | 6.67% | 16% | |||
| 3.13% | 3.33% | 16% | |||
| 3.13% | 3.33% | 16% | |||
| 3.13% | 3.33% | 10% | |||
| 3.13% | 3.33% | 10% | |||
| 3.13% | 3.33% | ||||
| 3.13% | 3.33% | ||||
| 3.13% | 3.33% | ||||
Locations:
- Tuvul Commons, Zariman Ten Zero
Drop tables outdated? Readers can update Module:DropTables/data and cross reference with official drop tables on https://www.warframe.com/droptables.
| A | B | C | |||
|---|---|---|---|---|---|
| 50% | 50% | 16% | |||
| 18.75% | 20% | 16% | |||
| 9.38% | 6.67% | 16% | |||
| 3.13% | 3.33% | 16% | |||
| 3.13% | 3.33% | 16% | |||
| 3.13% | 3.33% | 10% | |||
| 3.13% | 3.33% | 10% | |||
| 3.13% | 3.33% | ||||
| 3.13% | 3.33% | ||||
| 3.13% | 3.33% | ||||
Locations:
- Everview Arc, Zariman Ten Zero
Drop tables outdated? Readers can update Module:DropTables/data and cross reference with official drop tables on https://www.warframe.com/droptables.
Bounties
Before a Tenno can access Chrysalith bounties, they must first prove themselves to Quinn by completing the Angels of the Zariman quest.
Mission Bounties
Mission Bounties accessible from Quinn inside the Chrysalith on the Zariman Ten Zero. These bounties refresh every 2½ hours.
Upon accepting a bounty, it may be started via Fast Travel as follows: open Main Menu (default: Esc ) > FAST TRAVEL > ZARIMAN NAVIGATION. Alternatively, to access by foot - a portal will spawn behind Quinn that teleports to the Chrysalith elevator that will take the player to the bounty mission.
Unlike Landscape bounties, the Chrysalith's bounties consists of completing standard Zariman Ten Zero missions (Exterminate, Mobile Defense, Void Cascade, Void Flood, and Void Armageddon) with an additional mandatory bounty objective, with the rewards given on end of mission. These bounties do not occur in stages and there is no bonus objective, thus the entire drop table is only rolled once. Endless missions will still give their rotation rewards but will immediately end and prompt extraction once all relevant objectives are completed.
Note that an extraction will not be available until both the regular mission objective and the bounty objective have been achieved. For this reason Voidplume collection (via Syndicate Medallions as well as Void Angels and Zarium Accolades that do not pertain to the objective) should not take priority until after both the mission and bounty objectives are completed, as failing either will cause the whole bounty mission to fail, and thus lead to a forfeiture of all collected rewards, including Voidplumes.
There are five bounty tiers available on the Zariman. Increasing tiers will have an increasing starting enemy level, a different and more challenging pool of possible bounty objectives, and a different pool of possible rewards. To summarise:
| Bounty Tier(s) | Starting Enemy Levels | Rewards |
|---|---|---|
| Tier 1 | 50-55 | 1x |
| Tier 2 | 60-65 | 2x |
| Tier 3 | 70-75 | 3x |
| Tier 4 | 90-95 | 4x |
| Tier 5 | 110-115 | 5x |
Unlike in other locations, each of the current Chrysalith bounties has their own Steel Path variant available by switching to the Steel Path difficulty tab on the bounty screen. Steel Path bounties provide 150% of Voidplume bounty rewards rounded up and 1 Steel Essence upon completion, but allow Acolytes to appear.
Rewards
| Rewards | |
|---|---|
| 17.39% | |
| 17.39% | |
| 13.04% | |
| 13.04% | |
| 13.04% | |
| 13.04% | |
| 8.7% | |
| 4.35% | |
Locations:
- Chrysalith, Zariman; talk to Quinn
Drop tables outdated? Readers can update Module:DropTables/data and cross reference with official drop tables on https://www.warframe.com/droptables.
| Rewards | |
|---|---|
| 20.34% | |
| 20.34% | |
| 13.56% | |
| 13.56% | |
| 13.56% | |
| 8.47% | |
| 6.78% | |
| 3.39% | |
Locations:
- Chrysalith, Zariman; talk to Quinn
Drop tables outdated? Readers can update Module:DropTables/data and cross reference with official drop tables on https://www.warframe.com/droptables.
| Rewards | |
|---|---|
| 13.89% | |
| 13.89% | |
| 11.9% | |
| 11.9% | |
| 11.9% | |
| 11.9% | |
| 8.73% | |
| 7.94% | |
| 7.94% | |
Locations:
- Chrysalith, Zariman; talk to Quinn
Drop tables outdated? Readers can update Module:DropTables/data and cross reference with official drop tables on https://www.warframe.com/droptables.
| Rewards | |
|---|---|
| 12.99% | |
| 12.99% | |
| 12.34% | |
| 11.36% | |
| 11.36% | |
| 11.36% | |
| 11.36% | |
| 9.74% | |
| 6.49% | |
Locations:
- Chrysalith, Zariman; talk to Quinn
Drop tables outdated? Readers can update Module:DropTables/data and cross reference with official drop tables on https://www.warframe.com/droptables.
Objectives and Mission Types

Here are the details for all the possible known Chrysalith bounties. Note that bounty objective is always mandatory and not achieving it means that while there will be progress, there will be no other rewards from the bounty mission. Where an objective varies between tiers, the relevant tiers are specified in the parentheses. E.g. Find and activate 1 (T1-3) / 2 (T4-5) Lohk Surges denotes that Tiers 1, 2, 3 will require activating 1 Lohk Surge to achieve the objective, while Tiers 4 and 5 will require activating 2.
| Zariman Mission Type | Bounty Tier(s) | Bounty Name | Bounty Objective | Bounty Description | Community Notes |
|---|---|---|---|---|---|
| All | Tier 3-5 | WAKE AND BANISH | Awaken a Dormant Void Angel and Defeat it | Dormant Void Angels are too dangerous to be left alone. Wake one and destroy it. | The Dormant Void Angel is a unique (one per bounty mission, even an endless one) interactable stationary object that during this bounty will be marked with a special globally-visible yellow objective in-world icon in the HUD at the beginning of the mission. When you are ready for a combat encounter with it - approach and interact with it (default: X ). This bounty is a good way to farm |
| All | ? | Collect ? (T?) Credits | ? | ||
| All | All | BOOST MELICA'S MORALE | Find A Zarium Accolade And Take It To Melica | We can't let Cephalon Melica become unstable. She wants to teach, so play along. | Extraction is disabled until an Accolade has been handed in to Melica. Melica is only marked on the minmap/HUD with an objective icon when within 100 metres of it, while Accolades are not marked on the HUD with an objective icon (although they are marked on the minimap as resource pickups with Loot Radar mods), making aborting the mission the only option if either Melica or an Accolade cannot be found while exploring the map. |
| All | All | ASSAULT THE GRINEER / REPEL THE CORPUS |
Kill 100 (T1-2) / 150 (T3) / 200 (T4) / 250 (T5) Enemies | Grineer variant: The Worm Queen has limited troop numbers. Show her attacking us was a mistake. Corpus variant: Granum's plunderers have had the run of this ship for long enough. Punish them. |
|
| All | All | STEAL NEW STRENGTH | Find and activate 1 (T1-3) / 2 (T4-5) Lohk Surges | We can't pass up any opportunity to draw helpful power from the Void. | Lohk Surges are interactable stationary objects that during this bounty will be marked with a special globally-visible yellow objective in-world icons in the HUD at the beginning of the mission. To complete the bounty objective - approach and interact with them (default: X ). Bug: sometimes the Surges and their icons will not spawn at the beginning of the mission, making aborting the mission the only option to get out of the mission. |
| All | All | WORK WITHOUT WARFRAMES | Kill 10 (T1-2) / 20 (T3) / 30 (T4) / 40 (T5) Enemies as Operator | We can't become too dependent on your Warframes. Prove you can cope without. | Only the killing blow must be dealt by the Operator, thus tougher enemies can first be weakened with Warframe weapons before switching to the Operator and finishing them off.
|
| All | Tier 4-5 | WEAPONS ONLY EXTERMINATION* *Despite the bounty name, this bounty is also found on mission types other than Exterminate. |
Complete Mission Without Abilities | We can't become reliant on your impressive abilities. Prove you can do without. | Warframe abilities 1 -4 are disabled for the duration of the whole mission as if under Nullifier field, however Operator (Warframe ability 5 ) and their Focus abilities can still be used.
|
| Exterminate | All | EFFICIENT EXTERMINATION | Complete Mission In Under 6 Minutes | A short, sharp shock will make our enemies think again. Get it done fast. | Countdown stops when enemy kill count is reached allowing players to explore the map. Should the enemy kill count not be reached within 6 minutes - this will cause the mission to fail instantly. |
| Mobile Defense | Tier 1-3 | DEFEND CONSOLE SHIELDS | Keep Defense Targets Shields Intact | Energy is currently limited in this sector. We can't afford to let any shields go down. | The mission will fail instantly should any of the 3 consecutive defense console shields be reduced to 0. Using defensive Warframe Abilities such as |
| Void Armageddon | All | ACCUMULATE ARGOZENE | Collect 3 (T1-2) / 5 (T3) / 7 (T4) / 9 (T5) Argozene Canisters | We need to optimize Cavalero's Argozene deployment systems. | |
| Void Armageddon | All | DIVERSIFY OUR ARMAMENTS | Have All Armament Types Active At Once | We need data. Check how each Armament type is performing. | |
| Void Armageddon | All | DEVASTATE THE ANGELS | Kill 2 (T1-3) / 3 (T4-5) Void Angels | Too many Void Angels are waking up. Take some down. | |
| Void Armageddon | Tier 4-5 | PROTECT OUR EXODAMPERS | Destroy Void Angels 2 (T4) / 3 (T5) [sic], Keep Exodampers Intact | Replacing Exodampers costs valuable resources. Keep them intact. | The mission will fail instantly should an Exodamper be destroyed before the required number of Void Angels has been defeated. Note that here "intact" does not mean "without receiving any damage", i.e. the mission will not fail only because an Exodamper receives some damage. Instead the mission will only fail when an Exodamper's hit points reach 0, making this bounty similar to a conventional Mobile Defense. Using defensive Warframe Abilities such as |
| Void Cascade | All | RIDE THE CASCADE | Use 6 (T1-2) / 8 (T3) / 10 (T4) / 12 (T5) Exolizers | This Cascade is unusually intense. We need you to stay on top of it for longer. | |
| Void Cascade | All | MINIMIZE VOID CONTAMINATION | Use 4 (T1-2) / 5 (T3) / 7 (T4) / 9 (T5) Exolizers Keeping Meter Below 50% | The Void Flood Exolizers can't cope with the contamination levels we're seeing. Keep it low. | The mission will fail instantly should the meter rise above 50% before the required number of Exolizers have been used (in other words completed). |
| Void Flood | All | HARVEST VITOPLAST DROPLETS | Collect 75 (T1-2) / 100 (T3) / 200 (T4) / 300 (T5) Vitoplast | Vitoplast needs to be put to use, not left floating around. | |
| Void Flood | All | HARVEST VITOPLAST GLOBULES | Collect 4 (T1-2) / 6 (T3) / 8 (T4) / 10 (T5) Large Vitoplast Globules | Those drifting masses of Vitoplast need gathering up, for efficiency's sake. | Globules are shown with a special cyan circle icon on the Radar. Globules dropped by Skittergirl do not count. |
| Void Flood | Tier 2-5 | REPAIR THE RUPTURES | Seal 6 (T2) / 9 (T3) / 12? (T4) / 15 (T5) Ruptures | The Albrecht Membrane can't take this kind of punishment. Prioritize Rupture sealing. | |
| Void Flood | All | FIGHT VOID FLOOD EFFICIENTLY | Close 3 (T1-2) / 6 (T3) / 9? (T4) / 12 (T5) Ruptures And Keep Meter Below 70% | Too many ruptures lately. We can't afford to be lax on this one. | The mission will fail instantly should the meter rise above 70% before the required number of Ruptures have been closed. |
Tileset Features
Alternating Invaders
After the Zariman Ten Zero appeared from the Void fold, Grineer troops and Corpus units descended on the derelict ship, vying for its resources. Every 150 minutes, or 2½ hours, the invading forces will switch between the Worm Queen's Kuva Grineer and Parvos Granum's Juno Corpus. The current ruling faction can be determined by the ship next to the Zariman in the foreground of the Navigation map, or by opening the overlay map while within the Chrysalith with M .
Unique Enemies
While the primary enemies of the tileset switch periodically between Kuva Grineer and Juno Corpus, there are also some new strange Void entities roaming the ship. Killing their physical forms does not destroy them completely, as they will continue to exist in a spectral form that will then try to heal itself. Similar to Vomvalysts, These cannot be destroyed by Warframes and have to be taken down by using the Operator.
- Thrax Centurion: Void manifestations that vaguely resemble Grineer, they wield
 Hespars while levitating around the environment and attack with a quick flurry of slashes while in their physical form. Similar to Eximus units, it is shielded by Overguard.
 - Thrax Legatus: Void manifestations that vaguely resemble Grineer, they wield deadly Aeolaks and can create spectral copies of itself to attack while the real body vanishes temporarily. Also shielded by Overguard.
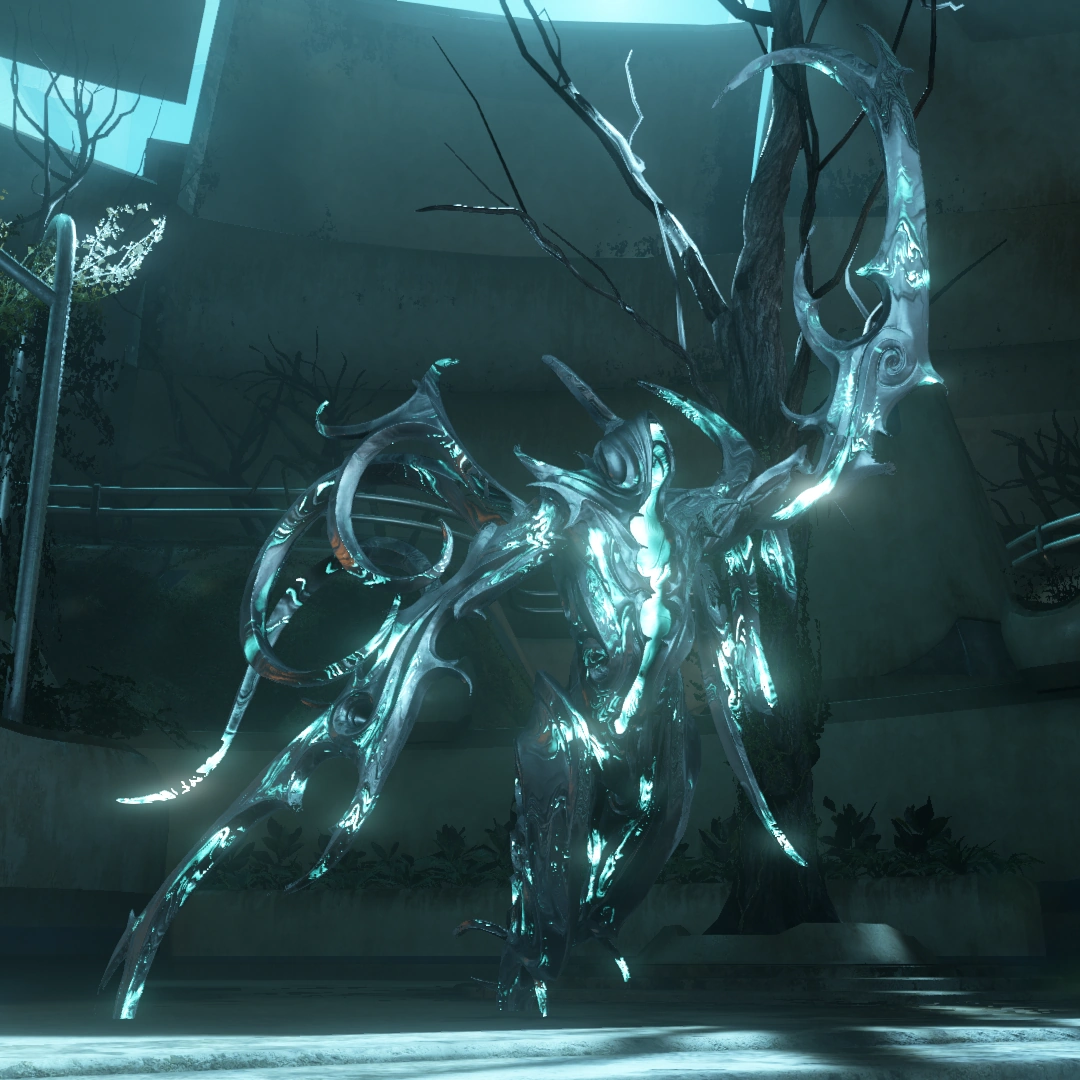
- Void Angel: Once Void Manifestations resembling the crew and colonists aboard the Zariman[1], the Void Angels have been fully corrupted by the Void and are no longer recognizable as human.
Voidplumes
Voidplumes are tokens shed by Void manifestations, and act as Syndicate Medallions for The Holdfasts. Every mission aboard the Zariman will have up to 11 total Voidplumes. 8 of these, like Syndicate missions, will be hidden throughout the map to be picked up. ![]() Voidplume Downs,
Voidplume Downs, ![]() Vanes, and
Vanes, and ![]() Crests are the only types of Voidplumes that can be obtained this way, and are worth
Crests are the only types of Voidplumes that can be obtained this way, and are worth ![]() 500,
500, ![]() 1,000, and
1,000, and ![]() 2,000 Standing, respectively. The remaining 3 are from Melica caches and the dormant Void Angel.
2,000 Standing, respectively. The remaining 3 are from Melica caches and the dormant Void Angel.
Melica Caches

Cephalon Melica's kiosk where a Zarium Accolade can be turned in.
Three versions of the Zarium Accolade.
Cephalon Melica may call out for nearby students from a terminal, asking for a Zarium Accolade. Accolades are large golden key-like objects which are typically located within the tile room of the terminal. They are marked on the map when using Loot Radar mods and emit a distinct shimmering sound, similar to Resource Caches. Accolades must be manually picked up and brought to a terminal in exchange for a ![]() Voidplume Quill, worth
Voidplume Quill, worth ![]() 2,500 Standing. Up to two Melica Caches can be found during a mission, and will also be marked on the mini-map when nearby. Each will only function for a single trade of an Accolade.
2,500 Standing. Up to two Melica Caches can be found during a mission, and will also be marked on the mini-map when nearby. Each will only function for a single trade of an Accolade.
Dormant Angels
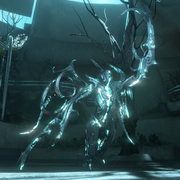
A dormant Void Angel.
- Main article: Void Angel
A dormant Void Angel is a guaranteed spawn and will be found in larger rooms. While they can be mistaken as a part of the environment, they can be identified by their pose: their left arm reaching the sky and their head looking above, and sport visible wings and somewhat lighter colors compared to the other angel-like statues used as decorations. Interacting with a dormant Angel will cause them to awaken and initiate a fight.
Lohk Surge
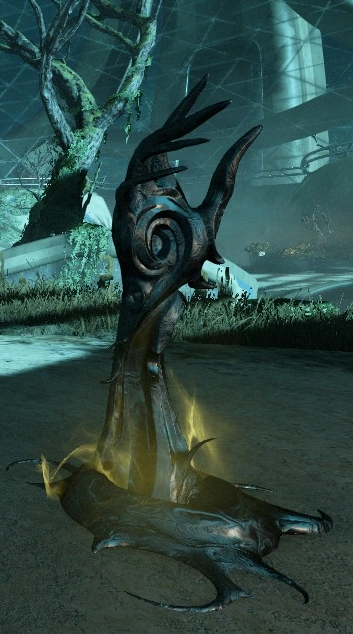

A Lohk Surge
Lohk Surges are Void interactables that provide a range of buffs to Tenno:
- Secondaries have guaranteed red crits.
- Any Health Orbs picked up grant 25 max Health for the rest of the mission.
- Any Energy Orbs picked up grant 1 Energy per second for the rest of the mission.
- 1% life leech and guaranteed Slash procs on all damage.
- No Energy cost on abilities and increase Casting Speed.
- 200% extra Affinity gain.
- Infinite ammo and 50% fire rate.
Interacting with a surge will spawn an Eximus unit. The surges last 45 seconds and have a 10 minute cooldown. Up to three Lohk Surges can spawn in a mission.
Lost Spirits
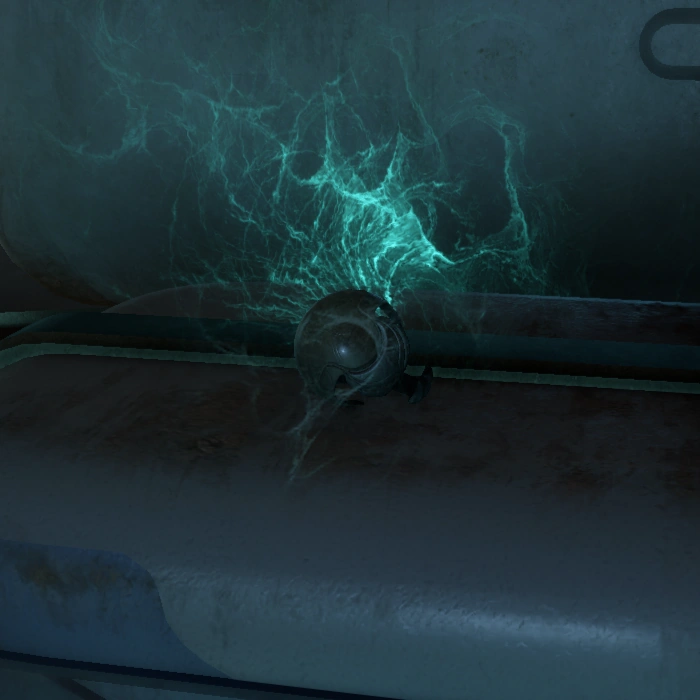
A spirit globe light.
Occasionally there will be a small blue-green, glowing, and whispering Globe Light on a table or bench. Interacting with this will summon a yellow Void manifestation in the image of a ghost-like child who will start running, leading the player to the nearest item of interest such as a Somachord fragment, Voidplumes, Ayatan Sculptures, and Rare Storage Containers called Molted Casks. Spirits will call out and slow down if the follower falls behind, but will still continue to their destination if ignored. Afterwards, the Globe Light will remain lit and can't be activated again.
Spirits have no minimum range when it comes to detecting items, and can traverse the whole map if the distance between the Light and the selected item is great enough. If all items of interest on the map have already been obtained before activating the Globe Light, a spirit will appear, then disappear again without moving.
On the other hand, managing to find the targeted item before the lost spirit reaches it will divert the spirit onto the next item. This means that several items of interest can be collected with only one spirit. Should the players collect all the items while a spirit is seeking them, the spirit will disappear.
Locked Storage Rooms
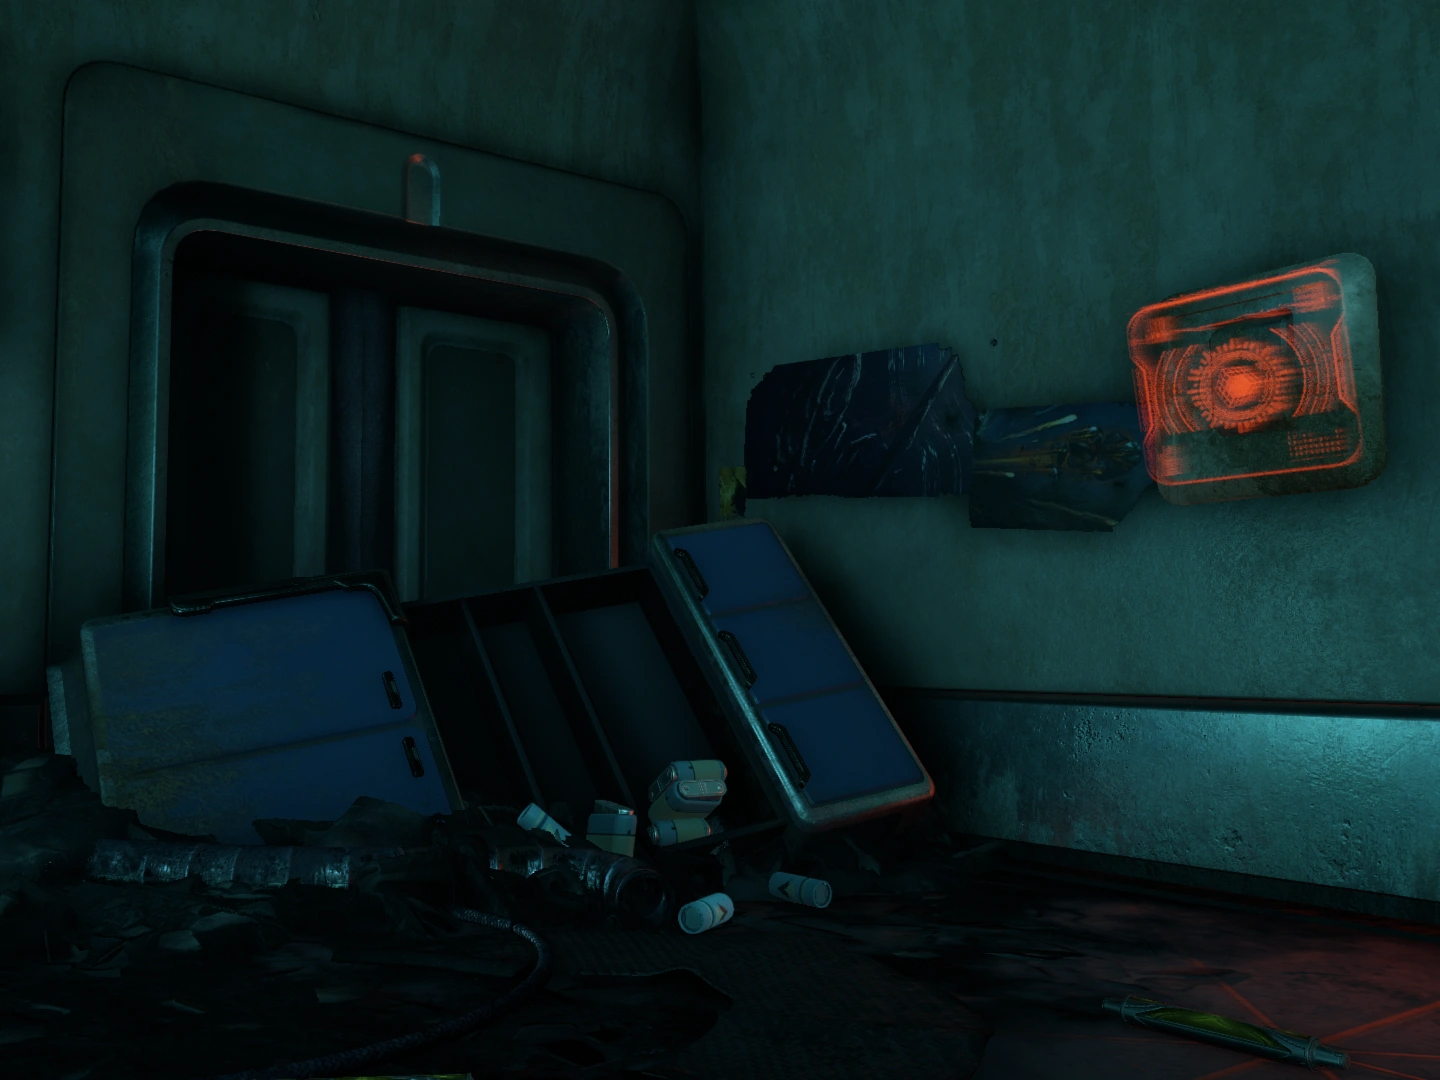

A red door console that can be shot at.
Certain rooms may be locked or partially opened, and can be unlocked by damaging the door console within. Most consoles can be shot at through the partially opened door or by using explosive weapons, but some require alternate paths in order to access them.
Secret Areas
Some rooms contain secret areas that can only be accessed in certain ways. For example, seemingly solid moss can be walked through, or some panels can be destroyed to reveal an alternate path. Destructible panels will be highlighted if viewed with Codex Scanners.
In a Hydroponics room, a set of four consoles (two lit) will be surrounding a central pillar. When all four consoles are lit, the central pillar rises to reveal a lower level in the room. Activating a console will toggle it and both its neighbors. Solutions:
- If the lit consoles are opposite, select both unlit consoles.
- If the lit consoles are adjacent, select both lit consoles.
- If one console is lit, select the opposite console.
- If three consoles are lit, select the unlit console and its neighbors.
- If no consoles are lit, select all four in any order.
- General algorithm: select unlit consoles until only one is lit, preferring the central one if three are in a row.
- Only yields a non-optimal solution in the case where there are exactly two adjacent lit consoles.
Voidplumes, Storage Containers, Somachord fragments, and Log Tablets can usually be found in these secret rooms, along with environmental storytelling showing remnants of survivors that had lived there.
Log Tablets
")
")
Secret rooms and other hidden passages may contain an interactable computer tablet with an orange screen. These will play a holographic message from Executor Tuvul, providing background lore about the Zariman as the situation degraded. These messages are not randomized and are specific to the room they are found in.
Lunaro Arena
In one large room, a dilapidated Lunaro arena along with some Lunaro balls can be interacted with. The balls can be thrown into the one intact Lunaro goal for a short fanfare. The fanfare will also activate if a Warframe, Operator, Drifter, animal Companion, or some projectiles pass through the goal in either direction.
Lore
General
In the Orokin's effort to expand their empire, they attempted an experimental Void-Jump with a colony ship, the Zariman Ten Zero. The ship contained many residences to keep the travelers comfortable on the journey. However, the ship experienced an accident while making "the fold from Saturn to the Outer gates"[2] and vanished into the Void, an incident that would be known as the Void-Jump Accident.
As the ship traveled in the Void, the adults became mind-warped and went feral, although the children were spared from such a fate and instead received mysterious powers from the Void. The adults began to hunt the children on board, forcing them to retaliate and fend for themselves. One child that was cast out by his peers, Rell, realized that there was an unknown entity within the Void. The entity offered a deal to the children aboard to allow for their survival.
Years later, the lost ship re-emerged from the Void and was recovered. The Orokin discovered that only the children had survived the voyage and that the Void had twisted and changed them, giving them inexplicable powers and abilities.[3] Feared and reviled, the survivors of the Zariman nonetheless were of great interest to the Orokin. The Orokin may have covered up the incident publicly, reporting that the Zariman instead was a military ship with no children aboard.
Far into the future, the ship re-emerges once again, drawing the attention of the Tenno, the Grineer, and the Corpus alike. A scant amount of the crew managed to survive and became The Holdfasts, who have dedicated their existence to defending the ship. Other members of the crew that were less fortunate became known as Void Angels.
Recovered Zariman Logs
- Main article: Zariman ARG
Ember Prime's Codex
Principal investigator Kaleen was assigned to inspect the disappearance of the Zariman. She initially concluded that its disappearance was due to mechanical failure and closed the case after notifying the families of the crew who had been aboard, but when the Zariman mysteriously returned days later she reopened it and began to inspect the ship.
During her personal inspections of the ship, she found no trace of the original crew but came across children on board the ship, one of whom burned Kaleen, horribly disfiguring her face in the process, when she attempted to "violate procedure" to comfort the children. The burns left her skin moon white, her mouth a sagging gash without expression, her head scarred and hairless, and she lost her left eye. She was brought before a military tribunal where she explained the story before being escorted away.
Kaleen snapped at her officer, asking why they "put children on a military ship." They responded, "We didn't. That would violate procedure."
Rhino Prime's Codex
Davis was a researcher working in a facility developing metallic creatures, presumably Warframes. At some point during his work, he developed a theory regarding the creatures he and others were working on and the victims of the Zariman. Believing that no one else would ever have believed him, he seemingly released the creature and allowed it to chase him and an unnamed colleague (who narrates the Codex entry) to a cell.
The creature mysteriously went calm after approaching the cell. His experiment seemingly successful, Davis tells his unnamed colleague that "This is where they keep them. The ones from the Zariman", and that because of this success both of them would receive "big, fat promotions."
Margulis
While most of the Orokin feared the survivors of the Zariman, the elite scholar Margulis did not, adopting them as if they were her own children. Initial experiments on how to tame the children's powers though led to several fatal accidents, including Margulis becoming blinded[4], which showed the danger their uncontrolled powers could wreak both on themselves and on others. However, Margulis continued to persevere for the children.
Ultimately, it was through her research that the children learned to control their powers through dreams. She developed Transference, a process that allows the children to transfer their consciousness and powers into the Warframes to act as a surrogate body.[5] The children would be placed into a device known as the Somatic Link to project their Transference, which would be hidden in a facility called the Reservoir on Lua, to control their surrogate bodies in a secure location away from their enemies.
However, the Orokin did not take kindly to Margulis's defense of the children. Her lover Ballas tried to persuade her away, but she refused.[6] Margulis would be executed and vaporized by the Jade Light[7], but her final thoughts were of her children.
While Ballas heavily resented the children for the death of his lover, he nonetheless continued Margulis's work on Transference and developed the Warframes.[8][5]
The New War
During flashbacks, it is revealed that the Zariman Ten Zero housed thousands of families and children that were scheduled to be transported to the Tau System, suggesting that the ship was not in fact a military ship as the Orokin claimed, but a residential one instead. The children aboard attended classrooms where, under their teacher Cephalon Melica, they learned from a curriculum consisting of the Orokin's understanding of the Void, including "Temporal Axioms" and "Phasics" to prepare them for the journey. During the children's Temporal Axioms exam, Zariman Actual interrupted the class to initiate a routine Reliquary field drill. However, something went wrong with the Void-Jump and the ship was lost to the Void "fold."
During the ensuing chaos, some of the surviving children barricaded themselves inside their classroom while the adults went mad and fought each other throughout the ship. The Man in the Wall appeared before one of these trapped children (the player's Operator), confirming that at least one child other than Rell could see them, where the entity then offered a deal to save everyone aboard. It was here that, under the concept of Eternalism, two simultaneous realities unfolded: one where The Man in the Wall's deal was accepted and one where it was not. The children who obtained their legendary Void powers from the entity were able to be rescued, and those who did not obtain the powers were not. At least one of the children continued to live and survive aboard the Zariman, growing older as normal without any Void powers. This survivor became known as the Drifter.
During the events of The New War, after Ballas throws the Operator into the Void, through unexplained means the Drifter was able to emerge from the Zariman and take the Operator's place for a period of time. The Operator eventually finds their way back to the Zariman, where they are able to meet the Drifter inside their old living quarters. There they learn that due to the paradoxical of their existence, only one of them can exist outside the Void at a time, and from then on their existences are linked.
Angels of the Zariman
After the events of The New War, the Zariman suddenly appears from the Void fold once again, accessible from the material world. The appearance of the fabled ship draws the attention of scavenging Kuva Grineer and Corpus, while a strange song emanating from within attracts the attention of the Tenno and the Lotus.
Once aboard, the Tenno finds that the Grineer had arrived first, loses the Lotus' signal, and meets The Holdfasts, the last remaining survivors of the Zariman's crew who were thought to be dead. Led by Quinn, they exist in a form in-between life and death, defending the Zariman from that which would destroy it, including the Void itself. They inform the Tenno that the Zariman is suffering a Void Cascade that threatens all of reality, accelerated by the Void Angels such as Kira, who was a former member of the Holdfasts before succumbing to the Void's call. The Tenno is able to stop the Void Cascade with their powers, but the Angels proceed to break through the Albrecht Membrane and cause a Void Flood. After sealing the Void ruptures causing the Void flood, the invading Grineer along with Kira head to attack the Reliquary Drive powering the Zariman directly. Cavalero of the Holdfasts explains that while the Zariman was a colony ship and not provided weapons, the Reliquary Drive was too important to leave unguarded and so it was equipped with Auto-Fabricating Armaments. Using the Armaments, the Tenno is able to successfully defend the Reliquary Drive from the encroaching Grineer troops and destroy Kira, putting a stop to the song and the threat. Quinn suggests creating a memorial for Kira, which the Tenno visits to honor her.
Archimedean Yonta explains that the Zariman cannot be freed from the Void without catastrophic consequences for the rest of the system, and so it is left from then on as a fortress against both the Void and the enemies of the Tenno.
Notes
- Tenno can access Zariman's Steel Path missions by switching to Steel Path mode in either the Orbiter's Navigation or the Zariman Navigation.
Trivia
- The term Tenno is loosely derived from its designation number Ten-Zero (10-0, "ten-oh").
- Based on the image of the ship in the Vitruvian, it heavily resembles a ship that makes an appearance in the original concept video for Digital Extremes's previous successful video game, Dark Sector.
- During The Duviri Paradox trailer, the ship can be seen at the far distance on the vast alien landscape, presumably inside the Void.
- The ship is lodged partially inside of the Void and the material world at the same time through a Void fold, existing in two planes of existence at once. This might be a basis for a 'paradox'.
- In addition, the version seen in the trailer is colored quite differently from the version seen in the Chains of Harrow comic. In the trailer, the ship uses a traditional Orokin ivory and gold color scheme, while in the comic it features a less ornamental, metallic scheme.
- The Zariman Ten-Zero is arguably the first major Star Chart location that may be considered Tenno-controlled (albeit frequently under attack), with other locations being dominated by the Grineer, Corpus, Infested or even the long deposed Orokin with the Orokin Void.
- Arguably, the Veil Proxima is Sentient territory, but also contested.
- Arguably, the Veil Proxima is
- The Zariman Ten-Zero is unique in a sense that despite its being at a fixed location, the Tenno can access it without needing a Solar Rail Junction, as they already have access to Railjacks by the timeline of The New War. The Kuva Fortress, on the other hand, will always stay close to the Origin System's planets and moons.
- Though the attempt to perform a long Void jump of the Zariman Ten-Zero was a failure, it wasn't the first Void Jump from Sol to Tau. The ancestors of the Sentients were sent to Tau by the Orokin a long time ago to terraform the system.
- However, the Orokin probably didn't know the outcome of the journey and assumed that it was a success, and the proto-Sentients had performed their directives.
Gallery
")
")
")
")
")
Patch History
Hotfix 31.5.10 (2022-05-17)
- Turned up Melica Cache sound FX slightly and increased its radius.
Hotfix 31.5.9 (2022-05-12)
- Added the Steel Path mission toggle to the Zariman Navigation located in the Chrysalith.
- In premade squads, the Steel Path toggle is determined by the Host (even if Clients do not have it toggled on, joining a Host who does will default everyone to Steel Path).
- Known issue: You are only able to publicly matchmake with Steel Path Tenno from the same location. In other words, Steel Path matchmaking from the Chrysalith will only match you with other Tenno who are looking for a Steel Path squad from the Chrysalith (same with Steel Path matchmaking from Orbiter Navigation).
- Fixed Zariman Exterminate mission sometimes spawning all the enemies while players are at the beginning of the level. Players now need to progress through the level as normal.
- More fixes towards a crash when Client returns to the Chrysalith when awakening/spawning a Void Manifestation.
Hotfix 31.5.8 (2022-05-11)
- Added additional spawn points for Voidplumes, Somachord Fragments, Storage Containers, and Zarium Accolades throughout the Zariman tileset.
- Fixed Zariman Steel Path missions not being considered completed on the Star Chart when played from the Chrysalith.
- Fixed extra extraction markers directing you to dead ends in the Zariman tileset.
- Fixed script error when Host migrating shortly after turning in a Zarium Accolade at a Melica Cache.
Hotfix 31.5.7 (2022-05-06)
- Made Zariman matchmaking more robust.
- Fixed players with public matchmaking turned on not matching into the same Bounty with each other.
- Fixed being unable to complete the “Complete mission without Abilities” Bounty in the Zariman Mobile Defense (The Greenway) due to a lack of extraction and other factors. As reported here: https://forums.warframe.com/topic/1309354-angels-of-zariman-mobile-def-mission-no-ability-bounty-not-finishing-after-mission-completion/
- Fixed level aura debuffs caused by destroyed Exodampers in Void Armageddon persisting in regular Zariman missions.
- Fixed crash when aborting or Host migrating in a Zariman mission while wall dashing.
- Fixed crash that could happen if Client went back to the Chrysalith at the same time that the Host is jumping into the Void Manifestation arena.
- Fixed crash that could happen if Client went back to the Chrysalith at the same time that the Host is awakening a Void Manifestation.
Hotfix 31.5.6 (2022-05-04)
- Fixed infinite loading screen when entering the Zariman elevator as Operator during Zariman Bounty.
- This resulted in having to abort the mission in order to escape the confines of the Elevator.
- Fixed Zariman ghosts standing still indefinitely after Host migration.
Hotfix 31.5.5 (2022-05-03)
- Fixes towards enemies not spawning properly if you Host migrate before fully connecting/loading into Zariman missions from the Chrysalith (and all other open landscapes).
- Fixed Zariman missions (including Bounties) at times auto-completing and on consecutive runs.
Hotfix 31.5.4 (2022-05-02)
- Zariman Mission Changes & Fixes:
- Decreased the required amount of Vitoplast Globules needed in the ‘Collect X Large Vitoplast Globules’ Zariman Bounty challenges from 5/10/15/20/100/150/250 to 4/6/8/10/75/100/200.
- Potential fixes towards Thrax units not spawning. As reported here: https://forums.warframe.com/topic/1306746-no-thrax-attackers-spawning-at-end-of-void-flood/
- Fixed Acolytes spawning in Zariman bounties after completing a Steel Path Zariman mission beforehand.
- Fixed crash when starting a Bounty with the ‘Complete Mission Without Abilities’ Zariman Bounty challenge.
- Fixed Thrax unit not matching enemy levels.
- Fixed the Chrysalith node not being marked as Complete at the conclusion of the Angels of the Zariman quest.
- This essentially fixes not being able to select the Zariman's missions on the Steel Path mode from Navigation.
- Fixed Zariman Bounties rewards not appearing in the public drop tables.
- Fixed a single Mobile Defense Zariman Bounty mission counting as multiple for the Nightwave ‘Protector’ Act challenge.
- Fixed the “Zariman 'Bounty Complete” text overlapping with the End of Mission “Mission Complete” UI popups.
- Fixed there being no UI element in multiple in-mission screens not indicating which Zariman mission you are playing.
- Fixed a script error caused by the new waypoint marker for inactive Void Manifestations in Zariman missions.
- Fixed crash when a squad returns to the Chrysalith.
- Fixed script error related to shutting down lighting FX when returning to the Chrysalith.
- Fixes:
- Fixed a certain Globe Light in the Zariman tileset missing a context action description.
Hotfix 31.5.3 (2022-04-29)
- Fixed the Protovyre Ephemera not tracking Focus gained from Zariman missions.
- Follow up fix to getting stuck in the Zariman elevator due to being in a ‘full’ public squad, and the session failing to join the mission.
- Fixed enemies not spawning when starting a Zariman mission from the Chrysalith immediately following a Void Armageddon or Flood mission.
- This also fixes post-Angels of the Zariman missions having spawn issues due to the last stage of the quest being Void Armageddon.
- Fixed some matchmaking issues in the Zariman after Host migration.
Hotfix 31.5.2 (2022-04-28)
- Turning in Zarium Accolades to Melica Caches will now immediately drop the Void Quill instead of after she finishes her voice lines.
- This also fixes the issue of Cephalon Melica’s voice lines getting interrupted when interacting with her.
- Turned up the volume of the Zarium Accolades.
- Fixed getting stuck in the Zariman elevator due being in a ‘full’ public squad, and the session failing to join the mission.
- There is still another case of this issue occurring that we are trying to nail down.
- Fixed matchmaking from Navigation in your Orbiter matching you with Bounty squads started from the Chrysalith.
- Matchmaking to Zariman missions from Navigation in your Orbiter will now only match you with players who are doing the non-Bounty version of the selected mission.
- Fixed a crash occurring when Nova Worm Holing into the Zariman elevator and extracting before the Worm Hole disappears.
- Fixed [PH] tags appearing in Zariman content.
- More fixes towards players getting unwarranted Trade bans after playing missions in the Zariman.
- Fixed script error in Zariman Mobile Defense mission (The Greenway).
Hotfix 31.5.1 (2022-04-27)
- Fixed music queues overlapping in the Zariman missions.
- Fixed lost spirits sometimes getting stuck and losing their way around the Zariman.
- Fixed Melica Cache missing shutdown sound.
- Fixed being able to get stuck in a school-room area in the Zariman tileset.
- Fixed minor map holes in certain parts of the Zariman.
- Fixed script error that would occur after Host migration in The Greenway Mobile Defense node.
Update 31.5 (2022-04-27)
- Formally introduced.
References
- ↑ "That form is what awaits us, should we fail to hold fast. The others were all like us, once. But in time they all drank from that bleak Reliquary, and now they scream in chorus to the Void." -Quinn during Angels of the Zariman
- ↑ Ember Prime's Codex entry
- ↑ Events of Rell (Webcomic)
- ↑ "We couldn't help it, the outbursts. We hurt her, blinded her, but even then, she never abandoned us. In the dream we found peace, and she sang to us in that cold, dark..." - Operator during The Second Dream
- ↑ 5.0 5.1 "My childhood dream has become a nightmare. I don't blame Margulis, she's as much a victim as the children we're working with. At first, the project seemed therapeutic and nurturing. I was myself. But now... Transference therapy is being turned into a weapon. Now I build these vile weapons called "Warframes" all for one purpose: death. I've become everything I hate." - Silvana during The Silver Grove
- ↑ Ballas: "I told you not to speak out. If you recant, maybe-"
Margulis: "-You lied to me, Ballas. You're no different than the rest of them."
- Dialogue during Apostasy Prologue - ↑ "Honored seven, we have gathered here today to carry out the sentencing of Archimedean Margulis... You face the Jade light, recant, and we will grant a merciful death." - Ballas during Apostasy Prologue
- ↑ "The Orokin murdered Margulis - used her work to create 'Transference'. Your mind - projected into a surrogate, strong enough to withstand your power. It felt like waking up, but it was just a lucid - second dream" - Lotus during The Second Dream
See Also
- Zariman ARG for the alternative reality game that revolved around the Zariman's past.
| Star Chart | |
|---|---|
| Mercury • Venus (Proxima) • Earth (Proxima) • Lua • Mars • Deimos • Phobos • Ceres • Jupiter • Europa • Saturn (Proxima) • Uranus • Neptune (Proxima) • Pluto (Proxima) • Sedna • Kuva Fortress • Eris • Void (Veil Proxima) • Zariman | |