
Wizards, minmaxing since the beginning.
While working on my trinity guide, it occurred to me that there are many aspects of warframe optimization that are fairly universal. Having a comprehensive explanation of why I pick certain mods where, specifically auras and defense mods, could save large amounts of time, as well as possibly clarify some things to some players that they might not have known or maybe overlooked. It is important to note that when I perform damage calculations, I will, unless i mention a specific damage type, be using a theoretical "untyped" damage that does not factor in the interactions defense types have with damage types.
Picking the Right Auras[]
Aura mods are unique in that they have their own specific mod slot, and thus all builds you will ever run will likely incorporate an aura when optimized. So the question is, "Which one?"
The D Slot[]
Auras that occupy the vazarin, more commonly called the D or defensive slot, tend to revolve around just that: increasing your squad's survivability. The options for this slot are physique, which increases the hp of each warframe in the squad by an additive 18%, rejuvenation, which regenerates 3 hp per second, and infested impedance, which decreases the movement and attack speed of all infested by 18%. At three mods, you don't have many options, so optimizing is somewhat more straightforward.
To start, lets compare rejuvination to physique. Now, health in warframe can be considered as having the inherent purpose of wanting to be maintained so that you continue to contribute to the team, and tends to be depleted either near instantly or more slowly over time as damage breaches your shielding and "sticks" since health does not typically recover like shielding. So the question becomes, "Which mod allows you to take more damage before going down?" Physique is relatively straightforward with an 18% additive health bonus, which will give, in most cases, 18 additional hp. Yes, it only gives 18 hp. To understand why this happens, lets take a look at how warframe calculates a frame's hp. With Frost Prime, which relevant testing was done on, you have a base frame health pool of 100, and gain and additional 200 hp by the time you reach 30 for a total of 300. The mod vitality only acts based on the base health pool, and will add an additional 440 hp to the frame. Physique acts the same way as vitality in only modifying the base health pool, but at +18%, will only give you 18 hp. In total, a Frost Prime at 30 with physique and vitality will have 758 hp, versus 740 hp at 30 with just vitality. Lets compare this to rejuvination, which restores hp at a rate of 3 per second, taking it 6 seconds to mitigate the effect of 18 points of damage. This means that physique is only better if you expect 18 points of damage to be the deciding factor in your survivavibility over a span of less than 6 seconds. But wait. As the fight goes on, rejuvination mitigates damage retroactively, meaning that if you have taken more than 18 damage to your health, and that damage is recovered by rejuvination, then it has already given you a larger effective health pool than physique. Long story short, rejuvination is always better than physique except in incredibly fringe use cases.
This means that the question is whether to take infested impedance or rejuvination. Well, infested impedance only works against infested, so already, rejuvination is a go-to against corpus, grineer, and corrupted without question. This leaves the infested, a faction which has a mechanic that makes rejuvination significantly more useful: toxin damage. Due to the nature of toxin damage bypassing shields, there is no way to mitigate it, which means that it will slowly down members of a squad without alternative sources of healing available. Assuming you have a trinity or oberon with you, or that you slapped life strike into your trusty blades, infested impedance starts to look like a viable pick. This is where you have to ask why you need to kill the infested. If it is survival then the speed at which you kill enemies is critical to squad survival, so infested impedance will potentially limit the time you can stay in the mission. In defense, where waves transition after a specific number of enemies die, it will add large portions of time to each wave as the enemies spawn and then slowly approach you. In other game modes, it can be seen as a viable pick.
The V Slot[]
The madurai, more commonly called V or offense slot, has a limited selection as well, with steel charge giving +60% melee damage, rifle amp giving +27% rifle damage, and dead eye giving +35% sniper damage. It is also important to note that steel charge is a 9 point mod, rifle amp 7, and dead eye 5. This makes steel charge give you more bonus points to work with than any other mod in the game. In addition these values are additive with other + damage mods such as serration and pressure point, making melee weapons benefit far more from steel charge than rifles will from rifle amp. So the question is, do you need points to work with or do you need to kill things? If you need points, then steel charge is the best of the 3 for your build. Rifle amp surpasses steel charge if you don't need the extra 4 points steel charge offers, and plan to use a rifle more than your melee, as well as not needing larger healing effects off of life strike. Dead eye comes in last as only being optimal if you have a squad of snipers and bowman and no need of 8 of those coveted points. All in all, I typically just run steel charge until I can forma the aura slot to a dash slot.
The -- Slot[]
Last we have the naramon, more commonly called the dash or utility slot, which features more aura mods to choose from than the other two categories combined. These fall under the scavenger aura series (pistol scavenger for example), energy siphon, corrosive projection, shield disruption, loot detector, sprint boost, speed holster, and enemy radar.
| Bombard Level (Armor) | Mitigation with No Corrosive (+ DPS) | Mitigation with 1 Corrosive (+ DPS) | Mitigation with 2 Corrosive (+ DPS) | Mitigation with 3 Corrosive (+ DPS) | Mitigation with 4 Corrosive (+ DPS) |
| 4 (500) | 62.5% (+0%) | 53.8% (+23.2%) | 40% (+60%) | 14.2% (+128.8%) | 0% (+167%) |
|
20 (820) |
73.2% (+0%) |
65.7% (+28%) |
52.2% (+78.4%) |
21.5% (+193%) |
0% (+273%) |
|
40 (1823) |
85.9% (+0%) |
81% (+34.8%) |
71% (+106%) |
37.8% (+341%) |
0% (+709%) |

Created by MarioVX and used on Enemy Level Scaling Page; Click To Expand
Corrosive Projection[]
This time I will begin with corrosive projection and then use that as the baseline for future comparisons. Now the purpose of corrosive projection is to prevent the damage resistance enemies receive based on armor, which is calculated with the formula "1-((300/(300+armor))." To demonstrate what this equates to at high levels, I have chosen to use a corrupted bombard, the enemy that is porbably responsible for your high tier tower wipes. A corrupted bombard has the lowest values at level 4 with 500 armor giving him a total of 62.5% damage reduction. At level 4. One corrosive projection will reduce this to 53.8% damage mitigation, two auras to 40%, three auras to 14.2%, and four all the way to 0% damage mitigation. This means that the first corrosive gives 23.2% bonus dps, followed by 60% dps with 2, 128.8% dps with 3, and 167% dps with 4. So at relatively small amounts of armor, 3 corrosive projections is an optimal number. But since this guide is about min maxing, the assumption is that you plan to tackle enemies higher than level 4.
So lets look at something relatively easy to manage still, a level 20 bombard. At this level they will have 820 armor giving 73.2% damage mitigation. That's 10.7% more than level 4, which means that they take 28.5% less damage than their squishier cousin. With one corrosive this goes down to 65.7% damage mitigation, two reduces it to 52.2% mitigation, three down to 21.5% mitigation, and four once again to 0%. This means you get 28% more dps with one, 78.4% dps with two, 193% dps with three, and 273% dps with four. But what about when you have been in that T4 mission a while and the enemies have had a chance to scale? At level 40 the bombard has grown to have 1823 armor. This confers 85.9% damage mitigation which means that it takes 62.4% less damage than the lvl 4 bombard. with 81% mitigation when equipped with one corrosive, 71% when equipped with two, 37.8% when equipped with three, and 0% at four. This equates to a 34.8% increase of dps with one, 106% with two, 341% with three, and 709% with four. Thus it can be seen that corrosive projection becomes exponentially more useful as enemies reach higher and higher levels. it is important to note however, that full removal of an enemies armor will lead to them having potentially unexpected interactions with damage types due to having a different hit point type stat than normal.
Ammo Scavenger[]
So now that corrosive projection has been shown to give substantially more damage the harder things get, lets talk about the scavenger mods. These work by making ammo drops more common in order to prevent you from ceasing to be able to deal damage with whatever weapons associated with that damage type. Thus it can be said that they indirectly increase the ammo efficiency of a weapon by making said ammo more abundant. with four scavenges you will pick up 600% more ammo of the relevant type, meaning that every 7 rounds fired will act as a single round for the purpose of being replenished by pickups. Now as has been shown with the previous section, at high end play four corrosives means that every 1 round you fire deals the damage of 8 rounds, meaning targets die significantly faster. Assuming this level of armor, no damage wasted overkilling, and no missed shots, Corrosive projection will increase the ammo efficiency of all weapons by the relevant numbers. Now in a real mission players will waste ammo by missing or firing more at an enemy than is needed to kill them, but the fact that corrosive even comes close to and eventually surpasses scavenger auras speaks volumes.
Speed Holster[]
Next is speed holster, which as far as I know has only been consistently used to decrease the time it takes for Mesa to change stances during her four skill, peacemaker. Four speed holsters means that you take 23.8% of the time that it would have originally taken to acquire a new target, with it being worth mentioning that the overwhelming majority of Mesa's time is spent firing in a given pose. Thus it will take you at least twice as long, more likely up to and surpassing eight times as long to kill a target, but in return you will be able to find a new target four times as fast. This is just bad, nobody on your squad benefits from it. The only time this is viable is when Mesa with peacemaker active is the primary source of damage, and she is capable of killing the vast majority of the enemies in one shot for the entirety of the mission. In that situation it has some benefit, but the moment enemies start to take more than 2 shots to kill, the minimal dps gains start to rapidly fall off. Outside of usage with mesa, it is of questionable benefit at all when compared to other options.
Shield Disruption[]
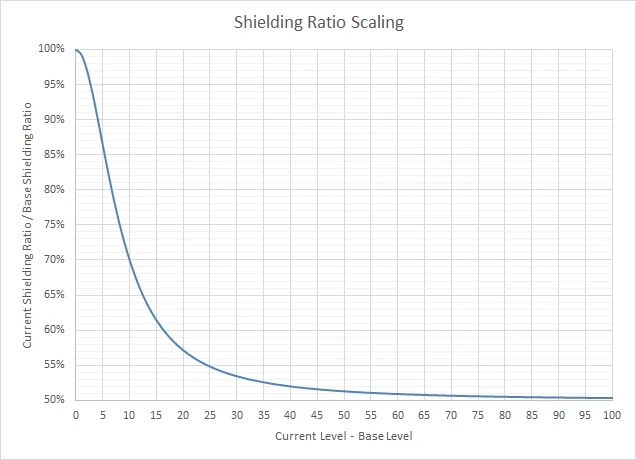
Graph posted by MarioVX on the Enemy Level Scaling Page; This is the scaling of the ratio of shield to health, not the ratio itself which will be lower.
Now shield disruption might look like corrosive projection at first glance, both are occupied with reducing a defensive stat heavily associated with a specific faction, but whereas corrosive prevents damage mitigation, shield disruption effectively decreases their max hp. Initial level 1 values for corpus tend to have the hit point (Hp) pool split as about 75% shielding and 25% health. This can be seen with crewman starting with 150 shield and 50 health, or MOAs starting with 150 shield and 60 health. More advanced enemy types such as the elite crewman and tech have progressively smaller portions of their hp pool consist of shield. In addition, shielding is calculted with the formula "Base Shield x (1 + (Current Level - Base Level)^2 x 0.0075)" whereas health is calculated with the formula "Base Health x (1 + (Current Level - Base Level)^2 x 0.015)." This means that health will scale faster than shielding converging towards shielding making up half as much of the Hp pool as it initially did. Thus shield disruption can be seen to decrease in effectiveness the higher the level of the enemy you are facing.
The DPS increase from shield disruption for the sake of comparing to scavenger mods and corrosive projection can be seen as the decreased amount of damage needed to kill the enemy. For a level 1 crewman complete shield removal would be a 300% increase in damage, due to him having only 1/4 his hit points available to him. At level 26 this would have dropped down to a 60% increase in damage if shields were completely removed, with the dps gained continuing to decrease. It is important to note that the Corpus crewman has some of the best shield to health ratios in the game in terms of maximizing the effect of shield disruption, and that almost all other enemies will be even more resistant to the auras effects. This, combined with the fact that it ruins the scaling of the damage on the mag frame which can be frequently found on corpus missions, leads me to my conclusion that shield disruption is in fact an inferior aura that should only be run in in an optimized squad if there is a trinity present who can reliably supply the entire squad with energy and health, and there is no mag. If these criteria are not met, energy siphon, rejuvination, and even ammo scavenge or rifle amp might be the optimal mods depending on squad composition.
Energy Siphon[]
Possibly the most used mod in warframe, energy siphon is unique as the most consistent form of energy recovery. Trinity's energy vampire, the mod rage, and consumables like team energy restores all grant energy back to the warframe using them, but none operate nearly as predictably or as cheaply as the 0.6 energy per second from energy siphon. As a form of passive energy regeneration, it allows a frame to more consistently plan for ability usage, such as a loki modded to recover enough energy during an invisibility to be able to perpetually recast without ever running out of energy. In addition, it allows for recovery from unexpected events such as an ancient disrupter draining your energy or having quick thinking completely drain your Trinity's energy as they got downed. But mainly, it lets you cast your warframe skills a lot more.
(Dash section is still being added to)
In Conclusion[]
If you have a D slot, use rejuvenation. If you have a V slot, use steel charge if you need points, rifle amp if you do not. If you have a dash slot or non-polarized slot and a trinity, use four corrosive projections vs grineer and orokin, shield disruption vs corpus if you don't have a mag, energy siphon if you do have a mag, a combination of energy siphons and rejuvenates vs infested, and an energy siphon if solo or joining random squads in mission. For trials and Tower IV endless keys (Defense, Survival, Intercept), four corrosive projections are optimal.
Redirection, Vitality, and Other Defensive Modding.[]
(To be expanded)chan