Survival is a mission type where players will have to fight an endless, steady stream of enemies to survive for as long as possible while slowly losing life support, distracting enemies as a Tenno operative secretly gathers supplies behind the scenes.
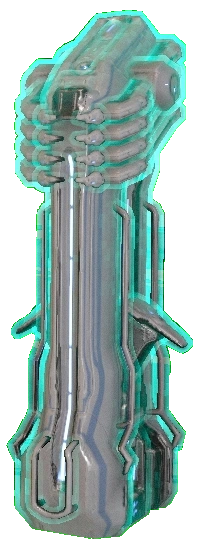
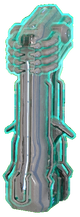
Life Support Tower

Life Support Tower UI Icon
Mechanics
At the start of the mission, there is a single terminal. Hacking this terminal will begin the objective, alerting an endless wave of enemies as life support begins to decay.
Each kill will have a chance to drop personal life support modules that restores 5% of the life support system.
After every 90 seconds, the Lotus will drop off life support capsules that restore 30% on activation. The amount of life support capsules that can be on the map is capped at 8; another capsule will not be given until one has been opened and the drop delay passed.
After 5 minutes, a random reward is given to the squad and the extraction point will be enabled and marked on the minimap. The squad can then choose between heading to extraction to complete the mission, or staying on for a longer period of time to receive rewards every 5 minutes.
Players may choose to extract individually at any time beyond the initial 5 minutes. Any player entering the extraction zone will trigger a countdown timer, at the end of which all players in the extraction zone will be extracted while remaining players continue playing and can extract later any time they choose.
When the life support system reaches 0%, if extraction is not available yet, the mission ends in failure. Otherwise, all squad members' health will start draining for 5 minutes, in a manner similar to a hull breach but at a much faster rate. The health drain will stop at 5 HP – making any damage lethal – and teammates who are killed can be revived normally. No more life support capsules will be dropped, rewards will no longer be given, enemies will stop dropping the life support modules, and all remaining life support modules on the map will become unusable. After this point, the mission can still be completed if at least one player reaches Extraction before the 5 minutes are up. After the timer is up, the mission will fail.[1] In addition, the mission will fail if all players die.

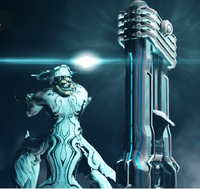
Survival diorama from Update 9
When Survival missions become Nightmare Modes, players will receive both the Nightmare reward and the normal Survival mode reward when completing the mission. Note that even though Nightmare mode enemies are usually higher level, the Survival mode rewards will be based on the mission's original enemy levels. On the other hand, if there is an Alert Survival mission, players will only receive the specified Alert reward (extraction available at 10 minutes).
Treasure rooms in the Void and Orokin Derelict are inaccessible. However, Derelict Vaults still exist, and accessing them will spawn Corrupted enemies.
Kuva Fortress
On the Survival mission "Taveuni" in the Kuva Fortress, the Lotus notifies players that the Grineer are harvesting Kuva which can be intercepted if players so choose. When a life support capsule is deployed, an Eximus unit will spawn, killing this unit will drop a Kuva Catalyst, which resembles a red-colored power cell from Excavation missions. Bringing this Catalyst near any life support capsule will turn it into a Kuva Harvester, and a 1 minute timer will count down. This tower, which has 4,000 health, can be targeted and must be defended while also keeping life support above 1% until the timer is over, after which all players will receive 200 Kuva.
- Kuva Towers will only reward 10% to the Life Support when complete, instead of the usual 30%. This means players must be either tactical and only turn some capsules into harvesters, or have Warframes that can quickly kill or farm enemies for life support drops.
- The Eximus unit carrying the Kuva Catalyst can have its corpse looted again with
 Hydroid's Pilfering Swarm or Khora's Pilfering Strangledome (if caught in the first place before dying) or Nekros' Desecrate, allowing another Catalyst to drop for converting another tower when it spawns.
 - The 200 Kuva per tower is affected by the Resource Booster, which doubles this amount to 400.
- If the Life Support on the level depletes to 0% before the Kuva harvesting is complete, the tower will vanish along with the Kuva players would have received.
Locations
Script error: The function "getMissionsOfTypeX" does not exist.
Enemies
This is a list of possible enemies and their respective "wave" they will start to appear. Note that this is based on the lowest level of each faction, at higher level survival missions enemies may come out sooner but usually in the same order.
Grineer Survival
- Lancer, Elite Lancer, Butcher - 0+ minutes
- Shield Lancer - 3.5+ minutes
- Trooper - 6.5+ minutes
- Bombard - 8.5+ minutes
- Heavy Gunner - 15+ minutes
Corpus Survival
- Crewman, Detron Crewman, Prod Crewman, MOA, Shield Osprey - 0+ minutes
- Shockwave MOA - 5+ minutes
- Oxium Osprey - 9+ minutes
- Railgun MOA - 10+ minutes
- Anti MOA - 15+ minutes
- Fusion MOA - 19+ minutes
Void/Corrupted Survival
- Corrupted Butcher, Corrupted Crewman - 0+ minutes
- Corrupted Lancer, Corrupted Heavy Gunner, Corrupted Ancient - 4+ minutes
- Corrupted Nullifier - 9+ minutes
- Corrupted MOA - 9+ minutes
- Corrupted Bombard - 14+ minutes
Eximus Spawn
As players advance through the survival, the amount of Eximus spawns will steadily increase from 0% at 5 minutes, to 20% at 60 minutes.
Rewards
Besides the bonus amounts of materials, experience, and mods from the increase in enemies compared to normal missions, certain rewards can be awarded at the end of the mission if the mission is a success. Mission rewards will vary depending on the level of the mission's enemies (the starting level; this tier does not scale during a mission as higher level enemies spawn) and also depends on the amount of time spent.
- Enemy level tier (on average):
- Tier 1: Level 1 - 10
- Tier 2: Level 10 - 20
- Tier 3: Level ≥ 20
- Note: While most missions obey these enemy level tiers, there are a few exceptions, such as Hymeno and Cambria. Refer to the table above for a more accurate list of mission enemy level tiers.
- Time spent Drop Rotation (rewards cycle every 20 minutes):
- Rotation A: 5, 10 minutes; 25, 30 minutes; etc.
- Rotation B: 15 minutes; 35 minutes; etc.
- Rotation C: 20 minutes; 40 minutes; etc.
- Rewards stack the longer you play.
| A | B | C | |||
|---|---|---|---|---|---|
| 50% | 7.69% | 11.06% | |||
| 50% | 7.69% | 11.06% | |||
| 7.69% | 11.06% | ||||
| 7.69% | 11.06% | ||||
| 7.69% | 11.06% | ||||
| 7.69% | 11.06% | ||||
| 7.69% | 11.06% | ||||
| 7.69% | 3.76% | ||||
| 7.69% | 3.76% | ||||
| 7.69% | 3.76% | ||||
| 7.69% | 3.76% | ||||
| 7.69% | 3.76% | ||||
| 7.69% | 3.76% | ||||
Drop tables outdated? Readers can update Module:DropTables/data and cross reference with official drop tables on https://www.warframe.com/droptables.
| A | B | C | |||
|---|---|---|---|---|---|
| 50% | 7.14% | 11.06% | |||
| 50% | 7.14% | 11.06% | |||
| 7.14% | 11.06% | ||||
| 7.14% | 11.06% | ||||
| 7.14% | 11.06% | ||||
| 7.14% | 11.06% | ||||
| 7.14% | 11.06% | ||||
| 7.14% | 3.76% | ||||
| 7.14% | 3.76% | ||||
| 7.14% | 3.76% | ||||
| 7.14% | 3.76% | ||||
| 7.14% | 3.76% | ||||
| 7.14% | 3.76% | ||||
| 7.14% | |||||
Drop tables outdated? Readers can update Module:DropTables/data and cross reference with official drop tables on https://www.warframe.com/droptables.
| A | B | C | |||
|---|---|---|---|---|---|
| 75% | 6.67% | 11.06% | |||
| 25% | 6.67% | 11.06% | |||
| 6.67% | 11.06% | ||||
| 6.67% | 11.06% | ||||
| 6.67% | 11.06% | ||||
| 6.67% | 11.06% | ||||
| 6.67% | 11.06% | ||||
| 6.67% | 3.76% | ||||
| 6.67% | 3.76% | ||||
| 6.67% | 3.76% | ||||
| 6.67% | 3.76% | ||||
| 6.67% | 3.76% | ||||
| 6.67% | 3.76% | ||||
| 6.67% | |||||
| 6.67% | |||||
Drop tables outdated? Readers can update Module:DropTables/data and cross reference with official drop tables on https://www.warframe.com/droptables.
| A | B | C | |||
|---|---|---|---|---|---|
| 25% | 6.67% | 12% | |||
| 25% | 6.67% | 12% | |||
| 25% | 6.67% | 8% | |||
| 25% | 6.67% | 8% | |||
| 6.67% | 8% | ||||
| 6.67% | 8% | ||||
| 6.67% | 8% | ||||
| 6.67% | 8% | ||||
| 6.67% | 8% | ||||
| 6.67% | 4% | ||||
| 6.67% | 4% | ||||
| 6.67% | 4% | ||||
| 6.67% | 4% | ||||
| 6.67% | 4% | ||||
| 6.67% | |||||
Locations:
Drop tables outdated? Readers can update Module:DropTables/data and cross reference with official drop tables on https://www.warframe.com/droptables.
| A | B | C | |||
|---|---|---|---|---|---|
| 11.06% | 11.06% | 7.79% | |||
| 11.06% | 11.06% | 7.79% | |||
| 11.06% | 11.06% | 6.49% | |||
| 11.06% | 11.06% | 6.49% | |||
| 11.06% | 11.06% | 6.49% | |||
| 11.06% | 11.06% | 6.49% | |||
| 11.06% | 11.06% | 6.49% | |||
| 6.15% | 6.15% | 6.49% | |||
| 4.1% | 4.1% | 6.49% | |||
| 2.05% | 2.05% | 6.49% | |||
| 2.05% | 2.05% | 6.49% | |||
| 2.05% | 2.05% | 6.49% | |||
| 2.05% | 2.05% | 6.49% | |||
| 2.05% | 2.05% | 6.49% | |||
| 2.05% | 2.05% | 6.49% | |||
Drop tables outdated? Readers can update Module:DropTables/data and cross reference with official drop tables on https://www.warframe.com/droptables.
| A | B | C | |||
|---|---|---|---|---|---|
| 18.18% | 12.5% | 22.11% | |||
| 18.18% | 12.5% | 11.13% | |||
| 18.18% | 12.5% | 11.13% | |||
| 9.09% | 12.5% | 11.13% | |||
| 9.09% | 12.5% | 11.13% | |||
| 9.09% | 12.5% | 11.13% | |||
| 9.09% | 12.5% | 11.13% | |||
| 9.09% | 12.5% | 11.13% | |||
Drop tables outdated? Readers can update Module:DropTables/data and cross reference with official drop tables on https://www.warframe.com/droptables.
| A | B | C | |||
|---|---|---|---|---|---|
| 22.22% | 12.5% | 22.56% | |||
| 11.11% | 12.5% | 11.06% | |||
| 11.11% | 12.5% | 11.06% | |||
| 11.11% | 12.5% | 11.06% | |||
| 11.11% | 12.5% | 11.06% | |||
| 11.11% | 12.5% | 11.06% | |||
| 11.11% | 12.5% | 11.06% | |||
| 11.11% | 12.5% | 11.06% | |||
Drop tables outdated? Readers can update Module:DropTables/data and cross reference with official drop tables on https://www.warframe.com/droptables.
| A | B | C | |||
|---|---|---|---|---|---|
| 40% | 25% | 20% | |||
| 20% | 17.5% | 15% | |||
| 10% | 7.5% | 15% | |||
| 6.67% | 7.5% | 10% | |||
| 3.33% | 7.5% | 10% | |||
| 3.33% | 7.5% | 10% | |||
| 3.33% | 7.5% | 10% | |||
| 3.33% | 7.5% | 10% | |||
| 3.33% | 7.5% | ||||
| 3.33% | 5% | ||||
| 3.33% | |||||
Drop tables outdated? Readers can update Module:DropTables/data and cross reference with official drop tables on https://www.warframe.com/droptables.
| A | B | C | |||
|---|---|---|---|---|---|
| 14.29% | 7.69% | 11.28% | |||
| 14.29% | 7.69% | 11.28% | |||
| 14.29% | 7.69% | 11.06% | |||
| 14.29% | 7.69% | 11.06% | |||
| 14.29% | 7.69% | 11.06% | |||
| 14.29% | 7.69% | 11.06% | |||
| 14.29% | 7.69% | 11.06% | |||
| 7.69% | 11.06% | ||||
| 7.69% | 11.06% | ||||
| 7.69% | |||||
| 7.69% | |||||
| 7.69% | |||||
| 7.69% | |||||
Drop tables outdated? Readers can update Module:DropTables/data and cross reference with official drop tables on https://www.warframe.com/droptables.
| A | B | C | |||
|---|---|---|---|---|---|
| 16.67% | 7.14% | 11.28% | |||
| 16.67% | 7.14% | 11.28% | |||
| 16.67% | 7.14% | 11.06% | |||
| 16.67% | 7.14% | 11.06% | |||
| 16.67% | 7.14% | 11.06% | |||
| 16.67% | 7.14% | 11.06% | |||
| 7.14% | 11.06% | ||||
| 7.14% | 11.06% | ||||
| 7.14% | 11.06% | ||||
| 7.14% | |||||
| 7.14% | |||||
| 7.14% | |||||
| 7.14% | |||||
| 7.14% | |||||
Drop tables outdated? Readers can update Module:DropTables/data and cross reference with official drop tables on https://www.warframe.com/droptables.
| A | B | C | |||
|---|---|---|---|---|---|
| 25% | 6.67% | 11.28% | |||
| 25% | 6.67% | 11.28% | |||
| 25% | 6.67% | 11.06% | |||
| 25% | 6.67% | 11.06% | |||
| 6.67% | 11.06% | ||||
| 6.67% | 11.06% | ||||
| 6.67% | 11.06% | ||||
| 6.67% | 11.06% | ||||
| 6.67% | 11.06% | ||||
| 6.67% | |||||
| 6.67% | |||||
| 6.67% | |||||
| 6.67% | |||||
| 6.67% | |||||
| 6.67% | |||||
Drop tables outdated? Readers can update Module:DropTables/data and cross reference with official drop tables on https://www.warframe.com/droptables.
| A | B | C | |||
|---|---|---|---|---|---|
| 25% | 14.29% | 12.5% | |||
| 25% | 14.29% | 12.5% | |||
| 25% | 14.29% | 12.5% | |||
| 25% | 14.29% | 12.5% | |||
| 14.29% | 12.5% | ||||
| 14.29% | 12.5% | ||||
| 14.29% | 12.5% | ||||
| 12.5% | |||||
Drop tables outdated? Readers can update Module:DropTables/data and cross reference with official drop tables on https://www.warframe.com/droptables.
| A | B | C | |||
|---|---|---|---|---|---|
| 26.67% | 35.29% | 37.5% | |||
| 20% | 17.65% | 12.5% | |||
| 20% | 17.65% | 12.5% | |||
| 13.33% | 17.65% | 12.5% | |||
| 6.67% | 5.88% | 12.5% | |||
| 6.67% | 5.88% | 6.25% | |||
| 6.67% | 6.25% | ||||
Locations:
Drop tables outdated? Readers can update Module:DropTables/data and cross reference with official drop tables on https://www.warframe.com/droptables.
| A | B | C | |||
|---|---|---|---|---|---|
| 26.67% | 34.29% | 39.58% | |||
| 20% | 17.14% | 12.5% | |||
| 20% | 17.14% | 12.5% | |||
| 13.33% | 17.14% | 12.5% | |||
| 6.67% | 5.71% | 8.33% | |||
| 6.67% | 5.71% | 6.25% | |||
| 6.67% | 2.86% | 6.25% | |||
| 2.08% | |||||
Locations:
Drop tables outdated? Readers can update Module:DropTables/data and cross reference with official drop tables on https://www.warframe.com/droptables.
| A | B | C | |||
|---|---|---|---|---|---|
| 26.67% | 30.3% | 39.58% | |||
| 20% | 18.18% | 12.5% | |||
| 20% | 18.18% | 12.5% | |||
| 13.33% | 18.18% | 12.5% | |||
| 6.67% | 6.06% | 8.33% | |||
| 6.67% | 6.06% | 6.25% | |||
| 6.67% | 3.03% | 6.25% | |||
| 2.08% | |||||
Locations:
Drop tables outdated? Readers can update Module:DropTables/data and cross reference with official drop tables on https://www.warframe.com/droptables.
| A | B | C | |||
|---|---|---|---|---|---|
| 42.86% | 34.29% | 31.25% | |||
| 21.43% | 17.14% | 16.67% | |||
| 21.43% | 17.14% | 12.5% | |||
| 5.71% | 17.14% | 12.5% | |||
| 4.29% | 5.71% | 12.5% | |||
| 4.29% | 5.71% | 6.25% | |||
| 2.86% | 6.25% | ||||
| 2.08% | |||||
Locations:
Drop tables outdated? Readers can update Module:DropTables/data and cross reference with official drop tables on https://www.warframe.com/droptables.
| A | B | C | |||
|---|---|---|---|---|---|
| 38.72% | 10% | 11.34% | |||
| 38.72% | 10% | 11.34% | |||
| 7.52% | 10% | 11.34% | |||
| 7.52% | 10% | 11.34% | |||
| 7.52% | 10% | 11.34% | |||
| 10% | 11.34% | ||||
| 10% | 11.34% | ||||
| 6% | 6.82% | ||||
| 6% | 4.55% | ||||
| 6% | 4.55% | ||||
| 6% | 4.55% | ||||
| 6% | |||||
Drop tables outdated? Readers can update Module:DropTables/data and cross reference with official drop tables on https://www.warframe.com/droptables.
| A | B | C | |||
|---|---|---|---|---|---|
| 38.72% | 10.16% | 12.24% | |||
| 38.72% | 10.16% | 10.2% | |||
| 11.28% | 10.16% | 10.2% | |||
| 11.28% | 10.16% | 8.16% | |||
| 10.16% | 8.16% | ||||
| 7.94% | 8.16% | ||||
| 7.94% | 6.12% | ||||
| 4.76% | 6.12% | ||||
| 4.76% | 6.12% | ||||
| 4.76% | 6.12% | ||||
| 4.76% | 6.12% | ||||
| 4.76% | 6.12% | ||||
| 4.76% | 6.12% | ||||
| 4.76% | |||||
Drop tables outdated? Readers can update Module:DropTables/data and cross reference with official drop tables on https://www.warframe.com/droptables.
Dark Sector Survival
Survival missions that take place in Dark Sectors always involve the Infested. These Survival missions have a higher level range (and thus, higher difficulty) than the planet they're found on, but give out larger quantities of experience, including the experience bonuses inherent in Dark Sectors. There are currently 10 Dark Sectors Survival Missions, one each for every planet except Mercury, Earth, Europa and Pluto.
Script error: The function "getMissionsOfTypeX" does not exist.
Tips
- It is helpful to bring a Sentinel as Vacuum (or Beast with Fetch) can be used to quickly gather Life Support Modules. However, the Sentinel may also pick up life support modules too early, especially early on in the mission or if players get a lot of kills at close range.
- If you manage to start activating the capsule when your Life Support is at 0% but before you hear the oxygen getting drained, you will be granted 2% oxygen, giving you enough time to consume the capsule.
- Lotus will tell you the location of the next airdrop in advance by placing a marker on your map without there actually being a capsule there to pick up. If you are getting close to 0% life support you should make your way to the drop point so you can activate the capsule as soon as it arrives.
- Activating a Life Support Capsule will take your Warframe a few seconds. Have teammates cover you or prepare yourself to prevent death while activating a capsule.
- After Update 10.3 (2013-10-09), once a life capsule has been activated, the second capsule in the same location will have shorter activation time. Further capsules do not continue to shorten the activation time.
- When activating the alarm, travel to the first marker and stay in that general location as a group. Life support will drop in other places in the map, so team coordination is critical to either move as a team to each, or have someone sprint to them, preferably someone with Loki or Ash, or by the use of Shade so they can pass by the hordes of enemies.
- You must last at least 5 minutes, and at least half the living squad must make it to extraction.
- When the life support reaches 0%, the timer will stop, and there will be no life support left on the map. It will drain your shields and then your health, but will always leave you with 5HP. This gives you a chance to reach extraction, but any damage done to you will be a lethal blow.
- Since a life support capsule restores 30% life support, they should be activated when life support levels are at 40% or below. This will leave room for life support pickups and also for player mistakes such as activating 2 life supports at the same time (40+30+30=100%).
- Sometimes many life support modules drop right after someone activates a life support capsule. This method helps reduce wasting life support.
- Enemies spawn at points where players can't see, and in rooms next to where players are. Larger tiles will have more spawning points than smaller tiles. Do not separate yourself from your team because it will disable the nearest spawning points and cause the enemies to spawn in spread out locations.
- Keeping close to your team will not only help the spawn rates, but it will also give you the Team Affinity Bonus.
- Standing on something (boxes, beams, or anything not on ground level) will slow down enemies from getting to you and your team. When on something that isn't the actual ground, enemies won't be able to detect where you are and will stand in place, therefore, slowing down the process.
- Oddly enough if any person within the mission remains within a hidden state, caused by afking or refusing to attack, it will cause enemies to swarm the player within the state. This causes all current spawns to focus on the hidden tenno.
Notes
- Each Life Support Capsule tend to be placed in each section of a map roughly around every 2 minutes and 30 seconds (150 seconds) before another capsule is dropped off by the Lotus. This is after the 5-minute start of the Survival.
- This delay will slowly increase over time, and there is a cap on extra support capsules 'in queue'.
- If there are three separate rooms that can accommodate Life Support Capsules, the first room will no longer be dropped off, instead the latter two rooms are provided in a cycle.
- If a Rhino has Iron Skin active, it will not protect the player from losing shields or health while oxygen is at 0%. It will continue to protect against enemy combat damage as normal. As soon as health reaches 5, Iron Skin will vanish and leave the player vulnerable. Reapplying it will make it vanish instantly.
- The time it takes to activate life support is around 3 seconds, which is long enough for pursuing enemies to kill you if you are not careful.
- The maximum amount of capsules that can be on the map is capped at 8. The Lotus will not deliver another one until one has been opened, at which the drop timer starts.
- Life Support decreases at 1% every 1.5 seconds. That means 100% is enough for 2 minutes and 30 seconds of Life Support.
- Prior to Update 10.3 (2013-10-09), Lotus would warn you at 20% that you have 60 seconds of life support remaining when you actually had 30 seconds. She also warned that you had 30 seconds remaining at 10%, which was actually 15 seconds.
- At Update 10.6 (2013-10-30), Lotus will only warn players at 20% of life support, referring to 30 seconds. The warning at 40% was removed. If extraction is ready, Lotus will also suggest extraction.
- Despite claims that sprinting hastens the rate that Life Support decreases, DE has confirmed that there is no correlation.
- Alert Survival missions will provide the usual 5-minute reward, but will only allow players to extract after the 10-minute mark, even if the extraction site has already been revealed.
- The Excavation mission type is slated to replace Survival missions taking place on planetside tiles, which include the Grineer Forest, Grineer Settlement, Grineer Shipyard, Corpus Outpost, and Corpus Ice Planet tiles.
- The "objective has been reached" flag is set at the 3:30 mark preventing new players from joining the session too close to the 5-minute reward mark.
- If the player sits idle and does not start the mission timer, it will eventually start itself after an unknown period of time.
Trivia
- This game mode was introduced early via the Survival Weekend Event.
- Survival replaced Raid missions in Update 10.0 (2013-09-13).
- Update 10.3 (2013-10-09) changed several mechanics regarding level generation and reward tables;
- The level was completely unlocked before activating the alarm, allowing players to sprint through the entire map to collect materials without running into enemies. This has since been fixed and the starting area's doors will all be locked until activated by the alarm.
- Survival rewards were dependent on faction type and the time spent. The update changed it so rewards are now dependent on the enemy level and the time spent. It also changed rewards so they stacked; players now take all rewards earned up to the point they leave, instead of the last reward.
- Before Update 10.3 (2013-10-09), you could fail the alarm cipher and it would still go off. Doing so will count towards failed ciphers in player stats.
- Before Update 10.3 (2013-10-09), repeated life capsules would tend to take longer to activate, and kept increasing if the players wished to stay in that location for longer periods of time.
- On Update 10.6 (2013-10-30) (Halloween), Life Support Capsules and Drops were changed into Jack-o'-Lanterns.
- Survival officially replaced Raid in Update 10.0 (2013-09-13). All Raid Void Keys were converted to Survival Void Keys, and T3 Survival keys were introduced.
- This mission type is essentially Raid viewed from a different perspective. Players must distract enemies while an unseen and unnamed Tenno secures Raid-like objectives elsewhere on the map. The mission rewards similar to the old Raid mission rewards, and will also appear at the beginning of the squad's reward display.
- The enemies in Survival mission scales for a hard cap of Level 9999, save for Eximuses which had a level modifier. After this, the enemies would simply stop spawning rendering the mission unplayable, unless the player extracts. This cap can be achieved in the star chart for roughly 14+ hours or so.
- Players can drop Life Support, similar to enemies.
Bugs
- If a player has reactivated the alarm after running out of oxygen, the player will still have 5 Health and 0 Shields, but new oxygen pickups can appear and the Lotus will continue to spawn Life Support capsules, even though they cannot be picked up or used.
- If a host migration is made and a player died and self-revived, there is a chance that the player will lose everything from before the migration took place.
- When there is more than 1 capsule in queue, with another ready to be placed in the queue, activating the capsule in a room which can occupy 2 capsules, a capsule will be delivered nearby in the same room 'instantly' without Lotus notifying you.
Media


References
Patch History
Hotfix 27.3.16 (2020-04-22)
- Fixed a script error that could occur while playing a Survival mission.
Hotfix 27.3.12 (2020-04-14)
- Fixed the UI for Clients breaking when playing a Survival mission.
- Fixed a script error occurring when playing a Survival mission.
Hotfix 27.3.11 (2020-04-09)
- Fixed errors associated with Survival host migration.
Hotfix 27.3.6 (2020-03-31)
- Fixed a script error when a Host migration occurred in a Survival mission.
Hotfix 27.3.5 (2020-03-27)
- Fixed a crash that could occur in a Survival mission.
Hotfix 27.3.3 (2020-03-25)
- Fixed a script error that resulted in a crash if a Host migration occurred when you returned to the Orbiter from a Survival mission.
Update 27.3 (2020-03-24)
- Fixed a script error when a Life Support spawns in a Survival mission.
- Fixed a script error when disabling the Alarms in a Survival mission.
Hotfix 27.2.2 (2020-03-06)
- Fixed an issue with Survival Missions causing issues past the 10 minute mark when players Join-in-progress.
Hotfix 27.2.1 (2020-03-05)
- Fixed a script error when activating a Survival Life Support Capsule.
Update 27.2 (2020-03-05)
- Heavily optimized Survival missions. Replaced the old script used in Survival missions with a new one that can perform up to 90% faster!
- Removed Security Cameras and Turrets in Corpus Ship survival missions.
- During an optimization pass we realized these environment hazards in Survival missions were extra AI overhead and annoyances when there’s already a lot going on.
- Made some minor UI tweaks in Survival missions to improve readability.
- Reduced overall transmission frequency in Survival missions.
- Updated the Survival tower icon for in-world markers so that it matches the objective UI.
- Fixed crash when playing Corpus Infested survival missions as Client after the Host crashes.
Update 27.1 (2020-02-04)
- Made micro-optimizations to a script used in Survival missions.
Update 25.7 (2019-08-29)
- Derelict Survival Missions no longer have electrified water to prevent enemies from slowing down to jump over it
- Fixed collision issues with Kuva Extractors in Kuva Survival.
Hotfix 25.3.2 (2019-07-12)
- Survival Spawn Change
- Historically the number of concurrent enemies in Survival was related to where the mission was in the Star Chart; early missions tended to have less enemies and later missions tended to have more and this number did not change even when you stayed in a mission longer to face higher-level enemies. As an experiment we have changed the scaling mechanic so that staying in a low-level mission longer will also increase the enemy count as it increases the enemy level until it hits the same cap it would have for high-level missions.
- Other Changes
- Kuva Cell pickups now take priority over Life Support Tower activation actions to alleviate accidental Life Support activation in Kuva Survival.
- Fixes
- Fixed Life Support Towers not spawning after a Host migration in Sortie Survival missions.
Update 25.0 (2019-05-22)
- Non-Endless Survival/Excavation/etc missions (i.e. Alerts, Sorties, Syndicate dailies, etc) now disable individual extraction as it leads to unnecessary Host migrations.
Update 24.4 (2019-03-08)
- Individual Extraction - Non-Wave Endless!
You are now able to extract from Survival, Excavation, and Defection missions independent of your squad.
- Once the 'mission complete' interval is met, players can head to extraction any time they choose (i.e 5 minutes for Survival).
- Any player at extraction triggers a countdown timer.
- If all players leave the extraction zone, the countdown timer is cancelled.
- When the timer is up, the extraction ship arrives and any players in the extraction zone leave.
- Anyone still playing can extract later any time they choose.
Update 22.17 (2018-03-28)
- Survival Life Support Towers no longer have interval spawn scaling (90 seconds + 1 second per pillar), instead they will just spawn every 90 seconds.
Update 16.0 (2015-03-19)
- Life Support Modules now have a chance to spawn from lockers and breakable containers in Survival.
- Made a small boost to Life Support Module drop rate in Survival when playing in Solo.
Update 15.0 (2014-10-24)
- Significant improvements to enemy spawning in non-Void Survival missions. Removed a bunch of rules that made spawns too spread out and frustrating.
Hotfix 14.10.3 (2014-10-15)
- Increased the drop rate on Personal Life Support modules in Corpus and Infested Survival missions so as to match Grineer and Corrupted Survival drop rates.
Update 14.0 (2014-07-18)
- Removed the locked door to extraction, as it only limits the available spawn locations within the first 5 minutes.
- Increased the number of small dead end rooms (caps) which can generate in place of red locked doors, providing more spawn locations for enemies.
- Added some new small cap tiles for Asteroid, Settlement, Outpost and Galleon tilesets.
- Restructured the Derelict Survival procedural level so it has more small tiles between the main areas. There are still three larger main areas which have life support capsule spawn points.
- The 'stacking' bug was fixed, capsules don't spawn instantly on activating a capsule if the level is full.
- The first room's capsule spawns are no longer switched off after one use. Since the first room is reused, each level may now have 2-3 more simultaneous capsules active before it reaches capacity. Originally the level structure was a little different, disabling spawns was intended to keep players closer to extraction after moving on from the first room.
- Added infested crawlers to survival enemy spec.
Update 13.0 (2014-04-09)
- Survival Spawning changes:
- Cap max total enemies including paused enemies to prevent performance issues and a potential exploit.
- Ramp up enemy count gradually during the first 20 seconds of the mission so players don't get swamped by enemies at the spawn.
Update 11.1 (2013-11-27)
- Survival Missions will now allow the replenishing of Life Support if the bar hits 0% while a player is activating a life support capsule.
- Survival Mission enemy level scaling changes.
- New Corpus Survival and Defense squads using new U11 enemy types.
Update 10.3 (2013-10-09)
- Survival Mission Improvements
- Items awarded at 5 minute intervals are now shown in the HUD below the Lotus transmissions.
- Reward items now stack as you play - all rewards are given at the end of the mission.
- As you play and survive, you will receive items at these times:
- 5m: Item from the first reward tier
- 10m: Item from the first reward tier again
- 15m: Guaranteed Void key (this is considered the second reward tier).
- 20m, 25m, 30m+: Item from the third reward tier
- Void mission Prime rewards are awarded at 15 minutes only.
- Mission rewards are now split into three distinct tiers of enemy level, instead of being based on faction.
- Expect better rewards based on the enemy tier you are fighting:
- Tier 1: Level 1-25
- Tier 2: Level 25-45
- Tier 3: Level 45+
- Void mission rewards are tied to the tier of the key.
- Extraction no longer triggers if only one player enters the extraction area.
- If the life support bar is still depleting, *all* players must be at extraction to complete the mission.
- The regular 60 second extraction timer starts if half the team is at extraction *after* the life support bar reaches zero.
- All doors in the level are now locked until you trigger the alarms.
- Added an effect to show the exact position of the next incoming support capsule.
Update 11.1 (2013-11-27)
- Survival Missions will now allow the replenishing of Life Support if the bar hits 0% while a player is activating a life support capsule.
- Survival Mission enemy level scaling changes.
Update 11.0 (2013-11-20)
- Removed co-op doors from survival missions
Update 10.0 (2013-09-13)
- Survival Missions Return!
Survival missions are here to stay and can be played by choosing Survival Missions on the Starchart. Our Survival weekend gave the team some early feedback on playability and difficulty, and our new Survival missions are ready for your Warframes! Survival missions will get more challenging the further you travel through the solar system. Expect to face lower level enemies closer to the sun, and higher level enemies as you reach the outer planets. The enemies you face will be prepared to take on the strongest Tenno – the longer you play, the higher the stakes!
- Survival now takes place in procedurally generated levels, allowing greater mission variety, challenge, and replayability.
- Weekly leaderboards are now live for all survival missions on the Starchart!
- All Raid Void Keys have been retroactively replaced with Survival missions.
- A handful of our new mods can be found by playing Survival missions, good luck!
Update 9.7 (2013-08-30)
- Introduced in Survival Weekend Event.