No edit summary Tag: rte-source |
m (→Endurance) |
||
| (89 intermediate revisions by 18 users not shown) | |||
| Line 1: | Line 1: | ||
| + | {{archived}}{{EventConclude}} |
||
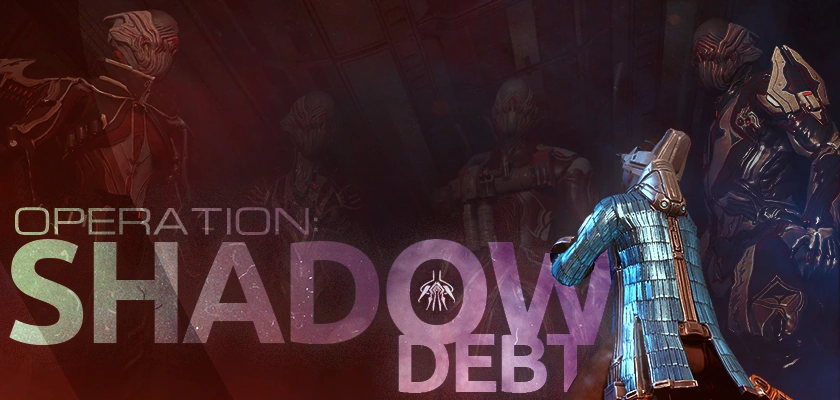
[[File:Update 18.4.1 Shadow Debt.png|Operation: Shadow Debt|660px|center]] |
[[File:Update 18.4.1 Shadow Debt.png|Operation: Shadow Debt|660px|center]] |
||
| + | {{tocright}} |
||
{{quote|The Stalker has found others as twisted as himself. He calls them his Acolytes and he's sent them after ME?! |
{{quote|The Stalker has found others as twisted as himself. He calls them his Acolytes and he's sent them after ME?! |
||
| Line 7: | Line 9: | ||
these…betrayers."|A message from Alad V}} |
these…betrayers."|A message from Alad V}} |
||
| + | '''Operation: Shadow Debt''' was an event released with {{ver|18.4.1|fix}} on PC, and {{ver|18.5.6}} on consoles. Calling in his favor from [[The Second Dream]], [[Alad V]] requested the Tenno's aid in hunting down the [[Stalker]]'s newly minted [[Acolyte]]s. |
||
| ⚫ | |||
| − | *Help Alad V by completing 4 missions to get data on these Acolytes that are pursuing him. |
||
| − | *Use his signals to track down the mysterious 'Acolytes'! |
||
| − | *Each Acolyte will be detected on a planet – seek them out on various nodes on the listed planet. |
||
| − | *Once the Acolyte is found – the hunt is on! The node will be revealed and players can deploy on this node to hunt out the Acolyte in the level and damage them. |
||
| − | *If enough damage is done, the Acolyte will flee, leaving behind new Mods! |
||
| − | *There are 5 Acolytes in total, find and hunt each of them down until they have 0 Health remaining! |
||
| − | *… but what happens once these 5 Acolytes are killed? |
||
| + | For PC, this event lasted between January 25 to February 3, 2016. For consoles, this event lasted between April 14 to April 22, 2016. |
||
| ⚫ | |||
| + | |||
| − | *This Operation is on now until you've killed all 5 Acolytes as a community. Spoilers: Once you've done that, a final challenger will appear which will be active for 3 days! The event duration is however long it takes you as a community to kill the 5 Acolytes, + 3 Days for the final challenger! While it's not required to have encountered any of the 5 Acolytes before facing this Challenger, we encourage you to do so for Mod collecting and helping out the community goal! |
||
| + | ==Mechanics== |
||
| − | *Acolytes will move around to try and escape the hunting tactics of the Tenno – be prepared to seek them out across many planets! |
||
| ⚫ | |||
| + | ===='''Tracking Down the Acolytes'''==== |
||
| + | *In order to track down the Acolytes, players will first be tasked in acquiring security data from [[Grineer]] and [[Corpus]] systems so that Alad V can pinpoint their locations. |
||
| + | **The first two missions are [[Spy]] missions set on [[Mercury]] and [[Venus]] respectively. Players must successfully break into ''at least two'' data vaults for a successful mission. |
||
| + | **The last two missions are [[Mobile Defense]] missions set on [[Earth]] and [[Jupiter]] respectively. They are otherwise identical to regular Mobile Defense missions. |
||
| + | *Once all the security data has been collected, the [[Acolyte]]s will be detected for the community to locate and hunt down. There are six Acolytes in total. |
||
| + | **An Acolyte will be located on a given planet and players must locate the mission node where he or she is found. Once the Acolyte's mission node is located, their location is announced in the Operations tab in the Mission selection screen. |
||
| + | **To hunt down an Acolyte, players must selected the mission node and explore the map. The Acolyte can spawn in ''any'' location of the map, ranging from dead-end rooms to the mission path. The Acolyte will announce his or her presence to the player in a manner similar to the [[Stalker]] and will spawn shortly afterward. |
||
| + | **Once the Acolyte spawns, players must damage the Acolyte until it leaves, whereupon it drops a mod. |
||
| + | **All Acolytes have a global health bar that is reduced by community effort with no given time limit. Once the health bar reaches 0%, the Acolyte is killed. Be warned however; the Acolytes will move to different mission nodes and even planets to evade their hunters, so be vigilant. |
||
| + | |||
| + | ===='''Defending Alad V'''==== |
||
| + | *Once the five Acolytes have been defeated, Alad V send a message to the player's inbox, remarking that there is still one Acolyte remaining – ''[[Misery]]''. You will then be tasked to complete a defense mission on [[Europa]] with Alad V as the defense objective against 10 waves of [[Shadows Of The Dead|Shadow]] [[Corpus]] enemies, with Shadow copies of [[Mania]] and [[Torment]] scattered amongst their ranks. |
||
| + | *Once the final wave is complete, Misery will spawn and players must defeat him to complete the mission. Misery will occasionally spawn [[Void Shade]]s that link to Misery similarly to {{M|Shield of Shadows}}, reducing the damage to Misery as long as they are linked to him. |
||
| + | **Misery is guaranteed to spawn additional Void Shades when his health drops below 66% and 33%, the latter case also spawning Shadow copies of [[Angst]] and [[Violence]]. |
||
| + | *Once Misery is defeated, the player will get a random assortment of mods from the pool of all the Acolytes. The mission can be replayed to gain additional mods but they will have to endure the full length of the mission each time. |
||
| + | |||
| + | ===='''Endurance'''==== |
||
| + | *After defending Alad V from Misery, the player then has the option to do a more challenging version of the mission, which requires the player to defeat waves of Acolytes and Corpus troops. At least 15 waves are required to get the [[Scorn Lacera Skin]]. |
||
| + | *It is identical to the normal defense mission, except Misery will spawn in every 5 waves, the players will have their shields reduced by 50% and their energy reserves will be capped at 50. |
||
| + | |||
| ⚫ | |||
| + | *This Operation will last until 5 Acolytes have been killed by the community, plus the three days that the 6th will be available. |
||
| + | *While it's not required to have encountered any of the first 5 Acolytes before facing the last Acolyte, it is encouraged to hunt them down for Mod collecting and helping out the community goal. |
||
| + | |||
| + | ===The Acolytes=== |
||
| + | <tabber> |
||
| + | |-|PS4 = |
||
| + | <gallery widths="175" perrow="3" hideaddbutton="true" position="center" captionalign="center" spacing="small" bordercolor="transparent"> |
||
| + | StrikerAcolyte.png|link=Angst|<s>'''[[Angst]]'''</s><br>''Agile and ferocious''<br>{{text|green|'''Defeated'''}} |
||
| + | HeavyAcolyte.png|link=Malice|<s>'''[[Malice]]'''</s><br>''Disciplined and accurate''<br>{{text|green|'''Defeated'''}} |
||
| + | RogueAcolyte.png|link=Mania|<s>'''[[Mania]]'''</s><br>''Elusive and deadly''<br>{{text|green|'''Defeated'''}} |
||
| + | AreaCasterAcolyte.png|link=Misery|<s>'''[[Misery]]'''</s><br>''Zealous and patient''<br>{{text|green|'''Defeated'''}} |
||
| + | ControlAcolyte.png|link=Torment|<s>'''[[Torment]]'''</s><br>''Arrogant and calculating''<br>{{text|green|'''Defeated'''}} |
||
| + | DuellistAcolyte.png|link=Violence|<s>'''[[Violence]]'''</s><br>''Fast and vicious''<br>{{text|green|'''Defeated'''}} |
||
| + | </gallery> |
||
| + | |-|XB1 = |
||
| + | <gallery widths="175" perrow="3" hideaddbutton="true" position="center" captionalign="center" spacing="small" bordercolor="transparent"> |
||
| + | StrikerAcolyte.png|link=Angst|<s>'''[[Angst]]'''</s><br>''Agile and ferocious''<br>{{text|green|'''Defeated'''}} |
||
| + | HeavyAcolyte.png|link=Malice|<s>'''[[Malice]]'''</s><br>''Disciplined and accurate''<br>{{text|green|'''Defeated'''}} |
||
| + | RogueAcolyte.png|link=Mania|<s>'''[[Mania]]'''</s><br>''Elusive and deadly''<br>{{text|green|'''Defeated'''}} |
||
| + | AreaCasterAcolyte.png|link=Misery|<s>'''[[Misery]]'''</s><br>''Zealous and patient''<br>{{text|green|'''Defeated'''}} |
||
| + | ControlAcolyte.png|link=Torment|<s>'''[[Torment]]'''</s><br>''Arrogant and calculating''<br>{{text|green|'''Defeated'''}} |
||
| + | DuellistAcolyte.png|link=Violence|<s>'''[[Violence]]'''</s><br>''Fast and vicious''<br>{{text|green|'''Defeated'''}} |
||
| + | </gallery> |
||
| + | |-|PC = |
||
| + | <gallery widths="175" perrow="3" hideaddbutton="true" position="center" captionalign="center" spacing="small" bordercolor="transparent"> |
||
| + | StrikerAcolyte.png|link=Angst|<s>'''[[Angst]]'''</s><br>''Agile and ferocious''<br>{{text|green|'''Defeated'''}} |
||
| + | HeavyAcolyte.png|link=Malice|<s>'''[[Malice]]'''</s><br>''Disciplined and accurate''<br>{{text|green|'''Defeated'''}} |
||
| + | RogueAcolyte.png|link=Mania|<s>'''[[Mania]]'''</s><br>''Elusive and deadly''<br>{{text|green|'''Defeated'''}} |
||
| + | AreaCasterAcolyte.png|link=Misery|<s>'''[[Misery]]'''</s><br>''Zealous and patient''<br>{{text|green|'''Defeated'''}} |
||
| + | ControlAcolyte.png|link=Torment|<s>'''[[Torment]]'''</s><br>''Arrogant and calculating''<br>{{text|green|'''Defeated'''}} |
||
| + | DuellistAcolyte.png|link=Violence|<s>'''[[Violence]]'''</s><br>''Fast and vicious''<br>{{text|green|'''Defeated'''}} |
||
| + | </tabber> |
||
==Rewards== |
==Rewards== |
||
| ⚫ | |||
| − | [[File:ProjectSinisterPhaseOneRewardsBlack.png|thumb|Rewards for completing Phase 1|right]] |
||
| ⚫ | |||
| − | *Complete the first 4 Missions for Alad V: Operation: Shadow Debt Sigil, Orokin Catalyst. |
||
| + | ! style="width: 25%;" | Collect 4 Cloaking Data |
||
| − | {{clrl}} |
||
| + | ! style="width: 25%;" | Force Acolytes to flee 10 times |
||
| − | [[File:ProjectSinisterPhaseTwoRewardsBlack.png|thumb|Rewards for completing Phase 2|right]] |
||
| + | ! style="width: 25%;" | Defeat Final Challenger |
||
| − | *Defeat 10 Acolytes in-mission: Operation: Shadow Debt Badge, Orokin Reactor. |
||
| + | ! style="width: 25%;" | Clear 15 Waves against Final Challenger |
||
| − | {{clrl}} |
||
| ⚫ | |||
| − | *20 new Event Mods are here, and can be earned as drops from Defeating Acolytes or by playing the bonus final challenger mission. The names of these New mods are as follows, find them in-game to reveal their function: |
||
| + | |style="background:radial-gradient(#3F565D, #0F181B);"|[[File:ProjectSinisterPhaseOneRewards.png|150px|center|link=]] |
||
| − | {{clr}} |
||
| + | |style="background:radial-gradient(#3F565D, #0F181B);"|[[File:ProjectSinisterPhaseTwoRewards.png|150px|center|link=]] |
||
| ⚫ | |||
| + | |style="background:radial-gradient(#3F565D, #0F181B);"|[[File:VulkarWraith.png|150px|center|link=]] |
||
| + | |style="background:radial-gradient(#3F565D, #0F181B);"|[[File:StalkerMiosAltSkin.png|150px|center|link=]] |
||
| ⚫ | |||
| ⚫ | |||
| + | *Acolyte [[Sigil]] |
||
| + | *[[Orokin Catalyst]] |
||
| ⚫ | |||
| + | *Acolyte [[Warframe Cosmetics#Event Emblems|Badge]] |
||
| + | *[[Orokin Reactor]] |
||
| ⚫ | |||
| + | *{{Weapon|Vulkar Wraith}} |
||
| + | : |
||
| ⚫ | |||
| + | *[[Scorn Lacera Skin]] |
||
| + | : |
||
| ⚫ | |||
| + | |||
| + | ===Acolyte Drops=== |
||
| + | {{CustomCollapsible|Acolyte Drop|acolytedrops}} |
||
| + | {| class="listtable sortable" style="width: 100%; text-align:left;" |
||
|- |
|- |
||
| − | ! Name |
+ | ! style="width: 25%;" | Name |
| + | ! Rarity |
||
| + | ! Type |
||
! Description |
! Description |
||
| − | ! Dropped By |
+ | ! style="width: 15%;" | Dropped By |
|- |
|- |
||
| − | | |
+ | | {{M|Blood Rush}} |
| + | | data-sort-value="2" | Uncommon |
||
| ⚫ | |||
| + | | Melee |
||
| ⚫ | |||
| [[Torment]] |
| [[Torment]] |
||
|- |
|- |
||
| − | | |
+ | | {{M|Body Count}} |
| + | | data-sort-value="1" | Common |
||
| ⚫ | |||
| + | | Melee |
||
| ⚫ | |||
| [[Angst]] |
| [[Angst]] |
||
|- |
|- |
||
| − | | |
+ | | {{M|Weeping Wounds}} |
| + | | data-sort-value="2" | Uncommon |
||
| ⚫ | |||
| + | | Melee |
||
| ⚫ | |||
| [[Mania]] |
| [[Mania]] |
||
|- |
|- |
||
| − | | |
+ | | {{M|Maiming Strike}} |
| + | | data-sort-value="3" | Rare |
||
| ⚫ | |||
| + | | Melee |
||
| ⚫ | |||
| ⚫ | |||
| + | | [[Violence]] |
||
|- |
|- |
||
| − | | |
+ | | {{M|Hydraulic Crosshairs}} |
| + | | data-sort-value="1" | Common |
||
| ⚫ | |||
| + | | Pistol |
||
| ⚫ | |||
| [[Torment]] |
| [[Torment]] |
||
|- |
|- |
||
| − | | |
+ | | {{M|Argon Scope}} |
| + | | data-sort-value="3" | Rare |
||
| ⚫ | |||
| + | | Rifle |
||
| ⚫ | |||
| [[Torment]] |
| [[Torment]] |
||
|- |
|- |
||
| − | | |
+ | | {{M|Laser Sight}} |
| + | | data-sort-value="2" | Uncommon |
||
| ⚫ | |||
| + | | Shotgun |
||
| ⚫ | |||
| [[Torment]] |
| [[Torment]] |
||
|- |
|- |
||
| − | | |
+ | | {{M|Sharpened Bullets}} |
| + | | data-sort-value="2" | Uncommon |
||
| ⚫ | |||
| + | | Pistol |
||
| ⚫ | |||
| ⚫ | |||
| + | | [[Violence]] |
||
|- |
|- |
||
| − | | |
+ | | {{M|Bladed Rounds}} |
| + | | data-sort-value="2" | Uncommon |
||
| ⚫ | |||
| + | | Rifle |
||
| ⚫ | |||
| ⚫ | |||
| + | | [[Violence]] |
||
|- |
|- |
||
| − | | |
+ | | {{M|Shrapnel Shot}} |
| + | | data-sort-value="1" | Common |
||
| ⚫ | |||
| + | | Shotgun |
||
| ⚫ | |||
| ⚫ | |||
| + | | [[Violence]] |
||
|- |
|- |
||
| − | | |
+ | | {{M|Pressurized Magazine}} |
| + | | data-sort-value="3" | Rare |
||
| ⚫ | |||
| + | | Pistol |
||
| ⚫ | |||
| [[Angst]] |
| [[Angst]] |
||
|- |
|- |
||
| − | | |
+ | | {{M|Spring-Loaded Chamber}} |
| + | | data-sort-value="2" | Uncommon |
||
| ⚫ | |||
| + | | Assault Rifle |
||
| ⚫ | |||
| [[Angst]] |
| [[Angst]] |
||
|- |
|- |
||
| − | | |
+ | | {{M|Repeater Clip}} |
| + | | data-sort-value="2" | Uncommon |
||
| ⚫ | |||
| + | | Shotgun |
||
| ⚫ | |||
| [[Angst]] |
| [[Angst]] |
||
|- |
|- |
||
| − | | |
+ | | {{M|Embedded Catalyzer}} |
| + | | data-sort-value="2" | Uncommon |
||
| ⚫ | |||
| + | | Pistol |
||
| ⚫ | |||
| [[Mania]] |
| [[Mania]] |
||
|- |
|- |
||
| − | | |
+ | | {{M|Catalyzer Link}} |
| + | | data-sort-value="1" | Common |
||
| ⚫ | |||
| + | | Rifle |
||
| ⚫ | |||
| [[Mania]] |
| [[Mania]] |
||
|- |
|- |
||
| − | | |
+ | | {{M|Nano-Applicator}} |
| + | | data-sort-value="3" | Rare |
||
| ⚫ | |||
| + | | Shotgun |
||
| ⚫ | |||
| [[Mania]] |
| [[Mania]] |
||
|- |
|- |
||
| − | | |
+ | | {{M|Narrow Barrel}} |
| + | | data-sort-value="3" | Rare |
||
| ⚫ | |||
| + | | Shotgun |
||
| ⚫ | |||
| + | | Temporarily increases accuracy while aiming after hitting an enemy. |
||
| + | | [[Malice]] |
||
|- |
|- |
||
| − | | |
+ | | {{M|Focused Defense}} |
| + | | data-sort-value="1" | Common |
||
| ⚫ | |||
| + | | Melee |
||
| ⚫ | |||
| + | | Increases armor while channeling with a melee weapon. |
||
| + | | [[Malice]] |
||
|- |
|- |
||
| − | | |
+ | | {{M|Guided Ordnance}} |
| + | | data-sort-value="2" | Uncommon |
||
| − | | |
||
| + | | Assault Rifle |
||
| − | | |
||
| + | | Temporarily increases accuracy while aiming after hitting an enemy. |
||
| + | | [[Malice]] |
||
|- |
|- |
||
| − | | |
+ | | {{M|Targeting Subsystem}} |
| + | | data-sort-value="2" | Uncommon |
||
| − | | |
||
| + | | Pistol |
||
| − | | |
||
| + | | Temporarily increases accuracy while aiming after hitting an enemy. |
||
| + | | [[Malice]] |
||
|} |
|} |
||
| + | {{CustomCollapsible/End}} |
||
| − | *Successfully complete the mission against the final challenger: [[Vulkar Wraith]]. |
||
| − | *Clear 15 waves total in the bonus final challenger mission: [[Lacera Acolyte Skin|Acolyte Lacera Skin]]. |
||
| − | == |
+ | ===Clan Trophies=== |
| − | + | All participating Clans will receive an event trophy for their attempts on the Endurance final challenger mission. The following table lays out which Trophy your clan will earn depending on the Sum of all participating Members best Wave. |
|
| − | {| class=" |
+ | {| class="listtable" sortable" style="width: 100%; text-align:left;" |
|- |
|- |
||
! Clan Tier !! Terracotta Trophy !! Bronze Trophy !! Silver Trophy !! Gold Trophy |
! Clan Tier !! Terracotta Trophy !! Bronze Trophy !! Silver Trophy !! Gold Trophy |
||
|- |
|- |
||
| − | | Ghost || 25 Waves || 50 Waves || 75 Waves || 100 Waves |
+ | | [[File:LeaderBadgeGhostHolo.png|x26px|link=Clan#Clan Tier|Ghost Clan]] [[Clan#Clan Tier Multiplier|Ghost]] || 25 Waves || 50 Waves || 75 Waves || 100 Waves |
|- |
|- |
||
| − | | Shadow || 75 Waves || 150 Waves || 225 Waves || 300 Waves |
+ | | [[File:LeaderBadgeShadowHolo.png|x26px|link=Clan#Clan Tier|Shadow Clan]] [[Clan#Clan Tier Multiplier|Shadow]] || 75 Waves || 150 Waves || 225 Waves || 300 Waves |
|- |
|- |
||
| − | | Storm || 250 Waves || 500 Waves || 750 Waves || 1000 Waves |
+ | | [[File:LeaderBadgeStormHolo.png|x26px|link=Clan#Clan Tier|Storm Clan]] [[Clan#Clan Tier Multiplier|Storm]] || 250 Waves || 500 Waves || 750 Waves || 1000 Waves |
|- |
|- |
||
| − | | Mountain || 750 Waves || 1500 Waves || 2250 Waves || 3000 Waves |
+ | | [[File:LeaderBadgeMountainHolo.png|x26px|link=Clan#Clan Tier|Mountain Clan]] [[Clan#Clan Tier|Mountain]] || 750 Waves || 1500 Waves || 2250 Waves || 3000 Waves |
|- |
|- |
||
| − | | Moon || 2500 Waves || 5000 Waves || 7500 Waves || 10000 Waves |
+ | | [[File:LeaderBadgeMoonHolo.png|x26px|link=Clan#Clan Tier|Moon Clan]] [[Clan#Clan Tier|Moon]] || 2500 Waves || 5000 Waves || 7500 Waves || 10000 Waves |
|} |
|} |
||
==Notes== |
==Notes== |
||
| − | *Each |
+ | *Each Acolyte will hide on a random mission node. Tenno must fan out and scout all mission nodes in search of the Acolyte. Once an Acolyte is found, all Tenno will be alerted of its presence within the Acolytes tab of the World State Window. |
| − | **The Acolyte will remain on that node until a set amount of damage (currently |
+ | **The Acolyte will remain on that node until a set amount of damage (currently 50,000 total) has been dealt to it (cumulative from all Tenno contributing). |
**Once the Acolyte has taken its beating, it will find a new node to hide in and the Tenno must search for it once again. |
**Once the Acolyte has taken its beating, it will find a new node to hide in and the Tenno must search for it once again. |
||
| + | **Acolytes can be found on any [[Nightmare Mode]] and [[Invasion]] missions on the node, but not [[Syndicate#Syndicate Alerts|Syndicate Alerts]]. |
||
*On mission nodes where they can be found, the Acolyte is hidden within a random room on the map. Upon entering the room the Acolyte is hidden in, the screen will flicker, similarly to other invaders ([[Stalker]], [[Zanuka]], etc.). |
*On mission nodes where they can be found, the Acolyte is hidden within a random room on the map. Upon entering the room the Acolyte is hidden in, the screen will flicker, similarly to other invaders ([[Stalker]], [[Zanuka]], etc.). |
||
| − | **This means that the Acolyte may be hidden in dead end rooms, or conveniently along the main path of the mission. |
+ | **This means that the Acolyte may be hidden in dead end rooms, or conveniently along the main path of the mission. Acolytes can also spawn in the map's starting room. |
*The Operation-only [[Spy]] nodes on [[Mercury]] and [[Venus]] can reward items not usually found in normal missions, such as [[Transmutation#Transmutation Cores|Transmutation Cores]]. |
*The Operation-only [[Spy]] nodes on [[Mercury]] and [[Venus]] can reward items not usually found in normal missions, such as [[Transmutation#Transmutation Cores|Transmutation Cores]]. |
||
==Tips== |
==Tips== |
||
| − | *The Acolytes are not immune to |
+ | *The Acolytes are not immune to Warframe abilities. Use whatever means possible to take them down. Beware, however, that [[Violence]] can cancel Warframe abilities in the same manner as the Stalker, including Focus abilities. |
| − | **Crowd Control abilities, such as |
+ | **Crowd Control abilities, such as {{WF|Rhino}}'s {{A|Rhino Stomp}} or {{WF|Nova}}'s {{A|Molecular Prime}} can be effective at stopping the Acolyte in its tracks. Using certain augments such as {{WF|Frost}}'s {{M|Chilling Globe}} will also be able to completely freeze them '''if''' it successfully procs. |
| + | ***{{WF|Equinox}}'s [[Rest & Rage|Rest]] will '''not''' affect Acolytes. |
||
| − | **Damaging abilities, such at |
+ | **Damaging abilities, such at {{WF|Banshee}}'s {{A|Sonar}} or Nova's {{A|Antimatter Drop}} can do massive amounts of damage to the Acolyte. |
***Note that you can only do a limited amount of damage to the Acolyte within any given mission. |
***Note that you can only do a limited amount of damage to the Acolyte within any given mission. |
||
| + | **Status Effects will not lock down the Acolytes. Therefore, abilities such as {{WF|Ember}}'s {{A|Accelerant}} will not stagger the Acolyte (damage will still be increased). |
||
==Trivia== |
==Trivia== |
||
| − | * |
+ | *Prior to {{ver|18.4.6|fix}}, the date on Alad V's inbox message was January 18, 2016, which marked the event's intended release goal prior to development delays. |
| + | *The event was originally developed under the name ''"Project Sinister"''. |
||
| + | *Although [[Torment]] had already been defeated by January 26, she was officially revived following the changes to Acolyte drops in {{ver|18.4.3|fix}}. This resulted in four Acolytes active simultaneously, and lasted until [[Angst]] was defeated on January 28. |
||
==Media== |
==Media== |
||
| + | <gallery position="center" widths="300" spacing="small" hideaddbutton="true"> |
||
| + | Warframe - Operations Shadow Debt |
||
| + | Warframe - Operation Shadow Debt |
||
| + | Warframe - How to beat Operation Shadow Debt |
||
| + | Warframe Event (Shadow Debt) + Awesome New Mods! |
||
| + | OPERATION SHADOW DEBT - Acolyte Hunt & Rewards Warframe |
||
| + | OPERATION SHADOW DEBT Part 2 - Alad V Defense & Misery & Rewards Warframe |
||
| + | </gallery> |
||
| − | ==See Also== |
||
{{EventNav}} |
{{EventNav}} |
||
| + | [[de:Operation Schatten-Schuld]] |
||
| − | __NOTOC__ |
||
| + | [[es:Operación: La deuda de la sombra]] |
||
| + | [[fr:Opération: Dette d'Ombre]] |
||
[[Category:Update 18]] |
[[Category:Update 18]] |
||
[[Category:Event]] |
[[Category:Event]] |
||
Revision as of 04:03, 17 June 2019


Operation: Shadow Debt was an event released with Hotfix 18.4.1 (2016-01-25) on PC, and Hotfix 18.5.6 (2016-03-10) on consoles. Calling in his favor from The Second Dream, Alad V requested the Tenno's aid in hunting down the Stalker's newly minted Acolytes.
For PC, this event lasted between January 25 to February 3, 2016. For consoles, this event lasted between April 14 to April 22, 2016.
Mechanics
What You'll Need To Do
Tracking Down the Acolytes
- In order to track down the Acolytes, players will first be tasked in acquiring security data from Grineer and Corpus systems so that Alad V can pinpoint their locations.
- The first two missions are Spy missions set on Mercury and Venus respectively. Players must successfully break into at least two data vaults for a successful mission.
- The last two missions are Mobile Defense missions set on Earth and Jupiter respectively. They are otherwise identical to regular Mobile Defense missions.
- Once all the security data has been collected, the Acolytes will be detected for the community to locate and hunt down. There are six Acolytes in total.
- An Acolyte will be located on a given planet and players must locate the mission node where he or she is found. Once the Acolyte's mission node is located, their location is announced in the Operations tab in the Mission selection screen.
- To hunt down an Acolyte, players must selected the mission node and explore the map. The Acolyte can spawn in any location of the map, ranging from dead-end rooms to the mission path. The Acolyte will announce his or her presence to the player in a manner similar to the Stalker and will spawn shortly afterward.
- Once the Acolyte spawns, players must damage the Acolyte until it leaves, whereupon it drops a mod.
- All Acolytes have a global health bar that is reduced by community effort with no given time limit. Once the health bar reaches 0%, the Acolyte is killed. Be warned however; the Acolytes will move to different mission nodes and even planets to evade their hunters, so be vigilant.
Defending Alad V
- Once the five Acolytes have been defeated, Alad V send a message to the player's inbox, remarking that there is still one Acolyte remaining – Misery. You will then be tasked to complete a defense mission on Europa with Alad V as the defense objective against 10 waves of Shadow Corpus enemies, with Shadow copies of Mania and Torment scattered amongst their ranks.
- Once the final wave is complete, Misery will spawn and players must defeat him to complete the mission. Misery will occasionally spawn Void Shades that link to Misery similarly to
 Shield of Shadows, reducing the damage to Misery as long as they are linked to him.
- Once Misery is defeated, the player will get a random assortment of mods from the pool of all the Acolytes. The mission can be replayed to gain additional mods but they will have to endure the full length of the mission each time.
Endurance
- After defending Alad V from Misery, the player then has the option to do a more challenging version of the mission, which requires the player to defeat waves of Acolytes and Corpus troops. At least 15 waves are required to get the Scorn Lacera Skin.
- It is identical to the normal defense mission, except Misery will spawn in every 5 waves, the players will have their shields reduced by 50% and their energy reserves will be capped at 50.
What You Need To Know
- This Operation will last until 5 Acolytes have been killed by the community, plus the three days that the 6th will be available.
- While it's not required to have encountered any of the first 5 Acolytes before facing the last Acolyte, it is encouraged to hunt them down for Mod collecting and helping out the community goal.
The Acolytes
")
")
")
")
")
")
<gallery widths="175" perrow="3" hideaddbutton="true" position="center" captionalign="center" spacing="small" bordercolor="transparent">
StrikerAcolyte.png|link=Angst|Angst
Agile and ferocious
Defeated
HeavyAcolyte.png|link=Malice|Malice
Disciplined and accurate
Defeated
RogueAcolyte.png|link=Mania|Mania
Elusive and deadly
Defeated
AreaCasterAcolyte.png|link=Misery|Misery
Zealous and patient
Defeated
ControlAcolyte.png|link=Torment|Torment
Arrogant and calculating
Defeated
Fast and vicious
Defeated
Rewards
| Collect 4 Cloaking Data | Force Acolytes to flee 10 times | Defeat Final Challenger | Clear 15 Waves against Final Challenger |
|---|---|---|---|
 |
 |
 |
|
|
|
|
|
Acolyte Drops
| Name | Rarity | Type | Description | Dropped By |
|---|---|---|---|---|
| Uncommon | Melee | Increases Critical chance as the Melee Combo Multiplier increases. | Torment | |
| Common | Melee | Extends the duration of the Melee Combo Multiplier. | Angst | |
| Uncommon | Melee | Increases Status chance as the Melee Combo Multiplier increases. | Mania | |
| Rare | Melee | Increases the chance of a Critical Hit on slide attacks. | Violence | |
| Common | Pistol | Increases Critical chance while aiming for a brief time upon a headshot. | Torment | |
| Rare | Rifle | Increases Critical chance while aiming for a brief time upon a headshot. | Torment | |
| Uncommon | Shotgun | Increases Critical chance while aiming for a brief time upon a headshot. | Torment | |
| Uncommon | Pistol | Increases Critical damage while aiming for a brief time upon a kill. | Violence | |
| Uncommon | Rifle | Increases Critical damage while aiming for a brief time upon a kill. | Violence | |
| Common | Shotgun | Increases Critical damage while aiming for a brief time upon a kill. | Violence | |
| Rare | Pistol | Increases Fire Rate while aiming for a brief time upon reloading. | Angst | |
| Uncommon | Assault Rifle | Increases Fire Rate while aiming for a brief time upon reloading. | Angst | |
| Uncommon | Shotgun | Increases Fire Rate while aiming for a brief time upon reloading. | Angst | |
| Uncommon | Pistol | Increases Status chance while aiming for a brief time after casting an ability. | Mania | |
| Common | Rifle | Increases Status chance while aiming for a brief time after casting an ability. | Mania | |
| Rare | Shotgun | Increases Status chance while aiming for a brief time after casting an ability. | Mania | |
| Rare | Shotgun | Temporarily increases accuracy while aiming after hitting an enemy. | Malice | |
| Common | Melee | Increases armor while channeling with a melee weapon. | Malice | |
| Uncommon | Assault Rifle | Temporarily increases accuracy while aiming after hitting an enemy. | Malice | |
| Uncommon | Pistol | Temporarily increases accuracy while aiming after hitting an enemy. | Malice |
Clan Trophies
All participating Clans will receive an event trophy for their attempts on the Endurance final challenger mission. The following table lays out which Trophy your clan will earn depending on the Sum of all participating Members best Wave.
| Clan Tier | Terracotta Trophy | Bronze Trophy | Silver Trophy | Gold Trophy |
|---|---|---|---|---|
| 25 Waves | 50 Waves | 75 Waves | 100 Waves | |
| 75 Waves | 150 Waves | 225 Waves | 300 Waves | |
| 250 Waves | 500 Waves | 750 Waves | 1000 Waves | |
| 750 Waves | 1500 Waves | 2250 Waves | 3000 Waves | |
| 2500 Waves | 5000 Waves | 7500 Waves | 10000 Waves |
Notes
- Each Acolyte will hide on a random mission node. Tenno must fan out and scout all mission nodes in search of the Acolyte. Once an Acolyte is found, all Tenno will be alerted of its presence within the Acolytes tab of the World State Window.
- The Acolyte will remain on that node until a set amount of damage (currently 50,000 total) has been dealt to it (cumulative from all Tenno contributing).
- Once the Acolyte has taken its beating, it will find a new node to hide in and the Tenno must search for it once again.
- Acolytes can be found on any Nightmare Mode and Invasion missions on the node, but not Syndicate Alerts.
- On mission nodes where they can be found, the Acolyte is hidden within a random room on the map. Upon entering the room the Acolyte is hidden in, the screen will flicker, similarly to other invaders (Stalker, Zanuka, etc.).
- This means that the Acolyte may be hidden in dead end rooms, or conveniently along the main path of the mission. Acolytes can also spawn in the map's starting room.
- The Operation-only Spy nodes on Mercury and Venus can reward items not usually found in normal missions, such as Transmutation Cores.
Tips
- The Acolytes are not immune to Warframe abilities. Use whatever means possible to take them down. Beware, however, that Violence can cancel Warframe abilities in the same manner as the Stalker, including Focus abilities.
- Crowd Control abilities, such as Rhino's Rhino Stomp or Nova's Molecular Prime can be effective at stopping the Acolyte in its tracks. Using certain augments such as Frost's Chilling Globe will also be able to completely freeze them if it successfully procs.
- Damaging abilities, such at Banshee's Sonar or Nova's Antimatter Drop can do massive amounts of damage to the Acolyte.
- Note that you can only do a limited amount of damage to the Acolyte within any given mission.
- Status Effects will not lock down the Acolytes. Therefore, abilities such as Ember's "Accelerant" wasn't found in Module:Ability/data will not stagger the Acolyte (damage will still be increased).
- Crowd Control abilities, such as
Trivia
- Prior to Hotfix 18.4.6 (2016-02-01), the date on Alad V's inbox message was January 18, 2016, which marked the event's intended release goal prior to development delays.
- The event was originally developed under the name "Project Sinister".
- Although Torment had already been defeated by January 26, she was officially revived following the changes to Acolyte drops in Hotfix 18.4.3 (2016-01-27). This resulted in four Acolytes active simultaneously, and lasted until Angst was defeated on January 28.
Media
")
")
")
 + Awesome New Mods! (26 KB)")
")
")