(→Media) Tag: rte-wysiwyg |
Tag: sourceedit |
||
| Line 119: | Line 119: | ||
!Executioner |
!Executioner |
||
!Type |
!Type |
||
| + | !Tier |
||
!Abilities |
!Abilities |
||
|- |
|- |
||
|Zura |
|Zura |
||
|Summoner |
|Summoner |
||
| + | |3 |
||
| − | |Summons [[Hyekka]] to aid her in battle. She wields an [[Ignis]] and |
+ | |Summons [[Hyekka]] to aid her in battle. She wields an [[Ignis]] and [[Ripkas]]. Is functionally identical to a normal Hyekka Master, but with improved stats and the additional melee weapon. Her Hyekka can deal considerable damage with their attacks and are not dismissed when Zura is killed. |
|- |
|- |
||
|Garesh |
|Garesh |
||
|Charger |
|Charger |
||
| + | |1-3 |
||
| − | |Sneaks up on players and attacks them with his [[Twin Basolk]]. |
+ | |Sneaks up on players and attacks them with his [[Twin Basolk]]. Garesh tends to teleport into close range when he can, appearing behind players to surprise them; he can also throw his Basolk as shock traps in a manner similar to [[Captain Vor]]'s [[Nervos Mine]] attack. Immune to knockdown (but not ragdolling). |
|- |
|- |
||
|Technician Reth |
|Technician Reth |
||
|Engineer |
|Engineer |
||
| + | |2-3 |
||
|Deploys [[Roller]] Turrets and [[Magnetic]] Traps as he navigates through the level. Roller Turrets must stop in place to arm themselves. Magnetic Traps self-destruct when in range of a Tenno and deliver a shock that completely drains Energy but not Shields. Magnetic Traps make sounds and can be destroyed like Arc Traps, and are typically placed in the same locations on the map, near powerup spawns and blind spots in bottlenecked areas. Wields a [[Drakgoon]], making him deadly up close. |
|Deploys [[Roller]] Turrets and [[Magnetic]] Traps as he navigates through the level. Roller Turrets must stop in place to arm themselves. Magnetic Traps self-destruct when in range of a Tenno and deliver a shock that completely drains Energy but not Shields. Magnetic Traps make sounds and can be destroyed like Arc Traps, and are typically placed in the same locations on the map, near powerup spawns and blind spots in bottlenecked areas. Wields a [[Drakgoon]], making him deadly up close. |
||
|- |
|- |
||
|Inquisitor Nok |
|Inquisitor Nok |
||
|Grunt |
|Grunt |
||
| + | |1-3 |
||
| − | |Equipped with a [[Sobek]] and a [[Sheev]]. Don’t get too close. Also deploys [[Carabus|Carabus Sentinels]] that seek and destroy with an incendiary beam attack. |
+ | |Equipped with a [[Sobek]] and a [[Sheev]]. Don’t get too close. Also deploys [[Carabus|Carabus Sentinels]] that seek and destroy with an incendiary beam attack. Aside from his shotgun and drones, Nok is a somewhat uncomplicated and unthreatening opponent. |
|- |
|- |
||
|Dok Thul |
|Dok Thul |
||
|Medic |
|Medic |
||
| + | |1-3 |
||
|Thul wields an [[Amphis]] and is equipped with a [[Hind]]. Deploys [[Carabus|Carabus Sentinels]] that use a green healing beam on allies. |
|Thul wields an [[Amphis]] and is equipped with a [[Hind]]. Deploys [[Carabus|Carabus Sentinels]] that use a green healing beam on allies. |
||
|- |
|- |
||
|Vay Molta |
|Vay Molta |
||
|Hellion |
|Hellion |
||
| + | |3 |
||
|Highly mobile, this enemy can fire Swarm missiles from the air. Also wields a modified [[Jat Kittag]] which is capable of performing charging attacks and jetpack assisted ground slams. Jetpack can be destroyed, denying access to related attacks. Immune to knockdown (but not ragdolling). |
|Highly mobile, this enemy can fire Swarm missiles from the air. Also wields a modified [[Jat Kittag]] which is capable of performing charging attacks and jetpack assisted ground slams. Jetpack can be destroyed, denying access to related attacks. Immune to knockdown (but not ragdolling). |
||
|- |
|- |
||
|Olka Harkonar |
|Olka Harkonar |
||
|Sniper |
|Sniper |
||
| + | |2-3 |
||
| − | |She is a deceptive foe who deploys decoys similar to [[Mirage]] |
+ | |She is a deceptive foe who wields a [[Vulkar]] and deploys decoys similar to [[Mirage]]; these decoys are fully autonomous, attack for full damage, and are significantly more aggressive, but they are very fragile. Olka tends to hide farther away from opponents while her decoys and teammates attack. May switch to a [[Sheev]] if engaged at close range. Very likely to cloak herself from sight and radar if critically damaged; this does not protect her from attacks, although she does run much faster while escaping. |
|- |
|- |
||
|Gorth |
|Gorth |
||
|Tank |
|Tank |
||
| + | |3 |
||
| − | |Wields an [[Ogris]] and an [[Ack & Brunt]], and has an array of tools at his disposal. |
+ | |Wields an [[Ogris]] and an [[Ack & Brunt]], and has an array of tools at his disposal. Gorth is extremely durable - easily the toughest of the Executioners. |
|} |
|} |
||
Revision as of 09:31, 1 May 2016


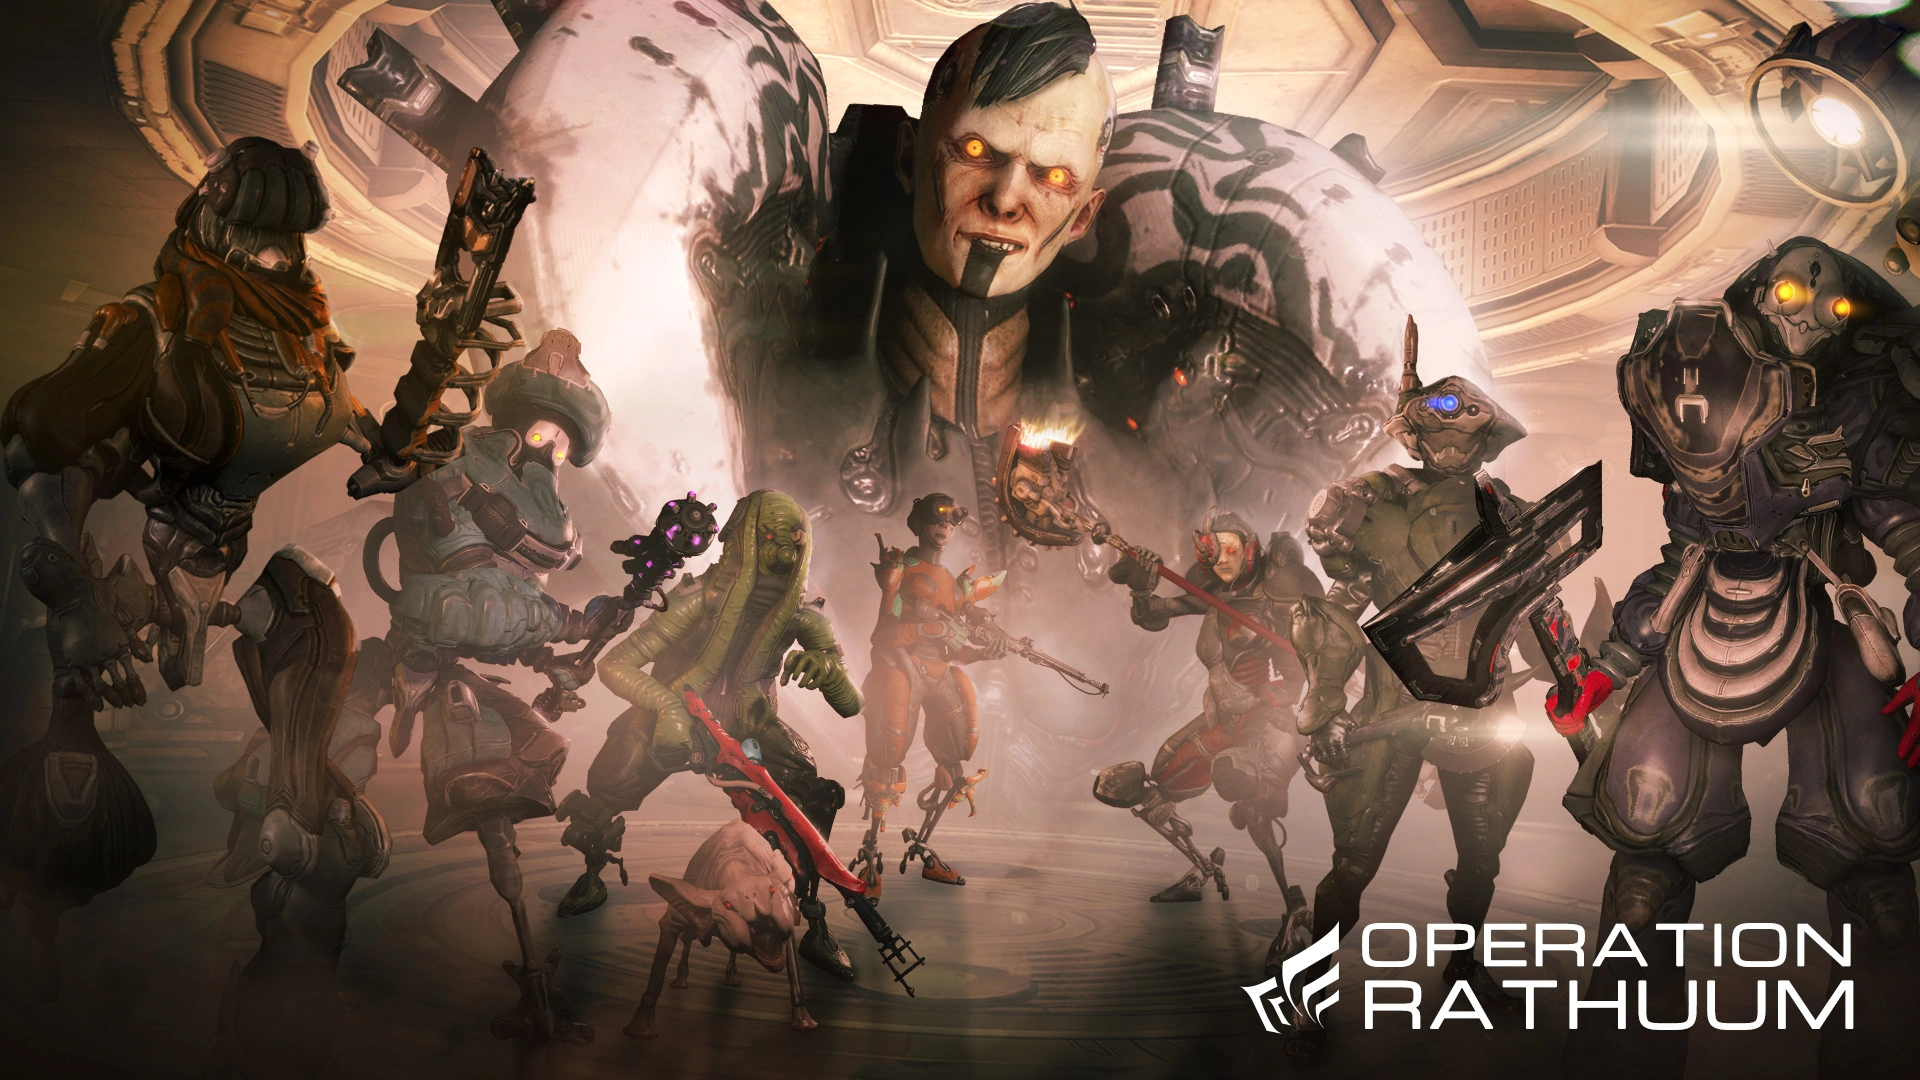
Operation: Rathuum is an event released with Update 18.10 (2016-04-29). Taking the place of Grineer defectors on behalf of Steel Meridian, the Tenno must prove themselves in Rathuum -Trial by combat held by the sadistic Kela De Thaym- in order to win the defectors' freedom. The event began on Friday, April 29, 2016 and will end on Monday, May 9, 2016 on PC.
What You'll Need To Do
Rathuum
- Rathuum uses a gametype called Arena, which is a modified version of Team Annihilation where players face off against Grineer executioners. The first team to attain 25 kills is the winner.
- Regardless of how many players are involved, the executioners will always outnumber the players by one member; thus a full Cell of 4 players will have to fight 5 executioners.
- All forms of Gear are disabled during the match (which also disables the use of Emotes) and players cannot bring along Companions of any sort.
- Before the match starts, a special modifier is applied and announced before the players are released. These modifiers are typically in favor of the executioners, making things more difficult for players.
- There are 3 special mission nodes located on Sedna where Rathuum is held, each more difficult than the last. Winning a round of Rathuum will award the players Judgement Points, which are used to unlock rewards and Rathuum nodes with higher level ranges. Winning a match can also reward a random Mod, Fusion Core pack or Credit Cache depending on the tier of the node.
- The first Rathuum node is unlocked from the start, and has a level range of 20-20. Winning a match at this node rewards 1 Judgement Point.
- The second Rathuum node requires at least 3 Judgement Points to unlock, and has a level range of 40-40. Winning a match at this node rewards 10 judgement Points.
- The third Rathuum node requires at least 10 Judgement Points to unlock, and has a level range of 60-60. Winning a match at this node rewards 25 judgement Points.
- Once the player accumulates 100 Judgement Points, an additional node will unlock where players must face off against Kela De Thaym in an Assassination mission, in order liberate the defectors. Take note that accessing this node spends 50 Judgement Points every time, so players who wish to acquire all of Kela's drops will have to get additional Judgement Points.
Assassinating Kela De Thaym
- Kela De Thaym's Assassination mission is largely identical to a typical Assassination mission, where players must locate the room where she spawns and defeat her.
- Unlike the Rathuum, players are free to use Gear and can bring Companions along.
- Once players reach Kela's boss room, they must activate a series of switches on the walls to fight her. There are four switches on each wall, and players must shoot the switches in order to progress to her arena above.
- Each group of switches is protected by a metal disc, with an aperture big enough for one switch. The whole mechanism is connected to a pressure plate that is activated when a player steps on it. When the plate is activated the disc begins to spin clockwise, and players must shoot the switch that has turned green in order to access Kela's arena. Be warned however, as the area is crawling with Armored Rollers that can stagger players off the pressure plates, impeding their progress.
- The number of switch groups is tied to how many players are there in the Cell; if there is only one player, then only on switch group must be interacted with, and so on.
- When all the necessary switch groups have been interacted with, the platform in the center of the room lifts, transporting players to Kela's arena. After the cutscene, Kela jumps into the arena and battles the players.
- Kela is incredibly agile, jumping from platform to platform and even grappling on the upper edges of the arena. Kela can summon Armored Rollers, and can launch a salvo of grenades or missiles, laying waste to a large area.
- Once her health dips below certain points, Kela retreats to a nearby balcony, and the arena is bombarded via orbital strike every few seconds. In order to halt the orbital strike and lure Kela back into the arena, players must shoot switch groups similar to the ones below the arena, complete with Armored Rollers to hinder players.
- Unlike the switch groups below, players must deal with all four switch groups regardless of player count, and they must shoot each switch in order uninterrupted. Every successful shot causes the disc to spin faster as well, and players only have a limited window of time before the orbital strike begins again.
- Players only have about 15 seconds to activate the switches during the first orbital strike, and only 10 seconds during the second orbital strike.
- When Kela is defeated, she is guaranteed to drop a Grineer-themed mod. She also has a chance to drop the blueprint for the Twin Kohmak. The Grineer-themed mod is unknown until players reach extraction, discouraging players from prematurely ending the mission if they get an undesired mod.
- Players will also be rewarded a random Saryn component once they reach extraction.
- Defeating Kela for the first time also awards players with the coordinates of the defectors' location. Once the players are back on the landing craft, they will receive a message from Steel Meridian, requesting that they turn over the coordinates to them so they can rescue the defectors.
- If the players have a Syndicate(s) whose Standing is higher than Steel Meridian's, they will also send a message requesting that the player turn over the coordinates to them instead. Regardless of who they choose, the coordinates are worth Template:Ss, and any alignments that Syndicate may have will also gain or lose Standing (i.e. giving the coordinates to Cephalon Suda will result in bonus Standing for the Arbiters of Hexis, and Standing penalties for the Red Veil and New Loka).
Endurance
- Defeating Kela De Thaym will unlock one last Rathuum node, where players must last for as long as possible and gain as many kills as possible before they all die. Players must get at least 25 kills to be eligible for the reward; an Orokin Reactor.
- Unlike the previous Rathuum matches before it, players will only have one life; if they die, they will not respawn.
What You Need To Know
- As with most Conclave maps, designated locations periodically resupply Tenno with Ammo, Health Orbs and Energy Orbs.
- The Health Orbs will restore 150 health, while the Energy Orbs will restore 50 energy.
- The following is a list of all the possible Rathuum modifiers players may encounter;
| Modifier | Effect |
|---|---|
| Half Energy | Players' maximum energy reserves are reduced by 50%, after taking mods into account. (Rathuum 2) |
| Half Health | Players' maximum health is reduced by 50%, after taking mods into account. (Rathuum 2) |
| Half Shields | Players' maximum shields is reduced by 50%, after taking mods into account. (Rathuum 2) |
| Health Drain | Players will gradually lose health. Killing an enemy will instantly restore they player's health to full. (Rathuum 3) |
| Low Gravity | Gravity is reduced, affecting all airborne Maneuvers. (Rathuum 1) |
| Quick Respawn | Executioners and Players will respawn in 2 seconds, as opposed to 8 seconds. (Rathuum 1) |
| Scaling Enemies | The levels of the Executioners go up each time they are killed, increasing their durability and damage. (Rathuum 3) |
| Speed Boost | The sprint speed of the players is significantly increased. (Rathuum 1) |
Rewards
| 3 Judgement Points | 10 Judgement Points | 100 Judgement Points | 25 kills in Endless Rathuum |
|---|---|---|---|
 |
|
||
|
|
A Forma blueprint or one of the following stance mods can drop as end-of-mission rewards:
- Rathuum 1: Pointed Wind, High Noon, Four Riders, Tranquil Cleave
- Rathuum 2: Crushing Ruin, Final Harbinger, Vermillion Storm, Stalking Fan, Decisive Judgement
- Rathuum 3: Crimson Dervish, Astral Twilight, Blind Justice, Tempo Royale, Vengeful Revenant
In addition to the above rewards, there are a number of mods that Kela De Thaym drops when killed:
- Electromagnetic Shielding
- Acid Shells
- Fomorian Accelerant
- Harkonar Scope
- Hunter's Bonesaw
- Nightwatch Napalm
- Rift Strike
- Vulcan Blitz
- Medi-Ray
Enemies
The enemies you'll be facing are a new breed of Grineer – deadlier, different, and destructive. Good luck taking them down, Tenno!
| Executioner | Type | Tier | Abilities |
|---|---|---|---|
| Zura | Summoner | 3 | Summons Hyekka to aid her in battle. She wields an Ignis and Ripkas. Is functionally identical to a normal Hyekka Master, but with improved stats and the additional melee weapon. Her Hyekka can deal considerable damage with their attacks and are not dismissed when Zura is killed. |
| Garesh | Charger | 1-3 | Sneaks up on players and attacks them with his Twin Basolk. Garesh tends to teleport into close range when he can, appearing behind players to surprise them; he can also throw his Basolk as shock traps in a manner similar to Captain Vor's Nervos Mine attack. Immune to knockdown (but not ragdolling). |
| Technician Reth | Engineer | 2-3 | Deploys Roller Turrets and Magnetic Traps as he navigates through the level. Roller Turrets must stop in place to arm themselves. Magnetic Traps self-destruct when in range of a Tenno and deliver a shock that completely drains Energy but not Shields. Magnetic Traps make sounds and can be destroyed like Arc Traps, and are typically placed in the same locations on the map, near powerup spawns and blind spots in bottlenecked areas. Wields a Drakgoon, making him deadly up close. |
| Inquisitor Nok | Grunt | 1-3 | Equipped with a Sobek and a Sheev. Don’t get too close. Also deploys Carabus Sentinels that seek and destroy with an incendiary beam attack. Aside from his shotgun and drones, Nok is a somewhat uncomplicated and unthreatening opponent. |
| Dok Thul | Medic | 1-3 | Thul wields an Amphis and is equipped with a Hind. Deploys Carabus Sentinels that use a green healing beam on allies. |
| Vay Molta | Hellion | 3 | Highly mobile, this enemy can fire Swarm missiles from the air. Also wields a modified Jat Kittag which is capable of performing charging attacks and jetpack assisted ground slams. Jetpack can be destroyed, denying access to related attacks. Immune to knockdown (but not ragdolling). |
| Olka Harkonar | Sniper | 2-3 | She is a deceptive foe who wields a Vulkar and deploys decoys similar to Mirage; these decoys are fully autonomous, attack for full damage, and are significantly more aggressive, but they are very fragile. Olka tends to hide farther away from opponents while her decoys and teammates attack. May switch to a Sheev if engaged at close range. Very likely to cloak herself from sight and radar if critically damaged; this does not protect her from attacks, although she does run much faster while escaping. |
| Gorth | Tank | 3 | Wields an Ogris and an Ack & Brunt, and has an array of tools at his disposal. Gorth is extremely durable - easily the toughest of the Executioners. |
Scans are automatic when an Executioner dies, so players do not need to use workarounds such as Ore Gaze to ensure that the Executioners are scanned and added to their Codex.
Clan Trophy Rewards
Clan Rewards: All participating Clans will receive an event trophy for their attempts on the bonus final endurance missions. The following table lays out which Trophy your clan will earn depending on the Sum of all participating Members best Endurance Round.
| Clan Tier | Terracotta Trophy | Bronze Trophy | Silver Trophy | Gold Trophy |
|---|---|---|---|---|
| Ghost | 25 Executioners | 50 Executioners | 75 Executioners | 100 Executioners |
| Shadow | 75 Executioners | 150 Executioners | 225 Executioners | 300 Executioners |
| Storm | 250 Executioners | 500 Executioners | 750 Executioners | 1000 Executioners |
| Mountain | 750 Executioners | 1500 Executioners | 2250 Executioners | 3000 Executioners |
| Moon | 2500 Executioners | 5000 Executioners | 7500 Executioners | 10000 Executioners |
Notes
- Players will automatically gain executioner scans throughout the duration of Rathuum. No need to equip special gear or the Helios sentinel.
- Fighting Kela currently requires 100 Judgement Points, yet only costs 50 Judgement Points once completed.
- If you have more Standing in any Syndicate other than Steel Meridian , they will send two messages alongside Steel Meridian's that first comment, then ask for the Defectors location. In any case, handing over the information simply grants an instant +10,000 affinity for that faction, with no repercussions from the other.
- Any syndicate can be given the Defector's location, regardless of affiliation.
- Remember that gaining standing with one Syndicate will deduct standing from Syndicates that are enemies with said faction.
- Only the syndicate with the most Standing will send the messages.
Media

Warframe How to Operation Rathuum