Mastery Ranking, commonly abbreviated as MR, is a method of tracking how much of the game's total content a player has experienced with points earned by ranking up Warframes, Weapons, Companions, and Archwings with Affinity and also successfully completing Junctions and nodes on the Star Chart.
Players can view their own Mastery Progress and Rank by hovering the cursor over their Avatar on the top left corner of the UI. The profiles and Mastery progress of the player and other squad members can also be viewed by clicking "Profile" under their equipment tab. These details of other players in chat or in communications can be viewed by selecting their name and clicking "Profile."
Increasing Mastery Rank
Mastery Points
To increase Mastery Rank, a player must earn Mastery Points through the following methods:
- Ranking Weapons, Sentinel weapons, and Archwing weapons will earn 100 mastery points for each rank gained up to Rank 30 for a total of 3,000.
- While Weapons do include Zaws and Kitguns, modular weapons of those types must be ranked up to 30, gilded at their respective vendors, then ranked up again to award mastery points.
- Certain special weapons can exceed Rank 30 and these weapons will continue to grant 100 mastery points for each additional level until they reach their max.
- Ranking Warframes, Companions, Archwings, and K-Drives will earn 200 mastery points for each rank gained up to Rank 30 for a total of 6,000.
- Though modular in nature, unlike Zaws and Kitguns, K-Drives do not require gilding to be able to award mastery points.
- Clearing the main objective of any Mission node for the first time and extracting will grant a predetermined number of mastery points (Map progress can be viewed in the general stats in the profile menu).
- Victory against the opponent frame in a Junction grants 1,000 mastery points.
- Each rank of a Railjack's Intrinsics grants 1,500 mastery points.
Take note that each individual equipment will only grant its mastery points once per variant; polarization or selling a Rank 30 equipment and then purchasing & reusing it will not grant mastery points again, including in the event that a copy of already max-ranked equipment is obtained and used. If equipment below max rank are sold, then purchased and reused, only the ranks previously not gained will grant mastery points.
Variants of original equipment count as a different equipment for mastery ranking; MK1, Prime, Syndicate, Vandal, Wraith, Prisma, the ![]() Mara Detron, and Akimbo/Dual variants. For example,
Mara Detron, and Akimbo/Dual variants. For example, ![]() Braton,
Braton, ![]() MK1-Braton,
MK1-Braton, ![]() Braton Vandal, and
Braton Vandal, and ![]() Braton Prime are all considered different weapons, each with their own set of mastery points, with a total of 12,000 mastery points for fully ranking all four weapons. The same goes for different breeds of same-species Companion such as Chesa Kubrow, Raksa Kubrow, and Helminth Charger. Completing missions in The Steel Path also awards mastery that is separate from normal missions and Junctions.
Braton Prime are all considered different weapons, each with their own set of mastery points, with a total of 12,000 mastery points for fully ranking all four weapons. The same goes for different breeds of same-species Companion such as Chesa Kubrow, Raksa Kubrow, and Helminth Charger. Completing missions in The Steel Path also awards mastery that is separate from normal missions and Junctions.
Excess mastery points are not lost if a player reaches the amount required to advance a rank – these will automatically fill the next mastery bar, displayed only once the player has succeeded on the rank-up test.
Mastery Rank Tests
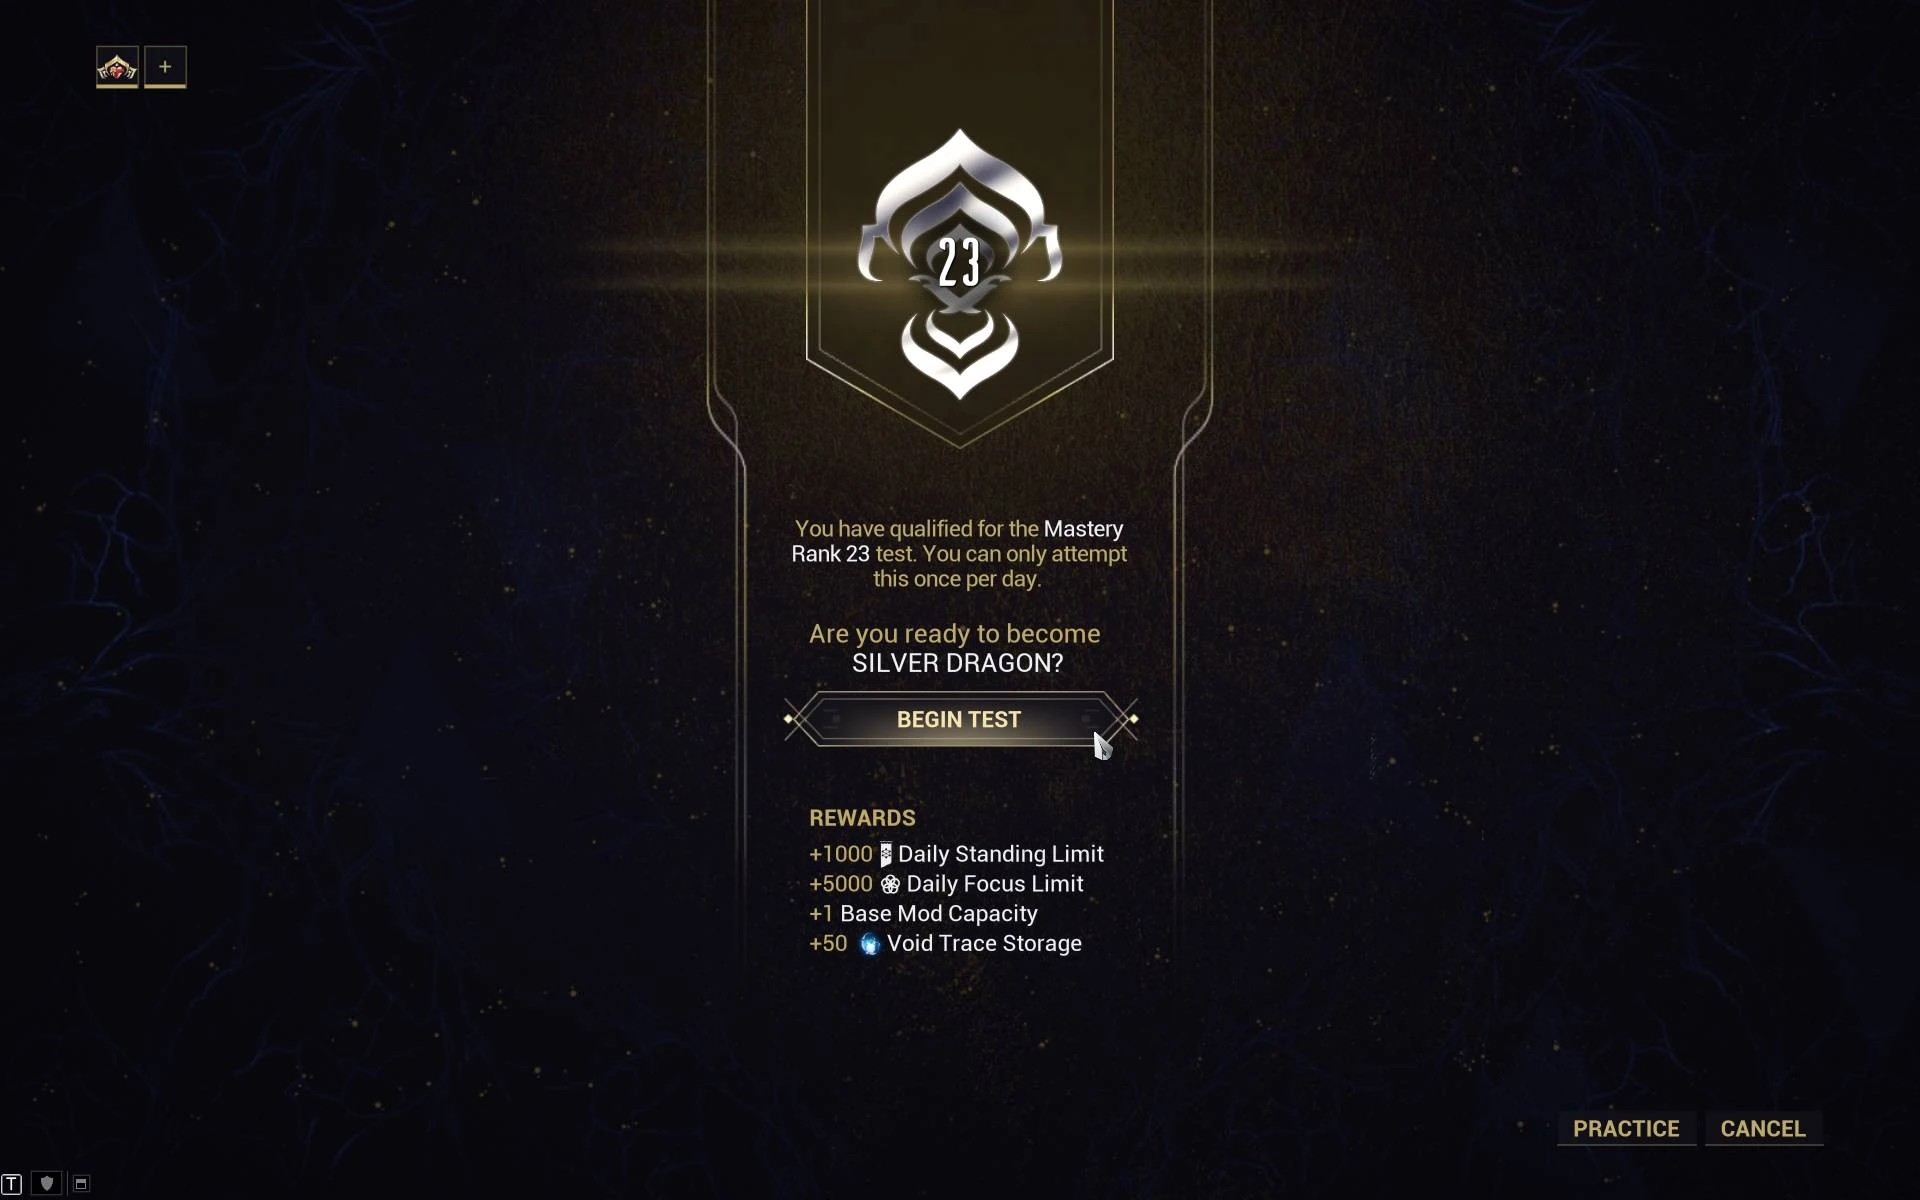

Mastery Test prompt with option to practice
In order to be promoted to the next Mastery Rank, a player must pass a test for each progressive rank they are trying to achieve. Mastery tests can only be accessed in solo play, and require the player to bring a full arsenal regardless of any in-test weapon restrictions. Each test is different and usually harder between ranks.
When a player becomes eligible for their next Mastery Rank they will be alerted and be given the option to proceed to the test immediately or wait. If the player chooses to wait they can access the test by simply hovering over their profile icon and selecting the "Rank Up" option later. The player's next Mastery Rank test will also be available for practice and, if eligible, for rank up in Cephalon Simaris' Relay room, as well as the players past completed Mastery Rank tests.
There is a 24-hour lapse in between consecutive attempts, whether having failed and to retake the current test or having succeeded previously and to qualify for the next rank.
It is recommended players go along the right aisle of the Cephalon Simaris room in most relays to practice for the current test beforehand. Outside of practice mode, inability to complete a test due to forfeiting or disconnection will consume the allowed attempt for the current day.
Players are also able to redo previous tests along the Cephalon's aisle. Players will be able to access all the tests previously passed, as well as the one for the next level.
The Operator cannot be used for Mastery Rank tests at 23 and below.
Tests for Rank 1-10
- Exterminate Test (Primary)
- This test requires players to exterminate three waves of enemies with their primary weapon.
The player starts in the center of a room encircled by eight pillars. From here they must eliminate 3, 5 and 8 enemies within 1:00, 2:00 and 3:00 for each wave respectively.
- Exterminate Test (Secondary)
- This test requires players to eliminate three waves of enemies with their secondary weapon.
The player starts in the center of a room encircled by eight pillars. From here they must eliminate 8, 12 and 16 enemies within 0:45, 1:00 and 1:15 for each wave respectively.
- Exterminate Test (Melee)
- This test requires players to eliminate three waves of enemies with their melee weapon.
The player starts in the center of a room encircled by four pillars. From here they must eliminate 5, 7 and 9 enemies within 0:45, 1:00 and 1:15 for each wave respectively.
- Survival Test
- This test requires players to endure an unlimited onslaught of Infested for a given period of time.
The player starts in the center of a room surrounded by several walls and platforms. From here they must survive for 1:30.
- Tips
- Leaving the center will relocate players to starting center instead.
- Stealth skills can be used to complete the test without issue.
- Terminal Hacking Test
- This test requires players to hack six terminals within a time limit of 1:45.
The player starts in the center encircled by terminals. From here they must hack three Grineer terminals and three Corpus terminals to pass the test.
- Tips
- Failed hacks do not automatically fail the test, so long as they are completed before time limit ends.
- You may use Ciphers, despite the test's purpose.
- Target Tracking Test
- This test requires players to track targets quickly and accurately.
The player starts the test standing on a brightly lit circular platform in a dark room encircled with metallic spheres. The player's camera will be turned toward the first target at the beginning of each round. Upon shooting the first target, lines will connect unlit spheres in succession before stopping at another target, this process will repeat itself until the test has ended.
- Tips
- Upon missing the white sphere, the original red sphere will be voided, reverting into a normal sphere. A new red sphere will appear elsewhere, thus it is better to take your time aiming rather than attempting to rush your aim.
- Any accurate weapon with a large magazine size (to avoid wasted time reloading) will do nicely. Shotguns are also a viable option since the test counts one shot per round, not per pellets.
- Timed Exterminate Test
- This test requires players to eliminate three waves of enemies within 1:00.
The player starts in the center of a white room with pillars circling the center. Grineer, Corpus, and Infested units will spawn in waves and must be dispatched of before time ends.
- Tips
- Remain near the center of the room.
 Enemy Sense or Enemy Radar can help you find all enemies.
- Sentinels can help with eliminating targets.
- Movement Test
- This test requires players to jump across several platforms, with a varying distance between each one. Shooting the red orbs that appear spawns the next platform. Players have three tries to complete the test; any fall from the platforms counts as a try.
- Tips
- This test is not timed, so give yourself some time to gauge each distance before you jump.
- Using advanced movement maneuvers (Bullet Jump, Double Jump, Wall Dash and Aim Glide) is necessary. If you have no experience with them, expect to have to try the test in practice mode (at Larunda Relay, Mercury, with Cephalon Simaris) several times. Note: bullet-jumping from a crouch rather than a slide makes this trial MUCH easier.
- You are limited to your secondary weapon for this test, so make sure to bring one with at least some range (and not, say, Atomos), or you might have trouble reaching the spheres.
- First red orb: Bullet-jump to the platform. Remember to look up, not at the platform, while doing so, to jump higher.
- Second red orb: Double-jump to the first platform, then bullet-jump to the second.
- Third red orb: Bullet-jump to the platform.
- Fourth red orb: Bullet-jump towards the wall, then wall-jump up it to land on the platform at its top. Jump to the next platform.
- Fifth red orb: Bullet-jump towards the nearest, lower platform, again looking up. Then at the apex of your jump, aim-glide towards the platform in order to be able to reach it. Once landed, bullet-jump up to the final platform marked with a bright arrow.
- Stealth Test
This test requires players to make use of cover and track enemy movements in order to assassinate targets without being detected using their equipped melee weapon only.
Players start in a room equipped with only their melee weapon. They make their way through three stages with increasing numbers of enemies and increasingly complexity patrol routes. Successful elimination of all enemies in a stage will unlock the next one.
Players are allowed three tries. Alerting an enemy counts as a try and will reset the stage. Falling off a platform does not count as a try. Also, there is no time limit.
At any point in time each enemy will be in one of 4 alert states: "Calm", "Investigative", "Suspicious" and "Alerted".
- "Calm" is the default state all enemies start in. They will be slowly patrolling along their predefined patrol routes, speaking random phrases in their language. They can be killed with a stealth finisher while in this state.
- "Investigative" is the state an enemy enters when they briefly see the player for a split second. E.g. showing to an enemy from behind the pillar then quickly hiding back in is what could cause this state to be activated from "Calm". They will pronounce a suspicion phrase that sounds like a question, and alter their patrol course to start moving to the point where they saw the player. The test does not yet fail if an enemy enters this state.
- "Suspicious" is when they see the player for longer still than what is required to enter "Investigative" state. E.g. falling off the platform in front of an enemy is an example of what could cause them to enter this state from "Calm". They will pronounce a suspicion phrase, then simply stop dead in their tracks and wait for a few seconds. In this state they cannot be killed with a stealth finisher. If they don't see a player within several seconds, they will fall back into "Calm" state and continue patrolling. The test does not yet fail if an enemy enters this state, and in fact it is quite possible to kill a nearby enemy that is transitioning from "Calm" into "Suspicious" state without failing the test.
- "Alerted", is the state an enemy in "Suspicious" state enters when they only glance momentarily at a player. The test instantly fails, even if you subsequently kill the enemy that entered this state.
- Tips
- Primary and secondary weapons, as well as abilities and companions, are disabled.
- Ranged melee weapons like the Glaive or the Redeemer can be used for taking out enemies from a safe distance.
- Note that the Redeemer is not silent and cannot be silenced with any mods, although Banshee's Passive Ability can counter this.
- Skiajati's passive can make the player go invisible on Finishers.
- Enemies can see far ahead of them in a cone-shape that expands with more distance. The sounds of running, jumping and falling do not alert them. Swinging your weapon will not alert them either, except if they are in a close proximity.
- Enemies are also very weak; one melee hit kills them.
- Increasing field of view in the options helps in glancing around corners.
- Mods that increase enemy radar ( Enemy Radar, Enemy Sense, Vigilante Pursuit) are extremely useful. It is also useful to open the full map (default M ) immediately on starting the test.
- Hitting ESC will pause the test, which is very useful when following a video walkthrough.
- Walkthrough
- First stage: Three enemies. Kill the immobile enemy whose back is turned. Wait until one of the other two is hidden behind the pillars and the other has his back turned; run up to and kill that one. Then jump to the top of a pillar; the enemy can't see you there and you can jump down and kill him from behind at your leisure.
- Second stage: Four enemies, two at ground level and two on an elevated walkway. Run towards one of the pillars closest to you and jump up it; the lower two can't see you and you can jump down to kill them whenever it's convenient. Then move below the walkway, keeping the other two in view; they can't see you standing below them, so you can jump up behind them and kill them whenever they are far away from each other.
- Third stage: Six enemies, three in the courtyard enclosed by pillars nearer to you, and three towards the back. First, kill the nearer three: As soon as they appear, run towards the closest pillar on either side and hide. Wait until you are out of line of sight and kill the three enemies one at a time whenever convenient. Then, kill the two in the far corners: Move towards them, hiding behind pillars, and kill them when their back is turned. Finally, watch the last one on his small platform: when his back is turned, jump carefully up behind him and kill him.
- Disappearing Platform Test
- This test requires players to eliminate targets at range while maneuvering on platforms in a 3x3 grid that will permanently disappear after a few seconds of standing on them.
The player will spawn in on a normal platform and the test will begin once you enter the grid area. You must kill all enemies spawning periodically atop five elevated platforms which line the far end of the grid. Once the player steps on a platform it will begin flashing increasing in speed until it disappears 8 seconds later.
Players have three chances to complete the test. Falling from the tileset counts as a try.
- Tips
- The number of targets is always 15, or, approximately, 1.6 per platform.
- It is recommended to go on all the edge platforms then use the one in the very middle to make use of all platforms and provide additional time.
- There are invisible walls preventing players from accessing the elevated platforms.
- Using Titania's Razorwing form or Ivara's Dashwire arrows from Quiver to connect ziplines to platforms can make this test trivial.
- Using a Continuous Hit-Scan weapon, such as the Quanta can make hitting targets easier.
- Using the Ignis can make the test inconsequential; as without having to aim precisely, you are free to focus on ensuring you have a safe platform to stand on. Sinister Reach is suggested for this approach, but not required.
- It is possible to stand on a tiny protrusion on one of the enemy platforms removing the urgency to maneuver the disappearing platforms.
Tests for Rank 11-20
- Time Trial Test
- This test requires players to make their way through an obstacle course while shooting red orbs to increase the amount of time they have to finish the course. Each orb adds 3.5 seconds of time.
- Tips
- Fast moving frames such as Volt or Loki are very handy for this test as speed can significantly ease completion.
- Using Zephyr's Tail Wind can make it possible to reach the end of the test without the need to go through the entire course. Especially the maze towards the end as she can go over the walls.
- Be sure to bring hitscan weapons as well, as some orbs move. At one point, you will take a hovering platform slowly up, during which moving orbs will appear. It is critical to shoot these as the time it takes for you to reach the top may run your time out.
- When attempting to complete the challenge, it is best to keep moving in the case that you miss an orb. Stopping to shoot the orb can result in you basically using the time you just gained.
- Using Titania's Razorwing allows the player to fly through the test.
- Carousel Test
- This test requires players to eliminate enemies while being aware of their surroundings.
Players start on a platform facing a carousel-like structure with two disks connected with a large pillar at their centers. Between the disks are a set of lasers which separate the quadrants of the disks and slowly rotate around the disks, essentially circling the "carousel".
The object of the test is to reach the carousel, eliminate 16 enemies spawning on the outer disk, all while avoiding the moving lasers.
- Tips
- The lasers move at about walking speed, and position can be judged by the set in front of the player.
- The lasers heavily damage shields, but the player is permitted to use revives available to them if they die.
- Rhino's Iron Skin can prevent this instant kill.
- Ivara's Prowl with Infiltrate augment can be used to easily pass this test, as players will be able to walk through lasers unharmed and will still be able to kill enemies on the outer ring.
- Limbo's Rift Walk can be used to pass through the lasers unharmed.
- Using Titania's Razorwing allows the player to fly above most of the lasers and towards the enemies, killing them easily.
- Wukong's Cloud Walker ability allows you to pass through the lasers unharmed. His passive 5 masteries of death can also allow you extra revives.
- A relatively accurate weapon is recommended, as the enemies are at mid to long range.
- Sentinels with Deth Machine Rifle or Stinger can help with eliminating targets.
- Ballistica, its burst fire producing a projectile "fan" when mobile, makes this test trivial.
- Advanced Disappearing Platform Test
- This test requires players to eliminate enemies while remaining extremely mobile.
Players start facing a number of platforms surrounded by walls which can be run across. Once the player touches a platform, it begins to flash increasingly rapidly and will disappear after a few seconds. The platforms are arranged with one in each corner, and three stacked vertically in the center.
Players have three tries to eliminate all enemies on surrounding platforms. Each fall counts as a try and returns all previously exhausted platforms.
Companions cannot be used in this test.
- Tips
- The number of targets is always 16, or, approximately, 2.3 per platform.
- Plan the order by which you will use the platforms, to avoid getting stuck in a corner.
- Utilize Power Wall Climbing to stand on top of walls and shoot enemies easier above disappearing platforms.
- Mesa can use her Peacemaker ability to take this test.
- Titania can use her Razorwing ability to hover above the platforms, and ignore the mechanic. Since you only start with 50 energy in the test, using either a Squad Energy Restore or Preparation is suggested.
- Similarly Zephyr can use her charged Tail Wind ability to hover, delaying the need to move to the next platform.
- Using the Akarius makes this test extremely inconsequential, since the homing rockets fired out of the gun explode upon hitting the ground and deal splash damage.
- Advanced Exterminate Test
- This test requires players to eliminate three waves of enemies of levels 15-20.
The player starts on the first level of a tower with multiple cover points and must eliminate targets until they are warped to the next level. There are three waves with Grineer, Infested, and Corpus units respectively.
- Tips
- Be careful of the gaps in the level.
- Transference and Companions (except Venari) are disabled, so try to use a well-rounded loadout.
- It appears that there is no time limit.
- Enemy numbers: 10 Grineer, 20 Infested (including both crawlers and ospreys), 15 Corpus.
Warframe - Mastery Rank 15 Test
- Interception Test
- This test requires players to capture and hold points in an Interception mission.
- Tips
- Some targets may not be standing on the same Interception point or are being blocked by consoles. Punch Through will be of some use mitigating this issue.
- You can use a specter to protect one of the points.
Warframe - Mastery Rank 16 Test
- Defense Test
- This test requires players to defend a Cryopod for 3 waves of level 25 to 30 Corpus.
- Wave 1: 8 enemies; Wave 2: 12 enemies; Wave 3: 16 enemies
- Tips
- Taking Frost and using Snow Globe will help you complete this test easily.
Warframe - Mastery Rank 17 Test
- Advanced Timed Exterminate Test
- This test requires the player to kill 30 Infested targets within a time limit.
- Tips
- Taking Wukong and using Celestial Twin can make the test fairly simple by having the twin use your primary weapon to kill the enemies while you use your melee to hit the orbs as they spawn.
- There will be a sphere that upon destruction will grant the player +7 seconds. It can only be harmed with melee.
- Thrown melee weapons like Glaive, Kestrel and Halikar don't deal any damage to the spheres when thrown.
- Spin attack of Telos Boltace can destroy the spheres. As the spheres have object-based health, line of sight is not required to damage them.
- The charge attacks from Redeemer and Sarpa cannot harm the spheres.
- Thrown melee weapons like
Warframe - Mastery Rank 18 Test
- Advanced Defense Test
- This test requires the player to defend a Cryopod for 5 waves of level 25 to 30 Corpus.
- Enemies per wave – Wave 1: 8; Wave 2: 12; Wave 3: 16; Wave 4: 18; Wave 5: 20.
- Tips
- Taking Frost and using Snow Globe will help you complete this test easily.
Warframe - Mastery Rank 19 Test
- Stealth Rescue Test
- This test requires the player to destroy six orbs without being detected by the 12 patrolling Grineer Lancers, and then escort a rescue target to the extraction point.
- Tips
- The player gets three attempts to complete the test without detection, after which the test will fail.
- Primary and Secondary weapons are restricted, you only have access to your Melee weapon.
- Active warframe abilities are disabled, however passive abilities (such as Banshee's Hush) remain in effect.
- Ranged melee weapons like the Glaive, the Redeemer, or the Orvius are ideal for taking out enemies from a safe distance.
- The Orvius' channeled throw auto-aims for heads and also destroys bodies which makes it a perfect choice.
- Note that the Redeemer is not silent and cannot be silenced with any mods, although Banshee's Passive Ability can counter this.
- Bug: After falling off the map the Redeemer sometimes becomes unusable, the regular melee attack nor the special (ranged) attack work. This also disables air glide. The only complete solution is to retake the trial since even failing the attempt in progress doesn't fix the issue. Workaround: assuming one managed to kill all the enemies beforehand, or at least the majority, it is possible to destroy an orb using "flying kick". One has to take a good running start, aim at the orb, run, bullet jump and press and hold crouch (CTRL ) while in the air until the orb is hit. This may not destroy it at first so it might take a few attempts. Moreover, the orb sometimes explodes spontaneously soon after hitting it.
- As of Update 28.0 (2020-06-11), equipment and gear items are disabled during the test.
- Archgun Deployer cannot be used.
- Ivara's passive as well as mods such as Enemy Radar, Enemy Sense and Vigilante Pursuit will allow you to see enemies on the minimap, making locating and avoiding them easier. Using Rush, Armored Agility, and Speed Drift will allow you to sneak up on enemies quicker, and Coaction Drift will increase the Enemy Radar further.
- Wisp's passive invisibility during jumps and aim-glide works very well with aim-glide mods and enemy radar. Jumping continually, landing behind and melee attack clears the map easily.
- Rakta Dark Dagger will help you sneak up on the enemies, as this weapon reduces enemy visibility. You will need to ensure that it can damage the enemies quick enough or you will be detected.
- Using the Skiajati can trivialize the test, because its unique ability (five seconds of invisibility on Finisher attacks) functions during the test.
- The best approach is to ignore the orbs and first observe the enemies' patrol patterns and eliminate them one by one. Once all enemies are down, get all the orbs, then get the rescue target. Most importantly DO NOT RUSH the test - a slow and methodical approach makes this test much simpler.
- Open Mission Progress with (ESC } > View Mission Progress, or TAB ) to see how many Grineer enemies have been killed so far. There is a total of 12 Grineer enemies in the test, and they never respawn once killed.
- In Practice mode there are up to ~20 enemies, instead of 12.
Warframe - Mastery Rank 20 Test
- Archwing Time Trial Test
- This test requires the player to fly between two platforms in Archwing mode before the timer runs out. There is a series of rings between the two platforms that grant additional time of 2 seconds when flown through. The player starts out with 10 seconds.
- Tips
- Your Warframe's Sprint Boost aura mod and max or nearly max Hyperion Thrusters will make quick work of this mission. You should also sprint (with toggle on) and immediately go for afterburners, and use blink between the rings.
- Using Blink will NOT take you through the rings, and thus will NOT add additional time.
- Naturally, take Itzal into this mastery test to grant you an upper edge on the challenge thanks to its higher base speed speed.
Tests for Rank 21-30
Warframe - Mastery Rank 21 Test
- Timed Exterminate Test
- This test requires the player to kill 35 enemies before the timer runs out. The player must destroy several orbs with their melee weapon to extend the timer, which spawn in random locations around the map.
- Tips
- The timer starts at 20 seconds, and each orb adds 15 seconds to the timer.
- A total of 8 orbs will spawn, after which the player will be unable to further increase the remaining time.
- Ranged melee weapons, such as the Glaive and Excalibur's Exalted Blade can be used to destroy the orbs from a distance.
- The map is very vertical, and thus an agile loadout is preferred. Consider bringing a Bullet Jump mod to help travel between platforms.
- Utilizing a Warframe with AoE abilities such as Ash, Ember, and Saryn, will allow the player to eliminate enemies with minimal effort.
Warframe - Mastery Rank 22 Test
- Arena
- This test consists of three rounds requiring the player to kill 12 / 18 / 24 Executioners (level 40). The player is given 3 respawns before the mission will fail. Executioners will spawn in pairs, a maximum of 6 simultaneously. The first round has a speed boost modifier, the second round has a health drain modifier (drains 100 health periodically until you have 3 health, killing enemies restores all health) and the third round has a scaling enemies modifier. Falling out of the map uses one respawn.
- Tips
- Falling off the arena counts as a death. Take extra precautions to avoid the edge of the platforms or being knocked over them.
- As gear use is not allowed, it is advisable to equip Energy Siphon, Streamline, or Fleeting Expertise for energy regen/ability efficiency.
- Ash's Blade Storm can make quick work of the Executioners.
- Rapid Resilience is recommended to help counter enemy Script error: The function "Proc" does not exist. procs.
- Ammo is not replenished between rounds; bring ammo efficient weapons.
- There are ammo, health, and energy spawns scattered around the map; energy is marked on the map with a blue circle, ammo and health have no markers.
- Loki trivializes this test. Put on Vitality to minimize accidental death in the second round due to health drain.
Warframe - Mastery Rank 23 Test
- Mobile Point Capture Test
- This test requires the player to capture 6 mobile control points before the timer runs out by standing within a radius as they move along set paths. Various types of Grineer enemies will spawn throughout the map, attacking the player as they capture the points. Capture progress will quickly decay while the player is outside of the white radius. The point will gradually turn green and then stop moving upon reaching 100%.
- Tips
- The player has 5 minutes to capture all 6 control points, with no way to increase the remaining time.
- The points can move very fast along certain paths, making it particularly difficult to aim at the surrounding enemies. Therefore, area-of-effect weapons and abilities are highly recommended.
- Control of an incomplete point will rapidly decay if it is not actively being captured.
- Area-of-effect crowd control abilities can trivialize the test if modded for sufficient range and duration.
- Some of the control points move much faster than base movement speeds. Equipping max rank Rush, Armored Agility, and Sprint Boost together grants enough speed for most Warframes to keep up with all but the fastest points with little effort.
- There are no sources of energy outside of enemy drops, so Energy Siphon and high Ability Efficiency are recommended.
- High duration Loki is ideal as it will allow players to ignore incoming damage by utilizing Invisibility.
- Limbo trivializes this test. Using Rift Walk at the beginning of the test, Limbo can remain in the Rift Plane indefinitely, effectively becoming immune to all damage for the duration of the test at no cost.
Warframe - Mastery Rank 24 Test
- Operator Test
- This test requires the player to use their Operator to destroy an orb in the center of a small arena, while being attacked by Infested Brood Mothers. The player is given 3 respawns before the mission will fail.
- Tips
- The player has 3 minutes to destroy the orb, with no way to increase the remaining time.
- The Operator is stripped of their Amp, and thus must carefully choose between using energy for Void Dash, Mode, Blast, or Beam.
- Dying during the test allows the player to use their equipped amp (with ammo separated from energy), focus upgrades, and Arcanes for the remainder of the test (bug?), making the test much simpler easier.
- Despite how short the obstacles on the arena appear, they cannot be stood on, even using Void Dash.
- The orb's size and hitbox shrink as it takes more damage. It will regenerate over time if it stops taking damage.
- There are two respawning energy orbs on opposite sides of the arena. Use these to your advantage.
- Falling off the platform will not kill the Operator, but it is still recommended to be careful, as reappearing on the platform can trigger the heavy landing animation and leave them open to attack.
- Void Mode will detach Maggots, though it will not kill them and they and can leap back onto the player at will, lifespans excepting.
- Void Dash is effective for evading Maggots, and will also remove any Maggots attached to the Operator. Dashing through enemies will replenish a little energy as well as damage them.
- Brood Mothers can be killed, but more will spawn to replace them as the test progresses. There will never be more than two Brood Mothers at one time, excepting bugs/glitches.
Warframe - Mastery Rank 25 Test
- Deployable Archwing Exterminate Test
- This test requires the player to use an Archwing deployed by the Archwing Launcher to traverse a multitude of floating platforms, killing 50 enemies before the timer runs out. The player can extend the remaining time by melee attacking the orbs that spawn on these platforms.
- Tips
- The timer starts at 28 seconds, and each orb destroyed will increase it by 20, up to a maximum of 29 seconds.
- Each platform contains a respawning Archwing that can be used to travel to another platform once it has been cleared.
- Blink maneuver can be used to traverse between platforms extremely quickly.
- Titania is ideal for this test, as Razorwing allows her to traverse the platforms without an Archwing and she can freely use the Diwata without exiting the ability.
- Enemies falling off the platforms do not count as kills; as such, Crowd Dispersion or melee weapons with high knockback may be undesirable.
- It is possible to complete the test without using any Archwing maneuvers as shown here
Warframe - Mastery Rank 26 Test
- Advanced Mobile Point Capture Test
- This test requires the player to capture 6 mobile control points within 5 minutes by standing within a radius as they move along set paths, while under constant fire from the Grineer. Capture progress will quickly decay while the player is outside of the white radius. The point will gradually turn green and then stop moving upon reaching 100%.
- Tips
- In contrast to the normal variant of this test:
- The Grineer enemies here are relatively high leveled (level 41-46). It is recommended to bring a Warframe that can sustain itself under heavy gunfire, such as Inaros, Rhino, Nezha or Nidus.
- The map in this test is much more vertical and open, increasing the overall heavy gunfire that must be endured.
- You can use your Operator.
- The mobile points move even faster, and they can move along a vertical path.
- The Grineer enemies here are relatively high leveled (level 41-46). It is recommended to bring a Warframe that can sustain itself under heavy gunfire, such as
- Much like the normal variant, the player has 5 minutes to capture all 6 control points, with no way to increase the remaining time.
- There are no sources of energy outside of enemy drops, so Energy Siphon, high Ability Efficiency, and Zenurik's Energizing Dash are recommended.
- Limbo or Loki are ideal as they can ignore incoming damage by utilizing Rift Walk or Invisibility, respectively.
Warframe - Mastery Rank 27 Test
- Index Banking Test
- This test requires the player to collect 100 points and bank them within 5 minutes by moving around and grabbing points and banking them. The test will complete when the player has banked 100 points. Lvl25+ Grineer units will spawn during the mission, gradually increasing in level as time passes.
- Tips
- Unlike The Index, you have to activate the deposit point to manually bank points.
- The map is very open to grab points using frames like Titania, Zephyr, or Nova to teleport around.
- Using Zenurik Tree on your Operator with max bound "Void Flow" to dash around is a fast way to complete this test.
- Orange orb locations are on the higher ground, worth 3 points each.
- Blue orb locations are on the lower ground and between platforms, worth 1 point each.
- Killing Grineer enemies marked with red color will drop an Orange orb worth 3 points.
- Orbs respawn when the player banks them in for points.
- It is possible to keep enemies at low level during the whole 5 minutes by not killing them. Making them less dangerous while the player is running around collecting points.
- Orbs are affected by Vacuum and Fetch. Utilizing in combination with Mag's Greedy Pull makes this test very easy.
- Condensed Thermia Extermination Test
- This test requires the player to eliminate 60 enemies. The enemies are invulnerable, requiring the player to pick up containers of Condensed Thermia that spawn every 30 seconds. These canisters must be thrown at enemies to make them vulnerable. The containers destabilize 15 seconds after spawning in. A maximum of 7 canisters will spawn; if 60 enemies are not killed after the last canister, the test will fail. No other timer is active for this test. This test uses game mechanics first seen in the Exploiter Orb fight but adapted for extermination.
- Tips
- It is recommended to throw the canisters into clusters of enemies to maximize their effectiveness.
- Using a frame like Limbo can allow you to avoid incoming damage from enemies you cannot kill yet.
- Operator Void Dashes are great ways to get to the Thermia canisters quickly, especially with Naramon's Mind Sprint.
- Warframes that can pull enemies into a cluster are the most effective at this test, such as Nidus's Larva, Vauban's Bastille in Vortex mode, or Khora's Ensnare, built with high Ability Range.
- Advanced Timed Extermination Test
- This test requires the player to eliminate 100 enemies, with enemy levels starting at 50 and ending at 110. The player is given a 14-second countdown timer to kill waves of enemies, each enemy kill resets the timer by 2 seconds. Every 10 enemies killed the test conditions get harder:
- 10 enemies: enemy level +10
- 20 enemies: enemy level +20
- 30 enemies: enemy health +50%
- 40 enemies: enemy level +30
- 50 enemies: max timer -3s
- 60 enemies: enemy level +40
- 70 enemies: enemy armor +50%
- 80 enemies: enemy level +50
- 90 enemies: enemy level +60
- Tips
- Mesa, combined with some Energy Restores, can make this test trivial.
Mastery Rank 30 is not yet available.
Mastery Ranks Allocation
| Rank Image | Rank Name | Rank Number | Next Rank Requirement | Total XP Required | Test | Note |
|---|---|---|---|---|---|---|
| None | Unranked | 0 | 2,500 | 0 | None | - |

|
Initiate | 1 | 7,500 | 2,500 | Primary Test |
Corpus |

|
Silver Initiate | 2 | 12,500 | 10,000 | Sidearm Test | Grineer Rank 1-3 |

|
Gold Initiate | 3 | 17,500 | 22,500 | Melee Test | Grineer Rank 1-3 |

|
Novice | 4 | 22,500 | 40,000 | Survival Test | Infested Rank 12-15 |

|
Silver Novice | 5 | 27,500 | 62,500 | Terminal Hacking Test | - |

|
Gold Novice | 6 | 32,500 | 90,000 | Target Tracking Test | - |

|
Disciple | 7 | 37,500 | 122,500 | Timed Exterminate Test | All Factions Rank 10-15 |

|
Silver Disciple | 8 | 42,500 | 160,000 | Wall Dash Test | - |

|
Gold Disciple | 9 | 47,500 | 202,500 | Stealth Test | Grineer Rank 1 |

|
Seeker | 10 | 52,500 | 250,000 | Disappearing Platform Test | Grineer Rank 1 |

|
Silver Seeker | 11 | 57,500 | 302,500 | Time Trial Test | - |

|
Gold Seeker | 12 | 62,500 | 360,000 | Carousel Test | Grineer Rank 1 |

|
Hunter | 13 | 67,500 | 422,500 | Advanced Disappearing Platform Test | Grineer Rank 1 |

|
Silver Hunter | 14 | 72,500 | 490,000 | Advanced Exterminate Test | All Factions Rank 20-25 |

|
Gold Hunter | 15 | 77,500 | 562,500 | Interception Test |
Grineer |

|
Eagle | 16 | 82,500 | 640,000 | Defense Test | Corpus 3 Waves |

|
Silver Eagle | 17 | 87,500 | 722,500 | Advanced Timed Exterminate Test | Infested 35 Targets |

|
Gold Eagle | 18 | 92,500 | 810,000 | Advanced Defense Test |
Corpus |

|
Tiger | 19 | 97,500 | 902,500 | Stealth Rescue Test |
Grineer |

|
Silver Tiger | 20 | 102,500 | 1,000,000 | Archwing Time Trial Test | - |

|
Gold Tiger | 21 | 107,500 | 1,102,500 | Timed Exterminate Test |
Grineer |

|
Dragon | 22 | 112,500 | 1,210,000 | Arena Test | Grineer Rank 40+ |

|
Silver Dragon | 23 | 117,500 | 1,322,500 | Mobile Point Capture Test | Grineer Rank 40 |

|
Gold Dragon | 24 | 122,500 | 1,440,000 | Operator Test | Infested Rank 15 |

|
Sage | 25 | 127,500 | 1,562,500 | Deployable Archwing Exterminate Test | Grineer Rank 25 |

|
Silver Sage | 26 | 132,500 | 1,690,000 | Advanced Mobile Point Capture Test | Grineer Rank 41-46 |

|
Gold Sage | 27 | 137,500 | 1,822,500 | Index Banking Test | Grineer Rank 25+ |

|
Master | 28 | 142,500 | 1,960,000 | Condensed Thermia Extermination Test | - |

|
Middle Master | 29 | 147,500 | 2,102,500 | Advanced Timed Extermination Test | All Factions Rank 50-110 |

|
True Master | 30 | 152,500 | 2,250,000 | ? | Currently Unobtainable |
Total Mastery
| Category | Count | Mastery |
|---|---|---|
| Warframes | 99 | 594,000 |
| Primaries | 169 | 523,000 |
| Secondaries | 132 | 406,000 |
| Melee (including Zaws) |
201 | 609,000 |
| Kitguns | 4 | 12,000 |
| Normal Missions (nodes + Junctions) | 490 (464 + 26) | 26,000 (0 + 26000) |
| The Steel Path (nodes + Junctions) | 490 (464 + 26) | 26,000 (0 + 26000) |
| Railjack Intrinsics | 0 | 0 |
| Drifter Intrinsics | 0 | 0 |
| Sentinels | 14 | 84,000 |
| Sentinel Weapons | 0 | 0 |
| Robotic Weapons | 0 | 0 |
| Hound Weapons | 0 | 0 |
| Companions | 0 | 0 |
| Kubrows | 6 | 36,000 |
| Kavats | 4 | 24,000 |
| Predasites | 0 | 0 |
| Vulpaphylas | 0 | 0 |
| MOAs | 4 | 24,000 |
| Hounds | 0 | 0 |
| Plexus | 0 | 0 |
| Archwings | 5 | 30,000 |
| Archguns | 0 | 2,000 |
| Archmelees | 0 | 0 |
| Amps | 8 | 24,000 |
| K-Drives | 0 | 0 |
| Necramechs | 0 | 0 |
| Total | 1626 | 2,420,000[?] |
| Minus Exclusives | 1547 | 2,420,000[?] |
| Category | Count | Mastery |
|---|---|---|
| Warframes | 72 | 432,000 |
| Primaries | 135 | 421,000 |
| Secondaries | 109 | 337,000 |
| Melee (including Zaws) |
156 | 474,000 |
| Kitguns | 4 | 12,000 |
| Normal Missions (nodes + Junctions) | 490 (464 + 26) | 26,000 (0 + 26000) |
| The Steel Path (nodes + Junctions) | 490 (464 + 26) | 26,000 (0 + 26000) |
| Railjack Intrinsics | 0 | 0 |
| Drifter Intrinsics | 0 | 0 |
| Sentinels | 14 | 84,000 |
| Sentinel Weapons | 0 | 0 |
| Robotic Weapons | 0 | 0 |
| Hound Weapons | 0 | 0 |
| Companions | 0 | 0 |
| Kubrows | 6 | 36,000 |
| Kavats | 4 | 24,000 |
| Predasites | 0 | 0 |
| Vulpaphylas | 0 | 0 |
| MOAs | 4 | 24,000 |
| Hounds | 0 | 0 |
| Plexus | 0 | 0 |
| Archwings | 5 | 30,000 |
| Archguns | 0 | 2,000 |
| Archmelees | 0 | 0 |
| Amps | 8 | 24,000 |
| K-Drives | 0 | 0 |
| Necramechs | 0 | 0 |
| Total | 1497 | 1,952,000[?] |
| Minus Exclusives | 1421 | 1,952,000[?] |
- Tables exclude China-version exclusives: Excalibur Umbra Prime, Cadus, Prisma Machete, and Carmine Penta.
- Kavat count includes Venari.
- In-game profile stats for Star Chart XP includes XP from completing Junctions.
- Mission and junction counts also includes recompletion during The Steel Path.
Exclusive Mastery
Most Mastery-rewarding items can be directly bought, built, or researched. However the following items had a limited distribution period or were removed from circulation entirely.
Acquisition: Events or Special Alerts
These items were once available from the Market but have since been removed. They cannot be traded, but may rarely appear as rewards for Events or Tactical Alerts.
| Item | Count | Mastery |
|---|---|---|
| Primary | 3,000 | |
| Total: | 1 | 3,000 |
Acquisition: None
These items were part of the Founders Program, rewarding those who donated during the crucial early stages of the game. They cannot be traded and will never be offered again.
| Item | Count | Mastery |
|---|---|---|
| Warframe | 6,000 | |
| Secondary | 3,000 | |
| Melee | 3,000 | |
| Total: | 3 | 12,000 |
Acquisition: Wolf Beacon and Nightwave Offerings
![]() Wolf Sledge is only obtainable by killing the Wolf of Saturn Six. He spawned during the Nightwave/Series 1 and can now only spawn with a Wolf Beacon.
Wolf Sledge is only obtainable by killing the Wolf of Saturn Six. He spawned during the Nightwave/Series 1 and can now only spawn with a Wolf Beacon. ![]() Vitrica is only obtainable by killing Nihil after purchasing the Nihil's Oubliette decoration and the Enter Nihil's Oubliette Key.
Vitrica is only obtainable by killing Nihil after purchasing the Nihil's Oubliette decoration and the Enter Nihil's Oubliette Key.
| Item | Count | Mastery |
|---|---|---|
| Melee | 3,000 | |
| Melee | 3,000 | |
| Total: | 2 | 6,000 |
Acquisition: Events, Special Alerts, or Celebrations
These items can appear as rewards for Events, Tactical Alerts, or celebratory periods. Their parts and/or blueprints can be traded except for all Dex Weapons, both Plague Zaw Strikes, and the ![]() Opticor Vandal.
Opticor Vandal.
| Item | Count | Mastery |
|---|---|---|
| Primary | 3,000 | |
| Arch-Gun | 3,000 | |
| Secondary | 3,000 | |
| Melee | 3,000 | |
| Primary | 3,000 | |
| Zaw Strike | 3,000 | |
| Zaw Strike | 3,000 | |
| Primary | 3,000 | |
| Primary | 3,000 | |
| Melee | 3,000 | |
| Total: | 10 | 30,000 |
- * Opticor Vandal can also be purchased from Baro Ki'Teer, which has the only tradeable version
Acquisition: Purchase or Trade
These items can occasionally appear with Baro Ki'Teer's merchandise. Unranked weapons can be traded.
| Item | Count | Mastery |
|---|---|---|
| Secondary | 3,000 | |
| Primary | 3,000 | |
| Primary | 3,000 | |
| Arch-Melee | 3,000 | |
| Melee | 3,000 | |
| Melee | 3,000 | |
| Primary | 3,000 | |
| Melee | 3,000 | |
| Melee | 3,000 | |
| Melee | 3,000 | |
| Primary | 3,000 | |
| Companion | 6,000 | |
| Robotic Weapon | 3,000 | |
| Primary | 3,000 | |
| Secondary | 3,000 | |
| Primary | 3,000 | |
| Melee | 3,000 | |
| Secondary | 3,000 | |
| Secondary | 3,000 | |
| Primary | 3,000 | |
| Secondary | 3,000 | |
| Secondary | 3,000 | |
| Primary | 3,000 | |
| Secondary | 3,000 | |
| Primary | 3,000 | |
| Arch-Gun | 3,000 | |
| Melee | 3,000 | |
| Melee | 3,000 | |
| Melee | 3,000 | |
| Melee | 3,000 | |
| Total: | 30 | 93,000 |
- * Prisma Burst Laser is included with Prisma Shade when purchased from Baro, but the items are separate when traded with other players.
- ‡ Aklex Prime and Akvasto Prime cannot be purchased directly. Aklex Prime parts can be obtained through Axi A2 Relics, and Akvasto Prime parts can be obtained through Axi A5 Relics, both of which are exclusively sold by Baro Ki'Teer.
Acquisition: Daily Tribute system
These weapons are available from the daily tribute system at milestones 100, 300, 500 & 700
| Item | Count | Mastery |
|---|---|---|
| Secondary | 3,000 | |
| Melee | 3,000 | |
| Primary | 3,000 | |
| Melee | 3,000 | |
| Total: | 4 | 12,000 |
- * Sigma & Octantis will only be available from Day 300
Acquisition: Legacy Relics, Trade, or Prime Vault Access
Relics containing their parts have been placed in the Prime Vault, no longer appearing in drop tables. However their parts and relics can be traded or used normally. These items are available on a random rotating schedule through the Prime Resurgence system.
| Item | Count | Mastery |
|---|---|---|
| Warframe | 6,000 | |
| Primary | 3,000 | |
| Melee | 3,000 | |
| Warframe | 6,000 | |
| Primary | 3,000 | |
| Melee | 3,000 | |
| Warframe | 6,000 | |
| Secondary | 3,000 | |
| Melee | 3,000 | |
| Warframe | 6,000 | |
| Primary | 3,000 | |
| Melee | 3,000 | |
| Warframe | 6,000 | |
| Melee | 3,000 | |
| Companion | 6,000 | |
| Sentinel Weapon | 3,000 | |
| Warframe | 6,000 | |
| Primary | 3,000 | |
| Secondary | 3,000 | |
| Warframe | 6,000 | |
| Archwing | 6,000 | |
| Warframe | 6,000 | |
| Primary | 3,000 | |
| Companion | 6,000 | |
| Sentinel Weapon | 3,000 | |
| Warframe | 6,000 | |
| Melee | 3,000 | |
| Warframe | 6,000 | |
| Secondary | 3,000 | |
| Melee | 3,000 | |
| Warframe | 6,000 | |
| Primary | 3,000 | |
| Melee | 3,000 | |
| Warframe | 6,000 | |
| Secondary | 3,000 | |
| Companion | 6,000 | |
| Sentinel Weapon | 3,000 | |
| Warframe | 6,000 | |
| Primary | 3,000 | |
| Melee | 3,000 | |
| Warframe | 6,000 | |
| Secondary | 3,000 | |
| Melee | 3,000 | |
| Warframe | 6,000 | |
| Secondary | 3,000 | |
| Melee | 3,000 | |
| Warframe | 6,000 | |
| Primary | 3,000 | |
| Melee | 3,000 | |
| Warframe | 6,000 | |
| Secondary | 3,000 | |
| Melee | 3,000 | |
| Warframe | 6,000 | |
| Primary | 3,000 | |
| Melee | 3,000 | |
| Warframe | 6,000 | |
| Secondary | 3,000 | |
| Melee | 3,000 | |
| Warframe | 6,000 | |
| Primary | 3,000 | |
| Melee | 3,000 | |
| Warframe | 6,000 | |
| Primary | 3,000 | |
| Melee | 3,000 | |
| Warframe | 6,000 | |
| Melee | 3,000 | |
| Companion | 6,000 | |
| Sentinel Weapon | 3,000 | |
| Warframe | 6,000 | |
| Primary | 3,000 | |
| Secondary | 3,000 | |
| Warframe | 6,000 | |
| Primary | 3,000 | |
| Melee | 3,000 | |
| Warframe | 6,000 | |
| Primary | 3,000 | |
| Melee | 3,000 | |
| Warframe | 6,000 | |
| Secondary | 3,000 | |
| Melee | 3,000 | |
| Total: | 80 | 333,000 |
- * Prime Laser Rifle is included with Wyrm Prime and cannot be obtained separately.
- † Sweeper Prime is included with Carrier Prime and cannot be obtained separately.
- ‡ Deconstructor Prime is included with Helios Prime and cannot be obtained separately.
- § Deth Machine Rifle Prime is included with Dethcube Prime and cannot be obtained separately.
Mastery Rank Benefits
Higher Mastery Ranks grants several benefits. These include access to equipment and certain game content such as quests, and raises the cap of certain limiters such as mod capcity, Void Traces, Extractors, Focus, and Syndicate.
Equipment Unlock
| MR | Warframe |
|---|---|
| 0 | |
| 1 | |
| 2 | |
| 3 | |
| 4 | |
| 5 | |
| 6 | |
| 7 | |
| 8 |
| MR | Sentinel | Robotic Weapon |
|---|---|---|
| 0 | ||
| 1 | ||
| 2 | ||
| 3 | ||
| . . . | ||
| 14 |
| MR | Archgun | Archmelee |
|---|---|---|
| 0 | ||
| 1 | ||
| 2 | ||
| 3 | ||
| 4 | ||
| 5 | ||
| 6 | ||
| 7 | ||
| 8 | ||
| . . . | ||
| 13 | ||
| 14 | ||
| 15 |
Other Benefits
- Unranked equipment in the inventory will begin with a mod capacity equal to the player's current Mastery Rank, with the maximum currently being 29 for Mastery Rank 29 (58 for equipment with a Orokin Reactor/Orokin Catalyst equipped, before aura and stance bonuses). Though this will not affect the maximum capacity in any way it provides higher-ranked players with a significant starting benefit, especially towards polarized equipment.
- The maximum enemy level in the Simulacrum will be calculated by the formula (5×MR)+ 30.
- Each rank-up increases the maximum accumulation cap of Void Traces by 50.
- Each rank-up increases the daily maximum of Focus points earned through Focus Lenses by 5,000.
- Each rank-up increases the daily maximum Syndicate standing by 1,000.
- The Mastery Sigil changes in aesthetic design every 3 ranks; as Sigil color is defined by the player; having a bronze, silver or gold mastery rank does not affect the available Sigil colors in any way. Players have no way of reverting the cosmetic Sigil back to previous designs if they complete the next bronze Mastery Rank test.
- The number of Extractors a player can deploy is Mastery Rank dependent as shown; with Founders and/or Prime Access status granting an additional drone each.
- [MR0]: 1 drone, 2 for Prime Access or Founder, 3 for Prime Access and Founder
- [MR5]: 2 drones, 3 for Prime Access or Founder, 4 for Prime Access and Founder
- [MR10]: 3 drones, 4 for Prime Access or Founder, 5 for Prime Access and Founder
- [MR1]:
- Unlocks Maroo's Bazaar, a relay located on Mars for trading and accessing a weekly mission to obtain Ayatan Sculptures.
- Unlocks Saya's Vigil quest.
- Unlocks level 10-30 Bounties.
- [MR2]:
- Unlocks Trading. The amount of trades a player may complete per day is equal to the player's current mastery rank.
- Each even-numbered rank attained will increase the amount of available Loadout slots in the Arsenal.
- Unlocks level 20-40 Bounties.
- [MR3]:
- Unlocks access to faction Syndicates.
- Unlocks level 30-50 Bounties.
- Unlocks Natah and The Second Dream quests.
- [MR5]:
- Unlocks ability to use an Archwing Launcher.
- Unlocks Councilor Vay Hek Assassination mission on Oro, Earth.
- Unlocks level 40-60 Bounties.
- Unlocks Sands of Inaros and The War Within quest.
- [MR7]: Unlocks The Silver Grove quest.
- [MR8]:
- Unlocks all faction Syndicate Melee weapons
- Unlocks access to all Relays.
- Minimium rank required to use and trade Riven Mods.
- [MR10]:
- Unlocks ability to auto-slot Ayatan Stars into Ayatan Sculptures.
- Unlocks ability to purchase more Mod Config and Appearance Config slots (max 3 more slots per item).
- [MR12]: Unlocks all faction Syndicate Primary weapons.
- [MR14]: Unlocks all Market, Syndicate and clan Research weapons.
- [MR15]: Unlocks all game content to date, with the exception of some Riven Mods.
- [MR16]: Unlocks the final rank requirement for Riven Mods.
Indirect Mastery Locks
- Some junctions have indirect Mastery Rank lock:
- Although normal Warframes do not have a lock, certain frames can only be obtained after achieving certain Mastery Ranks, barring Trading or the Marketplace:
- Places, which are MR-locked:
- [MR1]:
- [MR3]: Trinity and Loki are only obtained on planets after Neptune or on Neptune itself.
- [MR5]:
- Hydroid is only obtained by defeating Councilor Vay Hek, whose mission node can only be selected once above MR5.
- Saryn and Gauss are only obtained on Sedna.
- Chroma Systems requires Saryn Systems to craft.
- Baruuk and Hildryn require completion of The War Within quest in order to speak to Little Duck at Fortuna.
- Wisp is only obtained from the Ropalolyst after completing the Chimera Prologue quest.
- Grendel's components require mission keys purchasable via Arbitrations, which require all mission nodes on the Star Chart, including the Ropalolyst's node mentioned above, to be completed before Arbitrations can be accessed.
- Quests, which are MR-locked:
- [MR1]: Gara is only available through Saya's Vigil, however Gara Neuroptics requires [MR2] to access the LV20-40 bounty that it drops from.
- [MR4]: Protea is only available through The Deadlock Protocol.
- [MR5]: Inaros is only available through Sands of Inaros.
- [MR7]: Titania is only available through The Silver Grove.
- [MR1]:
- Quests, which are junction-locked:
- [MR3]:
- Atlas is only available through The Jordas Precept, obtained from the Eris junction.
- Mesa is only obtained by defeating Mutalist Alad V. The player can only fight him by using aMutalist Alad V Assassinate Key, which can be crafted after completing Patient Zero, obtained from the Eris junction.
- [MR5]: Mirage is only available through Hidden Messages, obtained from the Sedna junction.
- [MR3]:
- Quests, which are locked behind other quests.
- [MR3]: Octavia is only available through Octavia's Anthem, available after The Second Dream.
- [MR5]:
- Nidus is only available through The Glast Gambit, available after The War Within.
- Harrow is only available through Chains of Harrow, available after The War Within.
- Excalibur Umbra is only available through The Sacrifice, available after The War Within.
- Revenant is only available through the Mask of the Revenant, available after The War Within and Saya's Vigil.
- [MR3]:
- Places, which are MR-locked:
- [MR2] is required to unlock Archwings through The Archwing quest. A majority of Archwing weapons are built via parts purchasable only from Syndicates ([MR3]), with the exception of:
- Cyngas from the Market, which requires [MR4], though its components are available from Syndicates.
- Knux, Grattler, and Larkspur from Clan Research, and only require Resources to build. The Knux does not have a Mastery Rank lock, while the Grattler and Larkspur have locks of 4 and 8 respectively.
- Prisma Veritux from Baro Ki'Teer, which has no Mastery Rank lock and is purchased as is.
- Imperator Vandal from Fomorian Sabotage, which requires [MR5] and its components are also rewarded from Fomorian Sabotage.
- Players can join the Empyrean missions of others as long as they have completed The Archwing quest at [MR2], but to access those missions by themselves they must complete the Rising Tide quest to build their own Railjack which ultimately requires [MR3].
- Some weapons require other weapons of a higher Mastery Rank as a crafting component. These weapons include:
- Access to Sorties and Kuva Liches as well as their associated weapons is the completion of The War Within quest, available at [MR5].
- Access to Arbitrations and The Steel Path is unlocked by completing all nodes on the Star Chart, including the Ropalolyst node on Jupiter, which in turn is only unlocked after completing the Chimera Prologue quest available at [MR5].
Bypassing Mastery Locks
- There are bundles on the market which allows the player to obtain an equipment at an earlier rank:
- Sands of Inaros Bundle:
- Dual Toxocyst (Mastery 11)
- Mutalist Cernos (Mastery 7)
- Lesion (Mastery 7)
- Sands of Inaros quest (Mastery 5)
- Berserker Bundle:
- Brawler Bundle:
- Convectrix (Mastery 7)
- Sonicor (Mastery 2)
- Tekko (Mastery 2)
- Continuity Collection
- Kesheg (Mastery 7)
- Twin Rogga (Mastery 9)
- Zarr (Mastery 7)
- Dragon Bundle:
- Embolist Collection
- Caustacyst (Mastery 7)
- Embolist (Mastery 9)
- Equinox Mega Pack:
- Ack & Brunt (Mastery 3)
- Kulstar (Mastery 5)
- Harpak (Mastery 7)
- Gazal Complete Collection:
- Gazal Machete (Mastery 5)
- Gunslinger Bundle:
- Huntress Bundle:
- Limbo Bundle:
- Opticor (Mastery 14)
- Loki Pack
- Strun (Mastery 1)
- Paladin Bundle:
- Stay Frosty Pack:
- Dual Zoren (Mastery 2)
- The Silver Grove Bundle:
- Update 10 Mega Bundle:
- Ether Reaper (Mastery 3)
- Soma (Mastery 6)
- Update 12 Mega Bundle:
- Akstiletto (Mastery 8)
- Phage (Mastery 11)
- Jat Kittag (Mastery 5)
- Wrecking Rhino Pack:
- Boar (Mastery 2)
- Forged Artistry Bundle:
- Razor Gunplay Bundle:
- Stealth Pack:
- Kunai (Mastery 2).
- Hunhow's Gift
- War (Mastery 10)
- Accompanying other players who have access to certain Boss nodes can allow crafting Saryn, Equinox, Loki, Trinity, Mesa, and Atlas before fulfilling Junction requirements.
Notes
- Certain weapons have a minimum Mastery Rank requirement. However this only applies to crafting from a blueprint; if the weapon can be placed into one's Arsenal (such as through Prime Access, as an event reward, and so on), it will bypass the lock. For example, Broken War cannot be crafted until Rank 10, but any player who completes The Second Dream will be awarded a crafted weapon regardless of their rank.
- Stalker can appear during the test.[1]
- Paracesis's and the Kuva Lich Weapons maximum rank increases by 2 every time it's polarized, up to 40 at 5 polarizations. These 10 extra ranks will grant Mastery Points like normal.
- Resources dropped during the test seem to be identical to those dropped in the Orokin Void.[2]
- Current Mastery Points rewarded for Star Chart completion has been reduced from 14,627 to 14,579. The cause or intention for this change is currently unknown.
Bugs
- Failing a practice test will still increase "Missions failed" stat in Player's profile.
Trivia
- If a player reaches a Mastery Rank that the developers haven't developed a unique Mastery Rank test for it, the game will reuse the previous Mastery Rank's test.
- Prior to Hotfix 27.3.6 (2020-03-31)[citation needed], Mastery Rank 30 was called "Grand Master".
See Also
References
Patch History
Update 28.0 (2020-06-11)
- Added tooltip to Mastery Rank on hover while viewing your Profile to show total Mastery Breakdown per category.
- Fixed ability to Deploy your Arch-Gun in weapon-restricted Mastery Rank tests.
Update 27.4 (2020-05-01)
- Increased the text fields on the Mastery Rank Up message to better accommodate other languages.
- Fixed floating platforms appearing way in the distance in the Mastery Rank 29 test.
- Fixed having Mission Progress open when completing a Mastery Test preventing loading back to the Relay.
Hotfix 27.3.14 (2020-04-15)
- Fix ability script errors that could occur in the transition between phases in Mastery Rank 14 test (and possibly others).
Hotfix 27.3.8 (2020-04-02)
- Fixed some players appearing to be eligible for a Mastery Rank Test but upon selecting it would be rejected.
- This was due to some weapons being considered as ‘Mastered’ when they were not.
Update 27.3 (2020-03-24)
- Mastery Rank 28 Tenno can now practice the Mastery Rank 29 Test in Cephalon Simaris’ Relay room!
- Fixed Mastery Rank 15 Interception test UI using old HUD technology.
Update 27.2 (2020-03-05)
- Updated the Mastery Test UI screen with more information and style!
- Fixed broken icons for Mastery Rank in the in-game Market or Inventory if the selected weapon has a minimum Mastery Rank requirement.
- Fixed Focus Point cap increase missing from the list of Rewards in the Mastery Rank Screen.
Update 26.0 (2019-10-31)
- A new Mastery Rank 28 Test has been added for soon-to-be eligible Tenno!
Hotfix 25.7.5 (2019-09-09)
- Fixed inability to complete the Mastery Rank 12 test if you fall off the starting platform.
Hotfix 25.7.2 (2019-08-30)
- Fixed some players having their Mastery Rank recalculated slightly lower than before as a result of moving nodes around in the Star Chart for the Disruption expansion.
Update 25.7 (2019-08-29)
- To keep in-line with existing limitations, the first Ghoul Bounty is restricted to Mastery Rank 1, and the other Ghoul Bounty is restricted to Mastery Rank 3.
- Fixed your Liset being parked sideways in the Relay after completing a practice Mastery Test.
- Fixed inability to complete the Mastery Rank 12 test if you fall off the starting platform.
Update 24.4 (2019-03-08)
- A Mastery Rank 27 Test has been added!
Hotfix 24.2.1 (2018-12-18)
- Fixed inability to complete Mastery Rank tests (the increased Mastery for K-Drive and Moa-Pets was not being included).
Update 24.2 (2018-12-18)
- Fixed MOA Companions and K-Drives only giving 3000 Mastery as opposed to the correct 6000 Mastery. The missing *Mastery will be retroactively added on login.
- Corvas Mastery Rank increased from 0 to 1.
- Dual Decurion Mastery Rank increased from 0 to 1.
- Fluctus Mastery Rank increased from 0 to 2.
- Phaedra Mastery Rank increased from 0 to 3.
- Grattler Mastery Rank increased from 0 to 4.
- Velocitus Mastery Rank increased from 0 to 4.
- Imperator Vandal Mastery Rank increased from 0 to 5.
Hotfix 24.0.9 (2018-11-21)
- Fixed ability to invite other players to a Mastery Rank Up Test.
Hotfix 24.0.2 (2018-11-09)
- Fixed inability to complete the Mastery Rank 24 test due to missing ‘continue’ option.
Update 23.10 (2018-10-12)
- Mastery Rank 26 test added.
Update 22.20 (2018-05-17)
- Increased time given by targets in the Round 11 Mastery Rank Test from 3.5 seconds to 5 seconds and added aim assist to targets to make them slightly easier to hit.
Update 22.4 (2017-11-23)
- A Mastery Rank 25 test has been added!
Update 19.0 (2016-11-11)
- A Mastery Rank 23 test has been added! The War Within introduces enough content to push long-term players that are currently Mastery Rank 22 into Mastery Rank 23!
Update: Specters of the Rail 0.0 (2016-07-08)
- Removed in-mission challenges for all Mastery rank tests.
Hotfix 18.5.4 (2016-03-07)
- Removed item drops from Mastery Rank 4 survival test.
Update 18.5 (2016-03-04)
- Mastery Rank tests against enemy waves have been given a difficulty update.
- Mastery Rank 5 test has had its hacking puzzles reordered in order of difficulty.
Update 15.13 (2015-02-05)
- Councillor Vay Hek will no longer require a key to access. He is now a boss on Earth that can only be accessed by Mastery Rank 5 and above Tenno.
- Daily Standing caps for non-Syndicate missions for have been reduced by half (remember, this cap is determined by Mastery Rank). For example:
- MR 0 could earn 2000 Standing before, now 1000.
- MR 1 could earn 4000 Standing before, now 2000.
- MR 2 could earn 6000 Standing before, now 3000.
Hotfix 15.11.1 (2015-01-22)
- A Mastery test for Rank 18 to 19 has been added!
Hotfix 15.5.8 (2014-12-05)
- Fixed various improper localization on Mastery Rank 15 / 16 test completion.
Hotfix 15.5.7 (2014-12-03)
- Fixed issue caused by falling off the edge during the Mastery Rank 15 test, causing players to be caught in a teleport loop.
Update 15.5 (2014-11-27)
- Changed boss scaling to consider Mastery Rank 0 players. Should prevent boss encounters from becoming too difficult at lower ranks when higher rank players join missions.
- Fixed Mastery Sigil rank not displaying properly in profile diorama.
Update 15.3 (2014-11-20)
- Fixed Mastery Sigils being unable to identify players Mastery Rank correctly.
- Fixed Mastery rank of Sigils resetting on login.
Hotfix 15.2.1 (2014-11-14)
- Syndicate Standing gain per day now capped at 2000 + (2000 x Mastery Rank Number).
- For example, I am a Mastery Rank 15 player.
- My personal Syndicate Reputation Cap is 2000 + (2000 x 15)
- Using BEDMAS: 2000 + 30000
- 32000 is my Daily Syndicate Standing cap as a Mastery Rank 15 player.
(Coming in next build, missed build cutoff!)Base Syndicate standing gain is now ten times faster than before.
Update 15.1 (2014-11-05)
- Added new Mastery Tests for Rank 15>16, 16>17 and 17>18!
- Changed the cinematic intro to the Exterminate Mastery Rank test to be cleaner.
Hotfix 15.0.1 (2014-10-24)
- Fixed an issue with Mastery Rank showing as ‘0’ in player Profiles.
Update 15.0 (2014-10-24)
- All players Mastery Rank 2 or greater are eligible to begin the Archwing quest.
Update 14.6 (2014-09-11)
- Fixed an issue with players being able to mantle vertical walls in the Mastery Rank 7 & 8 tests and falling to their deaths.
Update 14.5 (2014-08-28)
- Fixed player completing a Rank Up Test and their Mastery Level will not update right away on the Player's Profile Box at the top of the Pause Menu
Update 14.1 (2014-07-30)
- Fixed an issue with other players being able to join Mastery Rank tests.
Hotfix 14.0.9 (2014-07-26)
- Sentinels and Kubrows are no longer able to spawn in Mastery Rank tests. These tests are for the Tenno to prove their worth, not the pets!
Update 14.0 (2014-07-18)
- Fixed the spawn position for a number of Mastery Rank challenges.
Update 13.2 (2014-05-01)
- Fixed an issue with the player appearing to shoot an invisible weapon during the first Mastery Rank test.
- Fixed an issue with users being in "Clan Membership Limbo", which also potentially prevented Mastery Rank tests from being complete.
Update 13.1 (2014-04-23)
- Players under Mastery Rank 2 will no longer be marked by the Grustrag Three.
- Fixed an issue with the Mastery Rank level 3 to 4 test not working properly in conjunction with Melee 2.0.
Hotfix 13.0.4 (2014-04-11)
- Fixed an issue with players being unable to properly perform melee attacks in the Rank 3 Mastery test.
Hotfix 12.0.4 (2014-02-07)
- Fixed all Sentinel Mastery achievements requiring rank 30 to unlock.
Update 11.6 (2014-01-08)
- Fixed issue with Rank 3 Weapon Mastery Challenge/Achievement not being updated immediately.
Update 11.5 (2013-12-19)
- Fixed max deployable resource drones:
- Amount of deployable drones varies – you get one for every five mastery ranks.
- Mastery 0 – 4, 1 drone
- Master 5- 9, 2 drones
- Master 10 +, 3 drones.
- All Founders/Primes Access get +1 to each tier. So if you are Mastery 14 and Founder, you get 4. If Mastery 14 and no Founder status, you get 3.
- Amount of deployable drones varies – you get one for every five mastery ranks.
Hotfix 11.1.3 (2013-11-29)
- Fixed Mastery Achievements not being awarded.
Hotfix 11.0.1 (2013-11-20)
- Fixed Mastery Rank tests not attributing higher rank to player after successful test.
Update 11.0 (2013-11-20)
- Star Chart progress, Sentinel and Sentinel-Weapon rank now contribute to Mastery level. Note: Complete a mission with your leveled up Sentinels and Sentinel-Weapons to receive this Master XP retroactively.
- Fixed falling out of level in Mastery Challenge 7 costing a revive.
Hotfix 10.6.1 (2013-11-01)
- Reduced difficulty of some mastery challenges.
Update 10.5 (2013-10-23)
- Soma Mastery Rank increased from 3 to 6.
Hotfix 10.2.1 (2013-10-04)
- Fix for issues with retrying the rank 7 – 8 mastery tests.
- Fix for issues after failing the rank 9 mastery test not allowing successful retrials.
- Fix for issues with rank 10 – 11 mastery not informing players of failure.
Update 9.3 (2013-07-26)
- Online matchmaking now favors hosts within 3 mastery ranks of player when joining a mission where multiple hosts are available.
- Fixed being able to gain mastery rank without completing test by replaying the tutorial.
Hotfix 8.1.3 (2013-06-19)
- Tuned difficulty for Mastery Rank Challenges for Ranks 4+ to be more balanced for a wider range of weapons.
Update 7.11 (2013-05-17)
- Disabled challenges (optional objectives) in Mastery Rank tests.
Update 5.3 (2013-01-10)
- Fixed loss of Mastery when selling an item.