Tag: source edit |
No edit summary |
||
| (21 intermediate revisions by 7 users not shown) | |||
| Line 2: | Line 2: | ||
<includeonly>[[File:FocusLensMadurai_b.png|thumb|125x125px]]</includeonly> |
<includeonly>[[File:FocusLensMadurai_b.png|thumb|125x125px]]</includeonly> |
||
{{Quote|They followed the path of Engage The Enemy. Their swift, uncompromising onslaught, holding nothing back and recklessly attacking their foes, could vanquish an opponent before he had the chance to steel himself. Speed and savagery characterized this school.|In-Game Description}} |
{{Quote|They followed the path of Engage The Enemy. Their swift, uncompromising onslaught, holding nothing back and recklessly attacking their foes, could vanquish an opponent before he had the chance to steel himself. Speed and savagery characterized this school.|In-Game Description}} |
||
| + | {{Quote|I see a cloud, a gathering storm... the Madurai Way. Our path was to Engage The Enemy... to sweep across our foes before they had a chance to steel themselves.|[[Operator]]}} |
||
| ⚫ | |||
| + | <noinclude> |
||
| ⚫ | |||
The '''Madurai''' way is a school dedicated to offense. [[Tenno]] of the Madurai way are unrelenting fighters, excelling in the arts of ambush and barrage. Those who mastered the Madurai school are granted predatory, savage power. |
The '''Madurai''' way is a school dedicated to offense. [[Tenno]] of the Madurai way are unrelenting fighters, excelling in the arts of ambush and barrage. Those who mastered the Madurai school are granted predatory, savage power. |
||
| Line 8: | Line 10: | ||
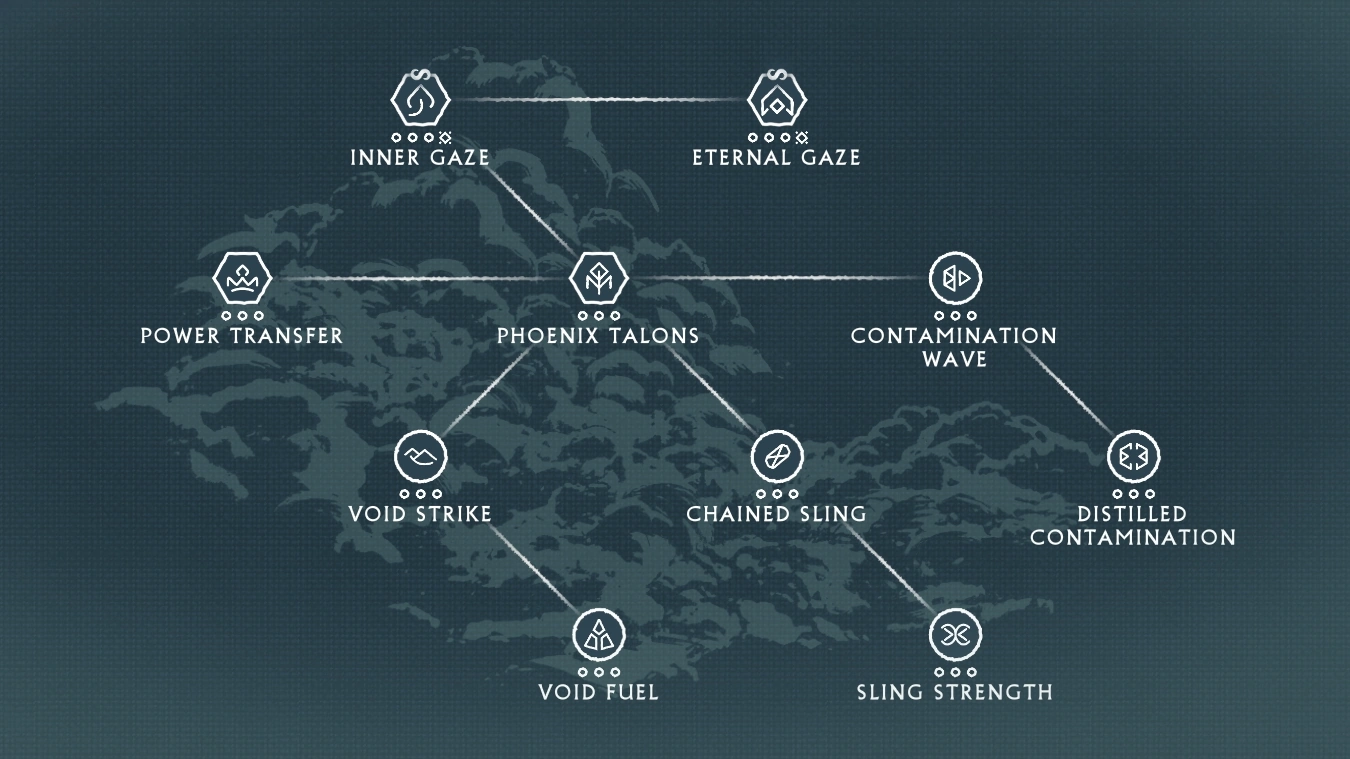
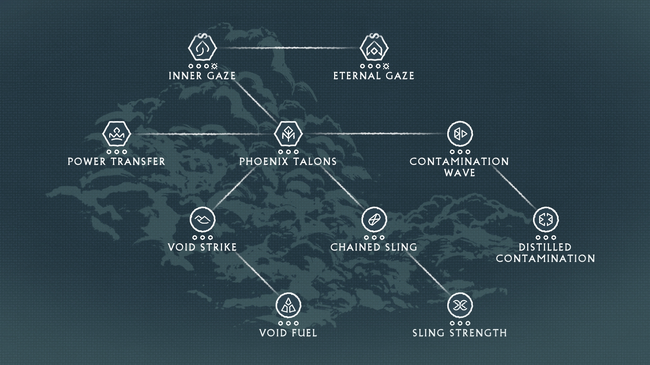
[[File:MaduraiFocusTree3.0.png|thumb|650x000px|center|The treeways of the Madurai school.]] |
[[File:MaduraiFocusTree3.0.png|thumb|650x000px|center|The treeways of the Madurai school.]] |
||
| + | |||
| − | <section begin=phoenixtalons /> |
||
| + | ==Ways== |
||
| + | ===Phoenix Talons=== |
||
{{FocusNode|name=Phoenix Talons|distance=0|icon=FocusPhoenixTalons.png|desc=Physical Damage and Operator Damage increased by '''5 / 10 / 20 / 30'''%|passive=y|warframe=y|operator=y|info= |
{{FocusNode|name=Phoenix Talons|distance=0|icon=FocusPhoenixTalons.png|desc=Physical Damage and Operator Damage increased by '''5 / 10 / 20 / 30'''%|passive=y|warframe=y|operator=y|info= |
||
| + | *Additive to Physical damage mods. |
||
| − | *Activates the moment a mission is started. Lasts throughout the duration of the mission. |
||
| ⚫ | |||
*Does not affect [[Damage#Unique_Damage|unique]] damage types. |
*Does not affect [[Damage#Unique_Damage|unique]] damage types. |
||
*Does not increase damage of Warframe abilities. |
*Does not increase damage of Warframe abilities. |
||
| + | *Does work on [[Exalted_Weapon|Exalted Weapons]]. |
||
| ⚫ | |||
| − | * |
+ | *Does not increase damage of [[Status Effect]]s. |
| − | *Does not increase damage of status effects. |
||
}} |
}} |
||
| + | {{clr}} |
||
| − | <section end=phoenixtalons /> |
||
| + | ===Power Transfer=== |
||
| − | <section begin=powertransfer /> |
||
{{FocusNode|name=Power Transfer|distance=1|icon=FocusPowerTransfer.png|desc='''45 / 60 / 75 / 100'''% Amp Critical Damage for '''5 / 10 / 15 / 20'''s on switching to Operator. '''20 / 30 / 40 / 50'''% Casting Speed on switching to Warframe.|passive=y|warframe=y|operator=y|info= |
{{FocusNode|name=Power Transfer|distance=1|icon=FocusPowerTransfer.png|desc='''45 / 60 / 75 / 100'''% Amp Critical Damage for '''5 / 10 / 15 / 20'''s on switching to Operator. '''20 / 30 / 40 / 50'''% Casting Speed on switching to Warframe.|passive=y|warframe=y|operator=y|info= |
||
}} |
}} |
||
| + | {{clr}} |
||
| − | <section end=powertransfer /> |
||
| + | ===Void Strike=== |
||
| − | <section begin=voidstrike /> |
||
{{FocusNode|name=Void Strike|distance=1|icon=FocusVoidStrike.png|desc=First Ability consumes all energy to increase damage for '''5 / 6 / 7 / 8'''s. Deal '''4 / 6 / 8 / 10'''% additional damage for every percentage of energy consumed. '''70 / 60 / 50 / 40'''s cooldown.|warframe=y|operator=y|info= |
{{FocusNode|name=Void Strike|distance=1|icon=FocusVoidStrike.png|desc=First Ability consumes all energy to increase damage for '''5 / 6 / 7 / 8'''s. Deal '''4 / 6 / 8 / 10'''% additional damage for every percentage of energy consumed. '''70 / 60 / 50 / 40'''s cooldown.|warframe=y|operator=y|info= |
||
| + | *When used at full energy, damage is increased by '''400 / 600 / 800 / 1000'''%. |
||
| − | *Void Strike's damage bonus is additive to other bonuses, such as {{Focus|Unairu Wisp}} |
+ | *Void Strike's damage bonus is additive to other Operator and Amp damage bonuses, such as {{Focus|Phoenix Talons}}, {{Focus|Unairu Wisp}}, {{Arcane|Virtuos Fury}} or {{Arcane|Eternal Eradicate}}. |
| + | *For warframe's weapons, Void Strike's damage bonus is additive to base damage bonus, like {{M|Serration}}, {{M|Condition Overload}}, or {{Arcane|Secondary Merciless}}. |
||
| + | *The ability's cooldown starts ''immediately'' when Void Strike's duration timer begins to count down. |
||
| + | *Does not work on Warframe damaging abilities. |
||
| + | *Does not work on [[Arch-gun]]s. |
||
}} |
}} |
||
| + | {{clr}} |
||
| − | <section end=voidstrike /> |
||
| + | |||
| − | <section begin=voidfuel /> |
||
| + | ===Void Fuel=== |
||
{{FocusNode|name=Void Fuel|distance=2|icon=FocusVoidFuel.png|desc='''10 / 20 / 30 / 40'''% Weapon Efficiency for Operator and Warframe while Void Strike is active.|warframe=y|operator=y|info= |
{{FocusNode|name=Void Fuel|distance=2|icon=FocusVoidFuel.png|desc='''10 / 20 / 30 / 40'''% Weapon Efficiency for Operator and Warframe while Void Strike is active.|warframe=y|operator=y|info= |
||
*Weapon Efficiency refers to [[Ammo Efficiency]] where there is a 40% chance at max rank for any shot to not consume ammo/Amp energy. |
*Weapon Efficiency refers to [[Ammo Efficiency]] where there is a 40% chance at max rank for any shot to not consume ammo/Amp energy. |
||
}} |
}} |
||
| + | {{clr}} |
||
| − | <section end=voidfuel /> |
||
| + | ===Contamination Wave=== |
||
| − | <section begin=contaminationwave /> |
||
{{FocusNode|name=Contamination Wave|distance=1|icon=FocusContaminationWave.png|desc=Second Ability emits a Void wave lasting '''0.5 / 1 / 1.5 / 2'''s that drenches enemies with Void Contamination making them '''20 / 30 / 40 / 50'''% more vulnerable to Operator Damage for '''5 / 10 / 15 / 20'''s.|operator=y|info= |
{{FocusNode|name=Contamination Wave|distance=1|icon=FocusContaminationWave.png|desc=Second Ability emits a Void wave lasting '''0.5 / 1 / 1.5 / 2'''s that drenches enemies with Void Contamination making them '''20 / 30 / 40 / 50'''% more vulnerable to Operator Damage for '''5 / 10 / 15 / 20'''s.|operator=y|info= |
||
| + | *Costs '''50''' energy to cast. |
||
| − | |||
}} |
}} |
||
| + | {{clr}} |
||
| − | <section end=contaminationwave /> |
||
| + | ===Distilled Contamination=== |
||
| − | <section begin=distilledcontamination /> |
||
{{FocusNode|name=Distilled Contamination|distance=2|icon=FocusDistilledContamination.png|desc=Killing an enemy affected by Contamination Wave makes all affected enemies '''10 / 15 / 20 / 25'''% more vulnerable, while also making the effect last '''4 / 6 / 8 / 10'''s longer. Maximum 4 stacks.|operator=y|info= |
{{FocusNode|name=Distilled Contamination|distance=2|icon=FocusDistilledContamination.png|desc=Killing an enemy affected by Contamination Wave makes all affected enemies '''10 / 15 / 20 / 25'''% more vulnerable, while also making the effect last '''4 / 6 / 8 / 10'''s longer. Maximum 4 stacks.|operator=y|info= |
||
| − | |||
}} |
}} |
||
| + | {{clr}} |
||
| − | <section end=distilledcontamination /> |
||
| + | ===Chained Sling=== |
||
| − | <section begin=chainedsling /> |
||
{{FocusNode|name=Chained Sling|distance=1|icon=FocusChainedSling.png|desc='''20 / 30 / 40 / 50'''% Energy Efficiency on Consecutive Void Slings.|opeartor=y|info= |
{{FocusNode|name=Chained Sling|distance=1|icon=FocusChainedSling.png|desc='''20 / 30 / 40 / 50'''% Energy Efficiency on Consecutive Void Slings.|opeartor=y|info= |
||
*After casting Void Sling, consecutive Void Slings will cost 50% less energy to perform at max rank. |
*After casting Void Sling, consecutive Void Slings will cost 50% less energy to perform at max rank. |
||
}} |
}} |
||
| + | {{clr}} |
||
| − | <section end=chainedsling /> |
||
| + | ===Sling Strength=== |
||
| − | <section begin=slingstrength /> |
||
{{FocusNode|name=Sling Strength|distance=2|icon=FocusSlingStrength.png|desc=Switching to Warframe after a Chained Sling adds '''10 / 20 / 30 / 40'''% Ability Strength for '''5 / 10 / 15 / 20'''s.|warframe=y|info= |
{{FocusNode|name=Sling Strength|distance=2|icon=FocusSlingStrength.png|desc=Switching to Warframe after a Chained Sling adds '''10 / 20 / 30 / 40'''% Ability Strength for '''5 / 10 / 15 / 20'''s.|warframe=y|info= |
||
*[[Ability Strength]] bonus is additive with similar bonuses like {{M|Intensify}} and {{M|Energy Conversion}}. |
*[[Ability Strength]] bonus is additive with similar bonuses like {{M|Intensify}} and {{M|Energy Conversion}}. |
||
}} |
}} |
||
| + | {{clr}} |
||
| − | <section end=slingstrength /> |
||
| + | ===Inner Gaze=== |
||
| − | <section begin=innergaze /> |
||
{{FocusNode|name=Inner Gaze|distance=1|icon=FocusInnerGaze.png|desc=Increase Energy for Amps and [[Void Beam]] by '''10 / 20 / 30 / 40'''%.|waybound=y|passive=y|operator=y|info= |
{{FocusNode|name=Inner Gaze|distance=1|icon=FocusInnerGaze.png|desc=Increase Energy for Amps and [[Void Beam]] by '''10 / 20 / 30 / 40'''%.|waybound=y|passive=y|operator=y|info= |
||
| − | |||
}} |
}} |
||
| + | {{clr}} |
||
| − | <section end=innergaze /> |
||
| + | ===Eternal Gaze=== |
||
| − | <section begin=eternalgaze /> |
||
{{FocusNode|name=Eternal Gaze|distance=2|icon=FocusEternalGaze.png|desc=Increase Energy Regeneration Rate for Amps and Void Beam by '''15 / 30 / 45 / 60'''%.|waybound=y|passive=y|operator=y|info= |
{{FocusNode|name=Eternal Gaze|distance=2|icon=FocusEternalGaze.png|desc=Increase Energy Regeneration Rate for Amps and Void Beam by '''15 / 30 / 45 / 60'''%.|waybound=y|passive=y|operator=y|info= |
||
| − | |||
}} |
}} |
||
| − | <section end=eternalgaze /> |
||
{{clr}} |
{{clr}} |
||
==Notes== |
==Notes== |
||
| − | *The Madurai school tree requires '''9,000,000''' Madurai focus points to fully unlock all nodes at max rank, as well as '''1,500,000''' and 2 {{Resource|Brilliant Eidolon Shard}} |
+ | *The Madurai school tree requires '''9,000,000''' Madurai focus points to fully unlock all nodes at max rank, as well as '''1,500,000''' and 2 {{Resource|Brilliant Eidolon Shard|Brilliant Eidolon Shards}} to unbind both Way-bound nodes, for a grand total of '''''10,500,000''''' focus. |
*A fully levelled Madurai Operator is capable of: |
*A fully levelled Madurai Operator is capable of: |
||
**'''Way-Bound:''' Increases the Operator's [[Amp]] and [[Void Beam]] energy capacity by '''40%''' and regeneration by '''60%''' |
**'''Way-Bound:''' Increases the Operator's [[Amp]] and [[Void Beam]] energy capacity by '''40%''' and regeneration by '''60%''' |
||
| − | **'''Warframe Passive:''' Increases [[Damage#Physical Damage|physical damage]] by '''30%''', and increases ability |
+ | **'''Warframe Passive:''' Increases [[Damage#Physical Damage|physical damage]] by '''30%''', and increases ability [[Casting Speed]] by '''50%''' on Transference. |
| − | **'''Operator Passive:''' Increases [[Amp]] Critical Damage by '''100%''' on Transference. |
+ | **'''Operator Passive:''' Increases damage by '''30%''' and Increases [[Amp]] Critical Damage by '''100%''' on Transference. |
**'''[[Void Sling]]:''' Increases the Operator's Energy Efficiency by '''50%''' and Warframe [[Ability Strength]] by '''40%''' on consecutive Void Slings. |
**'''[[Void Sling]]:''' Increases the Operator's Energy Efficiency by '''50%''' and Warframe [[Ability Strength]] by '''40%''' on consecutive Void Slings. |
||
**'''First Ability:''' Consumes all Operator energy to increase Operator and Warframe damage by '''10%''' per '''1%''' energy consumed up to a maximum of '''1000%''', and increases [[Ammo#Ammo Efficiency|Amp/Ammo Efficiency]] by '''40%'''. Lasts '''8''' seconds, '''40''' second cooldown. |
**'''First Ability:''' Consumes all Operator energy to increase Operator and Warframe damage by '''10%''' per '''1%''' energy consumed up to a maximum of '''1000%''', and increases [[Ammo#Ammo Efficiency|Amp/Ammo Efficiency]] by '''40%'''. Lasts '''8''' seconds, '''40''' second cooldown. |
||
Revision as of 23:14, 2 July 2022
- Not to be confused with the
 Madurai Polarity.
The Madurai way is a school dedicated to offense. Tenno of the Madurai way are unrelenting fighters, excelling in the arts of ambush and barrage. Those who mastered the Madurai school are granted predatory, savage power.
This school focuses to improve the damage output of Operators and Warframes. Their Way-Bound increases Amp energy pool and regeneration.
Ways
Phoenix Talons
 |
Physical Damage and Operator Damage increased by 5 / 10 / 20 / 30% | |
| ||
Power Transfer
|
45 / 60 / 75 / 100% Amp Critical Damage for 5 / 10 / 15 / 20s on switching to Operator. 20 / 30 / 40 / 50% Casting Speed on switching to Warframe. |
Void Strike
 |
First Ability consumes all energy to increase damage for 5 / 6 / 7 / 8s. Deal 4 / 6 / 8 / 10% additional damage for every percentage of energy consumed. 70 / 60 / 50 / 40s cooldown. | |
| ||
Void Fuel
|
10 / 20 / 30 / 40% Weapon Efficiency for Operator and Warframe while Void Strike is active. | |
| ||
Contamination Wave
|
Contamination Wave Second Ability emits a Void wave lasting 0.5 / 1 / 1.5 / 2s that drenches enemies with Void Contamination making them 20 / 30 / 40 / 50% more vulnerable to Operator Damage for 5 / 10 / 15 / 20s.
 Operator Operator |
|
| ||
Distilled Contamination
|
Distilled Contamination Killing an enemy affected by Contamination Wave makes all affected enemies 10 / 15 / 20 / 25% more vulnerable, while also making the effect last 4 / 6 / 8 / 10s longer. Maximum 4 stacks.
Operator |
Chained Sling
|
20 / 30 / 40 / 50% Energy Efficiency on Consecutive Void Slings. | |
| ||
Sling Strength
|
Sling Strength Switching to Warframe after a Chained Sling adds 10 / 20 / 30 / 40% Ability Strength for 5 / 10 / 15 / 20s.
 Warframe Warframe |
|
| ||
Inner Gaze
|
Increase Energy for Amps and Void Beam by 10 / 20 / 30 / 40%. |
Eternal Gaze
|
Increase Energy Regeneration Rate for Amps and Void Beam by 15 / 30 / 45 / 60%. |
Notes
- The Madurai school tree requires 9,000,000 Madurai focus points to fully unlock all nodes at max rank, as well as 1,500,000 and 2 Brilliant Eidolon Shards to unbind both Way-bound nodes, for a grand total of 10,500,000 focus.
- A fully levelled Madurai Operator is capable of:
- Way-Bound: Increases the Operator's Amp and Void Beam energy capacity by 40% and regeneration by 60%
- Warframe Passive: Increases physical damage by 30%, and increases ability Casting Speed by 50% on Transference.
- Operator Passive: Increases damage by 30% and Increases Amp Critical Damage by 100% on Transference.
- Void Sling: Increases the Operator's Energy Efficiency by 50% and Warframe Ability Strength by 40% on consecutive Void Slings.
- First Ability: Consumes all Operator energy to increase Operator and Warframe damage by 10% per 1% energy consumed up to a maximum of 1000%, and increases Amp/Ammo Efficiency by 40%. Lasts 8 seconds, 40 second cooldown.
- Second Ability: Emits a wave for 2 seconds causing enemies to take 50% additional Operator Damage for 20 seconds. Killing a debuffed enemy makes all affected enemies take an additional 25% more damage and increases the duration by 10 seconds, up to 4 stacks.
Patch History
Hotfix 31.5.7 (2022-05-06)
- Shortened and increased the speed of the Contamination Wave’s casting animation.
Hotfix 31.5.4 (2022-05-02)
- Fixed Madurai’s ‘Power Transfer’ effects not refreshing when re-triggered while active.
- This also fixes the HUD stating that it was refreshed, when it was indeed not.
Update 31.5 (2022-04-27)
- MADURAI
The Madurai way follows the path of Engage the Enemy. Speed and savagery characterized the Madurai school.
Madurai’s abilities focus on granting that offensive edge in combat with a combination of Damage increases, weapon efficiency, and Speed enhancements to recklessly attack your foes.
- 6 new Focus abilities.
- POWER TRANSFER (Passive)
- 100% Amp Critical Damage for 20s on switching to Operator. 50% Casting Speed on switching to Warframe.
- VOID FUEL
- 40% Weapon Efficiency for Operator and Warframe while Void Strike is active.
- CHAINED SLING
- 50% Energy Efficiency on Consecutive Void Slings.
- SLING STRENGTH
- Switching to Warframe after a Chained Sling adds 40% Ability Strength for 20s.
- CONTAMINATION WAVE (Second Ability input)
- Second Ability emits a Void wave lasting 2s that drenches enemies with Void Contamination making them 50% more vulnerable to Operator Damage for 20s.
- Added a mark FX similar to Ash's Bladestorm for Contamination Wave. Each contamination level will display its own marker above enemies.
- Second Ability emits a Void wave lasting 2s that drenches enemies with Void Contamination making them 50% more vulnerable to Operator Damage for 20s.
- DISTILLED CONTAMINATION
- Killing an enemy affected by Contamination Wave makes all affected enemies 25% more vulnerable, while also making the effect last 10s longer. Maximum 4 stacks.
- POWER TRANSFER (Passive)
- Eternal Gaze and Inner Gaze remain unchanged.
- Reworked Void Strike:
- It is now the First Ability input.
- First Ability consumes all Operator energy to increase damage for 8s. Deal 10% additional damage for every percentage of Operator energy consumed. 40s cooldown.
- eg. 100% of Energy consumed is 1000% damage.
- Why: Old Void Strike’s long charge up time didn’t provide an ideal gameplay experience within the fast paced environment. Players found themselves sitting in Void Mode waiting for the Damage bonus to build up. Now Void Strike no longer needs Void Mode and has instant damage on input. Additionally, Void Strike is Duration based now instead of per shot, meaning damage gets applied to all pellets of a shotgun for instance.
- Tweaked Phoenix Talons:
- Physical Damage and Operator Damage increased by 30%.
- Why: Adding the additional Operator Damage allows for benefits for both Warframe and Operator in the name of synergy.
- Physical Damage and Operator Damage increased by 30%.