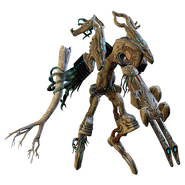
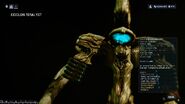
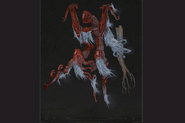
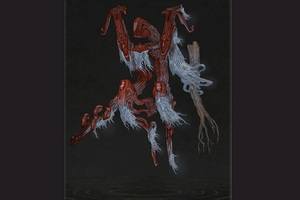
The Eidolon Teralyst is a gigantic spectral Sentient Eidolon creature that can be found aimlessly roaming around the Plains of Eidolon at night, acting as one of the Grand Bosses of the landscape. This is the first of the 3-night bosses of Plains of Eidolon, followed by Eidolon Gantulyst and then Eidolon Hydrolyst.
The Eidolons are remnants of a massive Sentient that was defeated in a battle against the Tenno during the Old War, whose remains now wander the plains perpetually searching for their lost components. These fragments are, however, still formidable creatures armed with powerful attacks and near-impenetrable defenses, and are hostile to both Tenno and Grineer alike.
It is important to note players that have not unlocked Transference from The War Within won't have any means to properly fight the Eidolon Teralyst.
Behavior[]
The Teralyst emerges from bodies of water on the Plains at the fall of night accompanied by a column of blue light marking their location. They generally walk in one direction, even if the Tenno are nearby, though their attention can be drawn to specific locations by using Eidolon Lures found throughout the Plains at night.
The Teralyst has many different attacks and several do very high damage, but they are all telegraphed. Once acquainted, it is possible to easily avoid the most damaging attacks.
- Seeking Missiles: A sphere of light emitted from the Teralyst's back which splits into multiple homing missiles. These are not very accurate, and are easily avoided, but will hit in an Area of Effect even if missing.
- Ground Stomp: Stomps the ground, sending out a ground shockwave that knockbacks back any Tenno in its path a great distance (100-meter radius). Can be avoided through jumping, just like the Shockwave Moa.
- Ground Smash: Smashes the ground, sending out a series of high-damaging, homing quakes to the Tenno's position. These homing quakes can stun the Tenno and are 25m high. In later stages, these waves also return to the Teralyst.
- Gun Swing: Swings its gun arm while firing it in a wide arc, each bullet creating a 2m wide explosion.
- Tree Swing: Swings its tree arm in a short arc, dealing heavy damage. Staggers.
- Summoning Scream: The Teralyst glows orange and screeches into the air. This will summon and buff Vomvalysts around it.
- Regenerating Scream: The Teralyst glows blue and screeches. This will cause surrounding Vomvalysts (that are not affected by Summoning Scream) to link to the Teralyst and begin to regenerate its shield. Additionally, this will render it invulnerable to all damage until all linked Vomvalysts are destroyed. Has a slightly longer wind-up time than Summoning Scream.
- Sentient Residue: The Teralyst will "bleed" teal blood on the ground after losing at least one of its Synovia, dealing damage over time to those standing on it. It is hard to avoid these.
- Star Fall: Fires its gun into the sky, causing a rain of explosive, slightly homing projectiles on all targets nearby. The explosives may cause knockdown. This ability can deal damage through
 Limbo's Rift Plane and
  Frost's
  Snow Globe. Base area-of-effect spans 200m in radius.
 - Energy Spikes: The attack Teralyst uses upon the destruction of one of his joints. This will emit five pulses of high
 Magnetic damage. He will repeat this three times.
- Following this attack, if there are any vomvalysts around the Eidolon, they will perform a mini energy spike dealing a moderate amount of damage over a smaller area without the magnetic status effect.
- Additionally, destroyed arm Synovias will emit Seeking Projectiles that have stronger homing capabilities, and leg Synovias will shoot out arcing shots of Sentient Residue that last a shorter duration.
If the Teralyst is still alive once sunrise hits, it will change course towards the nearest body of water. Upon arriving, it will become invulnerable and disappear in a pillar of blue light as it sinks back in, and all Eidolon Lures will self-destruct. The Teralyst can still be killed en route as long as it has not reached the water.
Damage Resistance[]
Eidolons' shields and health possess DR that scales depending on your weapon's DPS multiplier. Your DPS multiplier is defined as:
Final damage is defined as the damage that would be seen on screen if there was not any damage reduction.
Eidolons possess a body part multiplier of 2x, and a critical damage bonus of 2x which would be factored into the above formula. The Eidolon's head possesses a 3x headshot multiplier and also benefits from the 2x critical damage bonus. However, when damaging the Eidolon's head, AOE weapons will not benefit from the 3x headshot multiplier, providing no bonus damage, and will not benefit from the 2x critical damage bonus. Body hits with AOE weapons will still benefit from the 2x body part multiplier and 2x critical damage bonus.
Strategy[]
General[]
Due to the Teralyst possessing both Alloy Armor and Robotic health, weapons with ![]() Radiation damage will do the most damage (+75% vs Alloy Armor, +25% vs Robotic), whilst
Radiation damage will do the most damage (+75% vs Alloy Armor, +25% vs Robotic), whilst ![]() Puncture will also be reasonably effective (+15% vs Alloy Armor, +25% vs Robotic). Avoid using
Puncture will also be reasonably effective (+15% vs Alloy Armor, +25% vs Robotic). Avoid using ![]() Slash and
Slash and ![]() Magnetic.
Magnetic. ![]() Corrosive Projection is recommended to decrease the Teralyst's armor.
Corrosive Projection is recommended to decrease the Teralyst's armor. ![]() Shield Disruption has no effect on its shields. Bear in mind that the Teralyst is immune to all Status Effects, except for
Shield Disruption has no effect on its shields. Bear in mind that the Teralyst is immune to all Status Effects, except for ![]() Void.
Void.
Weapons with a high damage to ammo ratio are recommended. Snipers and shotguns are ideal for this purpose. Explosives are ineffective on the weak points as they will hit the invulnerable body and deal no damage, unless the projectile can make a direct hit on the weak point and explode there. Shotguns that fire projectiles, such as the ![]() Arca Plasmor, can be ineffective, since the weapon's damage will not register if any part of the projectile misses the joint.
Arca Plasmor, can be ineffective, since the weapon's damage will not register if any part of the projectile misses the joint.
The Voidrig Necramech is also capable of inflicting massive damage to the Teralyst's vulnerable points via ![]() Arquebex. Modding for
Arquebex. Modding for ![]() Necramech Rage helps keep its
Necramech Rage helps keep its ![]() Guard Mode fueled.
Guard Mode fueled.
The Itzal Archwing should be brought for fast traveling across the plains and it's ![]() Cosmic Crush is effective at gathering the Eidolon's loot.
Cosmic Crush is effective at gathering the Eidolon's loot.
To maintain a reliable source of energy, bring lots of Squad Energy Restores, subsume ![]() Dispensary to spawn a reliable source of energy orbs, and bring an Operator with
Dispensary to spawn a reliable source of energy orbs, and bring an Operator with ![]() Zenurik's
Zenurik's ![]() Wellspring. Bringing along an Ancient Healer Specter and equipping
Wellspring. Bringing along an Ancient Healer Specter and equipping ![]() Arcane Nullifier can be used to negate the
Arcane Nullifier can be used to negate the ![]() Magnetic status effect.
Magnetic status effect.
The Teralyst is immune to all debuffing effects of Warframe powers. Therefore, highly defensive and/or self/squad buffing Warframes such as ![]() Rhino's
Rhino's ![]() Iron Skin &
Iron Skin & ![]() Roar,
Roar, ![]() Trinity's
Trinity's ![]() Blessing,
Blessing, ![]() Chroma's Cold
Chroma's Cold ![]() Elemental Ward and
Elemental Ward and ![]() Vex Armor,
Vex Armor, ![]() Volt's
Volt's ![]() Electric Shield, or
Electric Shield, or ![]() Harrow's
Harrow's ![]() Covenant are good choices.
Covenant are good choices.
![]() Xaku's abilities, despite dealing
Xaku's abilities, despite dealing ![]() Void damage, have no effect on the Eidolon Teralyst shields.
Void damage, have no effect on the Eidolon Teralyst shields.
Some Warframes are well-equipped to fight the Eidolon Teralyst for the utility they bring to the squad:
 Chroma can quickly shred and even one-shot the Synovia joints by using
  Vex Armor's Fury buff extensively.
 Trinity's
  Blessing will provide extra survivability to the entire squad, as well as making sure the Eidolon Lures are kept at full health.
 Harrow's
  Covenant can be used to render the squad immune to the
  Magnetic proc of the energy spike the Teralyst emits, and provide a maximum damage buff based on the massive amount of damage prevented. Duration should be normalized, so as not to interfere with Chroma's Vex Armor.
 Warding Thurible can be used to provide damage reduction for the entire squad.
 Nezha's
  Warding Halo can be used to negate the
  Magnetic proc for yourself and with the
  Safeguard augment, the entire squad.
 Limbo's
  Cataclysm can be used to render the squad immune to most of Teralyst's attack including the
  Magnetic energy spike. Operators are not affected by Cataclysm and can fire through the rift while keeping their Warframes safe. Remember to decast the ability as not to interfere with the squad's weapons once the shield is down.
 Rift Haven can also be used to individually
  Banish allies and Eidolon Lures to heal them while providing semi-invulnerability from Eidolon attacks.
 Rhino's
  Roar ability can be used to increase the overall party DPS, given how durable the Teralyst is. Furthermore, due to the lack of CC required, a Rhino can opt to maximize their Power Strength to provide a +186% damage buff.
 Volt's
  Electric Shield, on top of their damage and crit enhancing capability, is one of the two abilities in the game (the other being Odonata's
  Energy Field) which can enhance the Operator's damage, making them a solid choice if the Teralyst's shield is a concern.
 Octavia's Amp ability can vastly increase damage dealt by weapons for the entire squad, with enough Ability Strength; however, make sure to cast the ability where attacking the Teralyst or its Synovia is the most convenient.
  Metronome and its Nocturne buff also allows the squad to evade the Teralyst's seeking projectiles and the Vomvalysts' attacks.
 Oberon's
  Hallowed Ground can render allies standing on it immune to status, as well as provide healing with
  Renewal.
  Phoenix Renewal can provide additional support and
  Smite Infusion can provide additional Radiation damage which is very effective against the Teralyst.
 Sevagoth's
  Gloom not only heals allies as they attack the Eidolon, the aura also slows down Vomvalysts, making it hard for them to both attack Eidolon lures and provide crucial support to a downed Eidolon.
- Alternatively, infusing Gloom into
 Garuda allows her to keep the aura active by using
  Bloodletting.
- Alternatively, infusing Gloom into
- Amesha's abilities are very useful for the fight:
 Benevolent Decoy can absorb the Star Fall and Seeking Projectile attack and turn them into healing pulses.
 Warding Grace can block the Teralyst's magnetic procs.
 Vengeful Rush grants invulnerability to all allies while they don't have a full energy pool.
- This can be used to tank the Teralyst's magnetic blasts between stages.
 Madurai can amplify the user's own Operator damage. In particular,
  Void Strike boosts damage for both Operator and Warframe by a massive 1000% for 8 seconds every 40 seconds, shredding the Teralyst's shields.
 Unairu's
  Unairu Wisp can increase the entire squad's Operator damage by 100% for 20 seconds upon hitting an enemy with
  Caustic Strike.
During any phase of the battle, players can bring Eidolon Lures into the battle and charge them by either letting them absorb three Vomvalysts in their spectral ethereal form, or by picking up the energy orb they drop (indicated by a blue beacon) and passing it onto the Lure. Once they are charged, they will glow blue, their waypoint will change from yellow to blue, and if brought near the Teralyst they will prevent it from teleporting away.
Phase 1[]
The Teralyst possesses a Sentient shield which is invulnerable to all sources of damage, it can only be harmed with![]() Void damage which can only be utilized by the Tenno Operator (which is unlocked after finishing the War Within).
Void damage which can only be utilized by the Tenno Operator (which is unlocked after finishing the War Within).
If depleted, the Eidolon's joints — Teralyst Synovia — will become vulnerable to all forms of damage, not just ![]() Void damage, but damage resistances still apply. Note that their shield can still regenerate after a moderate delay if not taking any damage.
Void damage, but damage resistances still apply. Note that their shield can still regenerate after a moderate delay if not taking any damage.
If one of their Synovia joints has been destroyed, it will drop an Exceptional Sentient Core. The boss will then retaliate by emitting an Energy Spike — which is a massive ![]() Magnetic pulse expanding up to 60 meters away — and then teleport away from the Tenno and recovering 75% of their shield.
Magnetic pulse expanding up to 60 meters away — and then teleport away from the Tenno and recovering 75% of their shield.
- If there is at least one charged Eidolon Lure to tether them, this teleportation can be prevented and the boss will only recover 50% of its shield.
- The Operator's Void Mode may also be used to completely ignore the damage and procs, but does not prevent procs affecting their Warframe.
- Remember to keep the Eidolon Vomvalyst count around the Teralyst to a minimum, as they can be a threat if ignored and enables the boss to regenerate their shields via the Vomvalysts.
Phase 2[]
Once two weak points have been destroyed, it will begin two new attack patterns while modifying the aggressiveness of the Vomvalysts.
- Firstly, the Teralyst will perform Star Fall — in which the Teralyst shoots into the sky causing a hailstorm of homing explosives, covering a large area around the Teralyst in multiple explosions. Staying airborne may help to avoid the radius of the explosive projectiles.
- Secondly, the Teralyst will follow it up with Ground Smash — in which the Teralyst smashes the ground sending a series of homing quakes — spread in a starburst pattern instead of circling outwards. This pattern does not change until all weak points have been destroyed.
- Finally, the Eidolon Vomvalysts spawned around the Teralyst will launch exploding spheres instead which deals more damage.
Once three Synovia joints have been destroyed, the Teralyst will attack more frequently and aggressively, and Ground Stomp will be followed by a slower damaging blue ring. The Vomvalyst spawn rate will increase notably.
Phase 3[]
Once all four Synovia joints have been destroyed, the Teralyst will drop down and summon a school of Eidolon Vomvalysts in their ethereal form to merge with it. Each Vomvalyst that merges with the Teralyst will heal it. The players should intercept and kill as many as possible. This phase will end automatically after approximately 30 seconds.
Phase 4[]
In this phase, the Teralyst will not regenerate its shields and can be killed entirely. Their attack pattern closely resembles the pattern of the third phase.
Once the Teralyst dies, it will drop to the ground, dropping an Eidolon Shard as well as one of the ![]() Pummel,
Pummel, ![]() Full Contact,
Full Contact, ![]() Crash Course, or
Crash Course, or ![]() Collision Force mods.
Collision Force mods.
If successfully defeated while tethered by at least two charged Eidolon Lures, the Teralyst will be captured. The lures will self-destruct and yield an additional four Intact Sentient Cores, two Exceptional Sentient Cores, a Flawless Sentient Core, and a Brilliant Eidolon Shard; all of which drop from the lures and not the corpse of the Teralyst. To know that the requirement of capture is fulfilled, listen for Quill Onkko's comment: "Sentient energy contained".
Summary[]
- Preparation Phase: Damage an Eidolon Lure and hack it to take control of it. The Lure can then be charged by either letting it absorb a nearby Eidolon Vomvalyst's spectral form, or by picking up the energy orb they drop (indicated by a blue beacon) and passing it onto the Lure. Each lure needs the energy of three Vomvalysts to fully charge. It is recommended to have two lures under control by the end of the hunt.
- Phase 1: The Eidolon Teralyst's shield can only be damaged with Operator's
 Void damage. The Synovia weak points will be vulnerable once its shields have been depleted.
 - Phase 2: Take down Synovia; this will trigger an energy spike of 5
 Magnetic waves in a 65-meter radius and yield an Exceptional Sentient Core for each one destroyed.
- With no charged Lure: The Teralyst will teleport away, regenerating 75% of its shield.
- With at least 1 charged Lure: The Teralyst will not teleport away, regenerating only half of its shield.
- Phase 3: Once all Synovia have been destroyed, the Teralyst will call upon surrounding Vomvalysts to heal it. Destroy these with the Operator.
- Phase 4: The Teralyst's entire body will finally be vulnerable to damage. At this point, it can be defeated.
- With 0-1 charged Lures (Killed): The Teralyst will collapse to the ground, yielding only an Eidolon Shard and an Arcane Enhancement.
- With 2 charged Lures (Capture): The Teralyst will be absorbed and dissolved into the ground, the Lures tethered to it explode, yielding a generous amount of Sentient Cores, an Eidolon Shard, a Brilliant Eidolon Shard and an Arcane Enhancement. Certain Arcanes are rewarded only from successful Captures.
- Capturing the Teralyst is required to summon the Eidolon Gantulyst, as it is the only way to obtain the Brilliant Eidolon Shard necessary for the summoning.
Tips[]
 Shattering Impact can remove the Teralyst's armor, even while it's shielded; 21 hits will remove the Teralyst's armor entirely, though doing so will also remove its weakness to
  Radiation damage. It is advised to hit it only 20 times to allow for
  Radiation damage to deal bonus damage to the Alloy Armor that it has.
- The Operator's Void Mode is the best way to avoid damage from all of the Teralyst's area of effect attacks, as Void Mode renders the Operator immune to all forms of damage while leaving the Warframe similarly invulnerable to attack while the Operator is out. Companions remain vulnerable, however.
- It is recommended that players with Eidolon Lures following them should not be the main source of damage in the squad, as the lures seem to frequently drift in front of the player, blocking shots and preventing the player from damaging the Teralyst.
- Only one charged Eidolon Lure is required to tether the Teralyst. Therefore, a second one can be charged later into the fight.
- If the Teralyst teleports away, it will emit a highly visible pillar of light wherever it arrives. Additionally, all nearby Vomvalysts will attempt to reconvene with the Teralyst, regardless of distance. A
 Titania in
  Razorwing or any player with an Archwing Launcher can easily fly up and locate the pillar.
- Similarly, upon entering the plains, the Teralyst's initial spawn will be accompanied by the same pillar of light.
- It can help to add a Waypoint the Teralyst (default G ). This will track its location, which can be useful if you need to retreat to refill on ammunition or hack additional Eidolon Lures. However, if the Teralyst teleports away then the waypoint will disappear.
- Eidolon Lures do not follow if the player is high off the ground, teleporting once they land. This can be exploited by using Archwing Launcher (or
 Titania's
  Razorwing) to escape the Magnetic Energy Spikes without touching the ground as the charged Lures prevent the Teralyst from teleporting away.
Trivia[]
- Eidolon in Greek literature are spirit-like images of a living or dead person.
- Eidolon Synovias are a direct reference to synovial joints, which are compound joints found throughout the body.
- It was revealed on Devstream 102 that Eidolon vocal sound effects were made using humpback whales' calls.[1]
- Eidolon Teralyst is sometimes referred to by the community as "Terry".
- The 3 night bosses of Plains of Eidolon together are sometimes referred to by the community as "Tridolons" (i.e. "Three Eidolons" - Eidolon Teralyst, followed by Eidolon Gantulyst, and finally by Eidolon Hydrolyst).
Bugs[]
- After killing a Teralyst, the doors back to Cetus may not open.
- Exceptional Cores may not drop for some players or be dropped up to 30m away.
- The Teralyst may occasionally begin rapidly flying upwards, then abruptly fall to the ground shortly after reaching the height limit.
- The Teralyst may randomly turn invisible during the fight. It is still possible to damage the shield/joints with certain weapons, however the hit-box for the joints is inconsistent and may require many 'test shots' in order to damage one successfully. If a joint is destroyed while it is in this state it will instantly teleport to a random spawn location.
- Even if you have charged lures to prevent the Eidolon from teleporting away, there is still a chance that it will teleport away.
- If the Teralyst is staggered while casting Star Fall (as when a Synovia is destroyed), its gun will wave erratically and may fire the projectile downward, causing the falling projectiles to spawn at or near ground level. Occasionally they will spawn below ground level, causing them to "fall" upward into the sky
- The Teralyst might remain even past nighttime, wandering during daylight and never leaving until a host migration.
Gallery[]
References[]
Patch History[]
Update 35.5 (2024-03-27)
- Fixed rare crash that could occur when returning to Orbiter when disconnecting from a fight with the Eidolons.
Hotfix 33.5.1 (2023-06-21)
- Fixed a script error caused by the Eidolon Teralyst.
Hotfix 31.5.4 (2022-05-02)
- Fixed Unairu’s Magnetic Flare being able to completely strip Profit-Taker’s shields in one cast.
- Applied the same logic with Magnetic Flare that is used for other bosses (Eidolons for example), since completely stripping Shields in a single Magnetic Flare cast removes a large portion of certain gameplay mechanics in these fights.
Hotfix 31.1.1 (2022-02-09)
- Fixed the Terralyst getting stuck on rocks after spawning from Gara Toht Lake in The Plains of Eidolon.
Update 31.1 (2022-02-09)
- Fixed a distorted FX on the Teralysts footsteps.
Hotfix 31.0.4 (2021-12-21)
- Fixed the Teralyst getting stuck on the terrain if you’ve completed The New War Quest.
Update 30.9 (2021-11-11)
- Fixed Eidolons being forcibly moved with Bonewidow’s Firing Line ability. While this may sound harmless, a full squad of Bonewidows could displace the Eidolon into water instantly spawning multiple Vomvalysts.
- Fixed script error with Eidolon fights.
Hotfix 30.5.3 (2021-07-09)
- Fixed all enemy shockwave type attacks doing knockbacks (ex: Eidolons).
Hotfix 29.10.1 (2021-03-19)
- Fixed a harmless script error if the gates to Cetus closed at exactly the same time as a Teralyst did a smash attack
Update 29.8 (2021-02-11)
- More fixes towards the Teralyst spawn sound being too loud.
Update 29.7 (2021-02-01)
- Fixed Teralyst spawn sound being overly loud.
Update 29.2 (2020-09-29)
- Fixed a script error when playing Eidolon hunts.
Hotfix 27.3.15 (2020-04-17)
- Fixed an issue where an Eidolon Wail could hit players in Limbo’s Rift after a Host migration.
- Fixed a script error that could occur when fighting Eidolons if an energy wave was still propagating as the Eidolon died.
- Fixed a harmless script error that would occur if you aborted a mission while a Teralyst was gathering Vomvalysts to shield it.
Update 25.8 (2019-10-01)
- Teralyst vocals will now be ducked more when an Onkko transmission is playing.
Hotfix 25.7.6 (2019-09-18)
- Fixed Teralysts (and other Eidolons) taking more damage to weak points than they should be.
Hotfix 25.7.3 (2019-09-03)
- Fixed certain Amps no longer applying multiple instances of damage to Eidolons. This resulted in the Shwaak Prism feeling like it lacked punchthrough, when in fact it was the Eidolon who was not registering hits.
Hotfix 25.6.3 (2019-08-14)
- Fixed issues with the Teralysts as well as some other enemies not having properly sized collision.
Update 25.1 (2019-06-05)
- Fixed cases of the Teralyst not spawning when initiating the Bounty from Konzu.
Hotfix 23.0.3 (2018-06-19)
- Changed the player marker to now attach to the body part that you were looking at, so it can be used to mark a specific Teralyst weak point, for instance. Also improved the behaviour when attempting to mark an enemy that was close to your marked world position.
Update 23.0 (2018-06-15)
- Teralyst, Gantulyst, and Hydrolyst no longer have regenerated Shields immediately after teleporting from being stuck.
Update 22.17 (2018-03-28)
- More Visual Effect intensity changes to reduce visual noise from Teralyst and Vomvalyst ability FX.
- Fixed cases of the Teralyst literally dissolving when killed with the Acrid.
Hotfix 22.16.4 (2018-03-20)
- Fixed a UI issue where Clients appeared to deal 0 damage when attacking a Teralyst Synovia.
Update 22.16 (2018-03-15)
- Based on feedback we are making some changes to the intensity of Visual Effects in Warframe, especially in the context of Eidolon fights!
- Reduced some visual noise/lens flares on numerous Warframe abilities.
- Reduced some visual noise/lens flares on the Operator Amp explosions/melee burst.
- Greatly toned down lens flare brightness and durations of Teralyst abilities (and variants) to help with visual clutter
- Fixed an extra "0" damage number popping up for every instance of damage dealt to a Teralyst Synovia. Shotguns will therefore no longer shower the Teralyst with a confetti of zeroes when hitting a weak-point.
- Fixed dealing slightly less damage to Eidolon Synovias due to obscured hitboxes.
Hotfix 22.13.2 (2018-02-16)
- Teralyst, Gantulyst and Hydrolyst now all drop Arcanes!
- All 3 Teralysts have a 100% chance of dropping an Arcane.
- The variety of Arcanes have been spread out across all 3 variants and weighted according to the rarity of the Arcane and difficulty of the Teralyst variant.
- How you choose to defeat the Teralyst variants also attributes to the Arcane type/chance.
Hotfix 22.13.1 (2018-02-15)
- Fixed a potential script error when fighting the Teralyst that would break Eidolon Lure functionality.
- Fixed smaller than intended collision shapes on the Teralysts, especially noticeable on the Gantulyst and Hydrolyst. This did not affect their "damage hitboxes", only player collision.
Update 22.12 (2018-02-09)
- Increased Teralyst base level to 50.
- Reduced base Armor and reduced base Health of Synovia weak points a bit.
- Reduced damage of Teralyst abilities to reflect increased level.
Update 22.10 (2018-01-25)
- The Teralyst has a new purple shield bar that will appear overtop its health bar until depleted. This is to give players a better indication of how much shields it has left.
Hotfix 22.0.3 (2017-10-16)
- The Teralyst will now no longer be affected by Auras that manipulate its max Health and max Shields.
- This affects auras like Shield Disruption
- Note that this change doesn't affect Corrosive Projection; it can still strip Eidolon's armor.
Update 22.0 (2017-10-12)
- Introduced.
Last updated: Hotfix 23.0.3 (2018-06-19)
Media[]
References[]
See also[]
- Plains of Eidolon
- Eidolon
- Eidolon Vomvalyst
- Eidolon Gantulyst
- Eidolon Hydrolyst
- Eidolon Shard
- Brilliant Eidolon Shard
| Drone | Aerolyst • Anu Mantalyst • Anu Pyrolyst • Battalyst • Brachiolyst • Conculyst • Eradicyst • Membroid • Mimic • Oculyst • Ortholyst • Summulyst • Symbilyst |
| Spectral | Anu Interference Drone • Choralyst • Spectralyst • Vomvalyst |
| Amalgam | Amalgam Arca Heqet • Amalgam Arca Kucumatz • Amalgam Cinder Machinist • Amalgam Phase MOA • Amalgam Swarm Satyr |
| Ships | Condrix • Gyrix • Ionyx • Murex • Orphix • Splintrix |
| Bosses | |
| Teralyst • Gantulyst • Hydrolyst • Ropalolyst • Condrix • Suda-Hunhow • Wolf of Saturn Six (Amalgamized) • Typholyst | |


