(→Mods) |
|||
| (23 intermediate revisions by 13 users not shown) | |||
| Line 1: | Line 1: | ||
| + | {{Infobox |
||
| ⚫ | |||
| + | | Box title = Electricity Damage |
||
| + | | image = ElectricModBundleIcon.png |
||
| + | }} |
||
| + | |||
'''{{Icon|Proc|Electricity|text}} Damage''' is one of the four primary elemental damage types. It performs well against {{Icon|Faction|Grineer|text}} [[Machinery]] and {{Icon|Faction|Corpus|text}} [[Robotic]]s, but is mitigated by the [[Alloy Armor]] worn by many high-level Grineer units. |
'''{{Icon|Proc|Electricity|text}} Damage''' is one of the four primary elemental damage types. It performs well against {{Icon|Faction|Grineer|text}} [[Machinery]] and {{Icon|Faction|Corpus|text}} [[Robotic]]s, but is mitigated by the [[Alloy Armor]] worn by many high-level Grineer units. |
||
| + | ==Status Effects== |
||
| − | {{Icon|Proc|Electricity|Text}} damage's unique [[Status Effect|status effect]] is '''Tesla Chain''', sending an electrical surge dealing damage equal to ({{tt|''Base Damage''|The combined innate Impact, Puncture, and Slash damage of the weapon, or innate elemental damage.}} + {{tt|''Electricity Damage''|Electricity damage added from mods.}}) {{div}} 2 as {{Icon|Proc|Electricity|Text}} to all enemies within a 3-meter radius. Shocked enemies will also be standing up stunned, exposing them from cover and preventing them from attacking for about 3 seconds (though [[Osprey]]s, [[Bosses]], and [[Tenno]] are immune to this). The target will have electricity running through their body over the duration, which disappears after 6 seconds. |
||
| + | {{Icon|Proc|Electricity|Text}} damage's [[Status Effect|status effect]] is '''Tesla Chain''', which sends an electrical surge dealing damage equal to {{tt|''Base Damage''|The innate Physical and/or Elemental damage of the weapon/ability, including Faction bonus damage mods and Base damage mods}} {{mul}} ({{tt|''Electricity Mod Multiplier''|The Electricity damage multiplier granted from Electricity and Faction mods}} {{div}} 2) as {{Icon|Proc|Electricity|Text}} to all enemies within a '''3'''-meter radius. If a proc occurs together with a headshot, stealth bonus, and/or critical hit, the damage is also affected by their respective multipliers. The Tesla Chain is able to hit heads and other [[Enemy Body Parts|body parts]] by itself, potentially allowing headshots' bonus to apply twice (which also affects the added headshot damage of some [[Sniper Rifle|sniper rifles]]' zoom bonuses and {{M|Target Acquired}}). It should also be noted that due to the nature of Faction damage mods, their bonuses are applied ''twice'' during the calculation of Tesla Chain damage. For example, the Tesla Chain damage of a weapon with an innate 100 damage, {{M|Serration}}, {{M|Stormbringer}}, and {{M|Bane of Grineer}} will be: |
||
| + | :Base Damage = {{Math|100 {{mul}} (1 + 1.65) {{mul}} (1 + 0.3)|t=y|bf-a=y}} |
||
| + | :Electricity Mod Multiplier = {{Math|(1 + 0.9) {{mul}} (1 + 0.3)|t=y|bf-a=y|m=y}} |
||
| + | :'''Tesla Chain Damage''' = {{Math|344.5 {{mul}} (2.47 {{div}} 2)|t=y|bf-a=y}} |
||
| + | |||
| + | |||
| + | Shocked enemies will also be standing up stunned, exposing them from cover and preventing them from attacking for about '''3''' seconds (though [[Osprey]]s, [[Bosses]], and [[Tenno]] are immune to this). Note that only the original target will be stunned, and others around it will only take damage. The target will have electricity running through their body over the duration, which disappears after '''6''' seconds. |
||
==Type Effectiveness== |
==Type Effectiveness== |
||
| Line 13: | Line 24: | ||
! style="background-color: #C8FFC8; font-size: 75%; " | {{Icon|Proc|Electricity|text}} Modifier |
! style="background-color: #C8FFC8; font-size: 75%; " | {{Icon|Proc|Electricity|text}} Modifier |
||
|- |
|- |
||
| − | | style="background-color: #FFE8E8;" | [[Damage |
+ | | style="background-color: #FFE8E8;" | [[Damage/Cloned Flesh|Cloned Flesh]] |
| style="background-color: #FFE8E8;" | |
| style="background-color: #FFE8E8;" | |
||
| − | | style="background-color: #E8E8FF;" | [[Damage |
+ | | style="background-color: #E8E8FF;" | [[Damage/Flesh|Flesh]] |
| style="background-color: #E8E8FF;" | |
| style="background-color: #E8E8FF;" | |
||
| − | | style="background-color: #E8FFE8;" | [[Damage |
+ | | style="background-color: #E8FFE8;" | [[Damage/Infested|Infested]] |
| style="background-color: #E8FFE8;" | |
| style="background-color: #E8FFE8;" | |
||
|- |
|- |
||
| − | | style="background-color: #FFE8E8;" | [[Damage |
+ | | style="background-color: #FFE8E8;" | [[Damage/Ferrite Armor|Ferrite Armor]] |
| style="background-color: #FFE8E8;" | |
| style="background-color: #FFE8E8;" | |
||
| − | | style="background-color: #E8E8FF;" | [[Damage |
+ | | style="background-color: #E8E8FF;" | [[Damage/Shield|Shield]] |
| style="background-color: #E8E8FF;" | |
| style="background-color: #E8E8FF;" | |
||
| − | | style="background-color: #E8FFE8;" | [[Damage |
+ | | style="background-color: #E8FFE8;" | [[Damage/Infested Flesh|Infested Flesh]] |
| style="background-color: #E8FFE8;" | |
| style="background-color: #E8FFE8;" | |
||
|- |
|- |
||
| − | | style="background-color: #FFE8E8;" | [[Damage |
+ | | style="background-color: #FFE8E8;" | [[Damage/Alloy Armor|Alloy Armor]] |
| style="background-color: #FFE8E8;" | {{text|red|–50%}} |
| style="background-color: #FFE8E8;" | {{text|red|–50%}} |
||
| − | | style="background-color: #E8E8FF;" | [[Damage |
+ | | style="background-color: #E8E8FF;" | [[Damage/Proto Shield|Proto Shield]] |
| style="background-color: #E8E8FF;" | |
| style="background-color: #E8E8FF;" | |
||
| − | | style="background-color: #E8FFE8;" | [[Damage |
+ | | style="background-color: #E8FFE8;" | [[Damage/Fossilized|Fossilized]] |
| style="background-color: #E8FFE8;" | |
| style="background-color: #E8FFE8;" | |
||
|- |
|- |
||
| − | | style="background-color: #FFE8E8;" | [[Damage |
+ | | style="background-color: #FFE8E8;" | [[Damage/Machinery|Machinery]] |
| style="background-color: #FFE8E8;" | {{text|green|+50%}} |
| style="background-color: #FFE8E8;" | {{text|green|+50%}} |
||
| − | | style="background-color: #E8E8FF;" | [[Damage |
+ | | style="background-color: #E8E8FF;" | [[Damage/Robotic|Robotic]] |
| style="background-color: #E8E8FF;" | {{text|green|+50%}} |
| style="background-color: #E8E8FF;" | {{text|green|+50%}} |
||
| − | | style="background-color: #E8FFE8;" | [[Damage |
+ | | style="background-color: #E8FFE8;" | [[Damage/Infested Sinew|Sinew]] |
| style="background-color: #E8FFE8;" | |
| style="background-color: #E8FFE8;" | |
||
|} |
|} |
||
| Line 44: | Line 55: | ||
==Elemental Combinations== |
==Elemental Combinations== |
||
{{Icon|Proc|Electricity|Text}} damage mods can be combined with other elemental mods to create a new elemental damage type. |
{{Icon|Proc|Electricity|Text}} damage mods can be combined with other elemental mods to create a new elemental damage type. |
||
| − | * |
+ | *{{Icon|Proc|Electricity|Text}} + {{Icon|Proc|Heat|Text}} = {{Icon|Proc|Radiation|text}} |
| − | * |
+ | *{{Icon|Proc|Electricity|Text}} + {{Icon|Proc|Cold|Text}} = {{Icon|Proc|Magnetic|text}} |
| − | * |
+ | *{{Icon|Proc|Electricity|Text}} + {{Icon|Proc|Toxin|Text}} = {{Icon|Proc|Corrosive|text}} |
==Electricity Sources== |
==Electricity Sources== |
||
| − | |||
<div class="mw-collapsible mw-collapsed"> |
<div class="mw-collapsible mw-collapsed"> |
||
===Weapons=== |
===Weapons=== |
||
| − | |||
<div class="mw-collapsible-content tabbertab-borderless">{{#tag:tabber|Primary = <gallery captionposition="below" captionalign="center" hideaddbutton="true" spacing="small" navigation="false" position="center" bordersize="none" bordercolor="#FFFFFF"> |
<div class="mw-collapsible-content tabbertab-borderless">{{#tag:tabber|Primary = <gallery captionposition="below" captionalign="center" hideaddbutton="true" spacing="small" navigation="false" position="center" bordersize="none" bordercolor="#FFFFFF"> |
||
| − | ChainLightningGunEdit.png|link=Amprex| |
+ | ChainLightningGunEdit.png|link=Amprex|{{Weapon|Amprex}} |
| − | + | Fulmin.png|link=Fulmin|{{Weapon|Fulmin}} |
|
| + | Lanka2.png|link=Lanka|{{Weapon|Lanka}} |
||
| ⚫ | |||
| − | + | InfCrpShockSwarm.png|link=Mutalist Quanta|{{Weapon|Mutalist Quanta}} (Alternate Fire) |
|
| ⚫ | |||
| + | QuantaVandal.png|link=Quanta Vandal|{{Weapon|Quanta Vandal}} (Primary Fire) |
||
</gallery> |
</gallery> |
||
{{!}}-{{!}} |
{{!}}-{{!}} |
||
Secondary = |
Secondary = |
||
<gallery captionposition="below" captionalign="center" hideaddbutton="true" spacing="small" navigation="false" position="center" bordersize="none" bordercolor="#FFFFFF"> |
<gallery captionposition="below" captionalign="center" hideaddbutton="true" spacing="small" navigation="false" position="center" bordersize="none" bordercolor="#FFFFFF"> |
||
| − | TaserStar.png|link=Castanas| |
+ | TaserStar.png|link=Castanas|{{Weapon|Castanas}} |
| + | Hystrix.png|link=Hystrix|{{Weapon|Hystrix}} <br />(Electric quill, proc only) |
||
| − | NLCastanas.png|link=Sancti Castanas| |
+ | NLCastanas.png|link=Sancti Castanas|{{Weapon|Sancti Castanas}} |
</gallery> |
</gallery> |
||
{{!}}-{{!}} |
{{!}}-{{!}} |
||
Melee = |
Melee = |
||
<gallery captionposition="below" captionalign="center" hideaddbutton="true" spacing="small" navigation="false" position="center" bordersize="none" bordercolor="#FFFFFF"> |
<gallery captionposition="below" captionalign="center" hideaddbutton="true" spacing="small" navigation="false" position="center" bordersize="none" bordercolor="#FFFFFF"> |
||
| − | DEAmphis.png|link=Amphis| |
+ | DEAmphis.png|link=Amphis|{{Weapon|Amphis}} (Slam Attack) |
| − | CYSingleStaffSkin.png|link=Cadus| |
+ | CYSingleStaffSkin.png|link=Cadus|{{Weapon|Cadus}} |
| − | + | CrpGlaive.png|link=Falcor|{{Weapon|Falcor}} |
|
| − | + | StalkerMios.png|link=Lacera|{{Weapon|Lacera}} |
|
| − | + | CorpusWhip.png|link=Lecta|{{Weapon|Lecta}} |
|
| + | Nunchaku.png|link=Ninkondi|{{Weapon|Ninkondi}} |
||
| − | CorpusKickNPunch.png|link=Obex| |
+ | CorpusKickNPunch.png|link=Obex|{{Weapon|Obex}} (Slam Attack) |
| − | CorpusTonfa.png|link=Ohma|[[Ohma]] |
||
| − | + | CorpusTonfa.png|link=Ohma|{{Weapon|Ohma}} |
|
| + | Plasma.png|link=Plasma Sword|{{Weapon|Plasma Sword}} |
||
| − | Prova8point2.png|link=Prova|[[Prova]] |
||
| + | PrismaObex.png|link=Prisma Obex|{{Weapon|Prisma Obex}} (Slam Attack) |
||
| ⚫ | |||
| − | + | Prova8point2.png|link=Prova|{{Weapon|Prova}} |
|
| ⚫ | |||
| + | PSLecta.png|link=Secura Lecta|{{Weapon|Secura Lecta}} |
||
| + | Corpuspolearm.png|link=Serro|{{Weapon|Serro}} |
||
</gallery> |
</gallery> |
||
{{!}}-{{!}} |
{{!}}-{{!}} |
||
Sentinel = |
Sentinel = |
||
<gallery captionposition="below" captionalign="center" hideaddbutton="true" spacing="small" navigation="false" position="center" bordersize="none" bordercolor="#FFFFFF"> |
<gallery captionposition="below" captionalign="center" hideaddbutton="true" spacing="small" navigation="false" position="center" bordersize="none" bordercolor="#FFFFFF"> |
||
| − | SentinelElectricRailgun.png|link=Vulklok| |
+ | SentinelElectricRailgun.png|link=Vulklok|{{Weapon|Vulklok}} |
</gallery>}}</div> |
</gallery>}}</div> |
||
</div> |
</div> |
||
| ⚫ | |||
| + | <div></div> <!--these div tags are here so that formatting doesn't break--> |
||
| − | + | <!-- CorpusTonfa,PSLecta,PrismaObex,SentinelElectricRailgun,Arc_Coil_19.6.3,Electro_Pulse_19.6.3 --> |
|
===Enemies=== |
===Enemies=== |
||
<div class="mw-collapsible-content tabbertab-borderless">{{#tag:tabber|Corpus = <gallery captionposition="below" captionalign="center" hideaddbutton="true" spacing="small" navigation="false" position="center" bordersize="none" bordercolor="#FFFFFF"> |
<div class="mw-collapsible-content tabbertab-borderless">{{#tag:tabber|Corpus = <gallery captionposition="below" captionalign="center" hideaddbutton="true" spacing="small" navigation="false" position="center" bordersize="none" bordercolor="#FFFFFF"> |
||
| − | CrewmanProd.png|link=Prod Crewman|[[Prod Crewman]] wielding the |
+ | CrewmanProd.png|link=Prod Crewman|[[Prod Crewman]] wielding the {{Weapon|Prova}} |
DiscOsprey.png|link=Sapping Osprey|[[Sapping Osprey]] deploys pulse mines |
DiscOsprey.png|link=Sapping Osprey|[[Sapping Osprey]] deploys pulse mines |
||
| − | CrewmanSniper.png|link=Sniper Crewman|[[Sniper Crewman]] wielding the |
+ | CrewmanSniper.png|link=Sniper Crewman|[[Sniper Crewman]] wielding the {{Weapon|Lanka}} |
| − | CrpNullRanger.png|link=Nullifier Crewman|[[Nullifier Crewman]] wielding the |
+ | CrpNullRanger.png|link=Nullifier Crewman|[[Nullifier Crewman]] wielding the {{Weapon|Lanka}} |
| − | JetpackCrewmamQuanta.png|link=Quanta Ranger|[[Quanta Ranger]] wielding the |
+ | JetpackCrewmamQuanta.png|link=Quanta Ranger|[[Quanta Ranger]] wielding the {{Weapon|Quanta}} |
CrpShipFlak.png|link=Corvette|[[Corvette]] fires electrical scatter grenades |
CrpShipFlak.png|link=Corvette|[[Corvette]] fires electrical scatter grenades |
||
DEHyenaTh.png|link=Hyena TH|[[Hyena TH]] uses [[Electric Surge]] |
DEHyenaTh.png|link=Hyena TH|[[Hyena TH]] uses [[Electric Surge]] |
||
| − | SapComba.png|link=Comba|[[Comba]] may be armed with the |
+ | SapComba.png|link=Comba|[[Comba]] may be armed with the {{Weapon|Lecta}} |
| − | FogScrambus.png|link=Scrambus|[[Scrambus]] may be armed with the |
+ | FogScrambus.png|link=Scrambus|[[Scrambus]] may be armed with the {{Weapon|Lecta}} |
</gallery> |
</gallery> |
||
{{!}}-{{!}}Infested= |
{{!}}-{{!}}Infested= |
||
| Line 109: | Line 126: | ||
<gallery captionposition="below" captionalign="center" hideaddbutton="true" spacing="small" navigation="false" position="center" bordersize="none" bordercolor="#FFFFFF"> |
<gallery captionposition="below" captionalign="center" hideaddbutton="true" spacing="small" navigation="false" position="center" bordersize="none" bordercolor="#FFFFFF"> |
||
SparkNewArcEng.png|link=Spark|[[Spark]] fires slow-moving electrical orbs |
SparkNewArcEng.png|link=Spark|[[Spark]] fires slow-moving electrical orbs |
||
| − | EelFrogLancer.png|link=Shock Draga|[[Shock Draga]] can fire an electric arc from his |
+ | EelFrogLancer.png|link=Shock Draga|[[Shock Draga]] can fire an electric arc from his {{Weapon|Sydon}} |
</gallery> |
</gallery> |
||
{{!}}-{{!}}Corrupted= |
{{!}}-{{!}}Corrupted= |
||
<gallery captionposition="below" captionalign="center" hideaddbutton="true" spacing="small" navigation="false" position="center" bordersize="none" bordercolor="#FFFFFF"> |
<gallery captionposition="below" captionalign="center" hideaddbutton="true" spacing="small" navigation="false" position="center" bordersize="none" bordercolor="#FFFFFF"> |
||
| − | OrokinNullifySpaceman.png|link=Corrupted Nullifier|[[Corrupted Nullifier]] wielding the |
+ | OrokinNullifySpaceman.png|link=Corrupted Nullifier|[[Corrupted Nullifier]] wielding the {{Weapon|Lanka}} |
</gallery> |
</gallery> |
||
{{!}}-{{!}}Environment= |
{{!}}-{{!}}Environment= |
||
| Line 119: | Line 136: | ||
Arc Trap Improved.png|link=Arc Trap|[[Arc Trap]]s fire an electric arc at enemies that come too close to it |
Arc Trap Improved.png|link=Arc Trap|[[Arc Trap]]s fire an electric arc at enemies that come too close to it |
||
Plasmavents.png|link=Environmental Hazards#Plasma Vent|[[Environmental Hazards#Plasma Vent|Plasma Vents]] periodically damage nearby [[Archwing]]s |
Plasmavents.png|link=Environmental Hazards#Plasma Vent|[[Environmental Hazards#Plasma Vent|Plasma Vents]] periodically damage nearby [[Archwing]]s |
||
| − | </gallery><!-- will add electrified water -->}}</div> |
+ | </gallery><!-- will add electrified water -->}}</div></div><hr /><div class="mw-collapsible mw-collapsed"> |
| ⚫ | |||
| ⚫ | |||
===Mods=== |
===Mods=== |
||
| + | |||
| − | <div class="mw-collapsible-content tabbertab-borderless">{{#tag:tabber|Rifle = <gallery captionposition="below" hideaddbutton="true" spacing="small" navigation="true" position="center" bordersize="none" bordercolor="#FFFFFF"> |
+ | <div class="mw-collapsible-content tabbertab-borderless">{{#tag:tabber|Rifle = <gallery captionposition="below" hideaddbutton="true" spacing="small" navigation="true" position="center" bordersize="none" bordercolor="#FFFFFF" perrow="3" captionalign="center"> |
StormbringerModU145.png|link=Stormbringer |
StormbringerModU145.png|link=Stormbringer |
||
HighVoltageModU145.png|link=High Voltage |
HighVoltageModU145.png|link=High Voltage |
||
| − | VoltageSequenceMod.png|link=Voltage Sequence| |
+ | VoltageSequenceMod.png|link=Voltage Sequence|(Dropped Arc Traps) |
</gallery> |
</gallery> |
||
{{!}}-{{!}}Shotgun = |
{{!}}-{{!}}Shotgun = |
||
| Line 148: | Line 164: | ||
<gallery captionposition="below" hideaddbutton="true" spacing="small" navigation="true" position="center" bordersize="none" bordercolor="#FFFFFF"> |
<gallery captionposition="below" hideaddbutton="true" spacing="small" navigation="true" position="center" bordersize="none" bordercolor="#FFFFFF"> |
||
ElectrifiedBarrel.png|link=Electrified Barrel |
ElectrifiedBarrel.png|link=Electrified Barrel |
||
| + | ChargedBulletsMod.png|link=Charged Bullets |
||
</gallery> |
</gallery> |
||
{{!}}-{{!}}Arch-Melee = |
{{!}}-{{!}}Arch-Melee = |
||
<gallery captionposition="below" hideaddbutton="true" spacing="small" navigation="true" position="center" bordersize="none" bordercolor="#FFFFFF"> |
<gallery captionposition="below" hideaddbutton="true" spacing="small" navigation="true" position="center" bordersize="none" bordercolor="#FFFFFF"> |
||
GalvanizedBlade.png|link=Galvanized Blade |
GalvanizedBlade.png|link=Galvanized Blade |
||
| + | IonInfusion.png|link=Ion Infusion |
||
</gallery> |
</gallery> |
||
{{!}}-{{!}}Warframe = |
{{!}}-{{!}}Warframe = |
||
| − | <gallery captionposition="below" hideaddbutton="true" spacing="small" navigation="true" position="center" bordersize="none" bordercolor="#FFFFFF"> |
+ | <gallery captionposition="below" hideaddbutton="true" spacing="small" navigation="true" position="center" bordersize="none" bordercolor="#FFFFFF" perrow="3" captionalign="center"> |
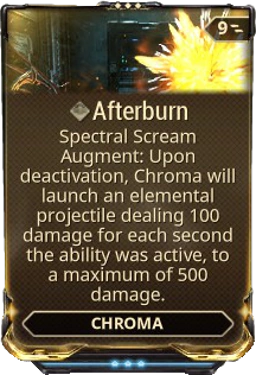
Afterburn.png|link=Afterburn |
Afterburn.png|link=Afterburn |
||
ShockTrooper2.png|link=Shock Trooper |
ShockTrooper2.png|link=Shock Trooper |
||
| Line 161: | Line 179: | ||
RetributionModU145.png|link=Retribution |
RetributionModU145.png|link=Retribution |
||
LightningDashMod.png|link=Lightning Dash |
LightningDashMod.png|link=Lightning Dash |
||
| + | VoltaicLanceMod.png|link=Voltaic Lance|([[Conclave]] only-Comestic) |
||
| ⚫ | |||
| + | </gallery>}}</div> |
||
| ⚫ | |||
| + | |||
| ⚫ | |||
===Abilities=== |
===Abilities=== |
||
| Line 182: | Line 204: | ||
{{:Discharge|cardonly}} |
{{:Discharge|cardonly}} |
||
}} |
}} |
||
| + | {{!}}-{{!}}Wisp= |
||
| + | {{:Reservoirs|cardonly}} |
||
{{!}}-{{!}}Itzal (Archwing)= |
{{!}}-{{!}}Itzal (Archwing)= |
||
{{:Fighter Escort|cardonly}} |
{{:Fighter Escort|cardonly}} |
||
| − | }}</div> |
+ | }}</div></div> |
| + | |||
| + | ==Sources of Electricity Resistances== |
||
| + | ===Mods=== |
||
| + | <gallery captionposition="below" hideaddbutton="true" spacing="small" navigation="true" position="center" bordersize="none" bordercolor="#FFFFFF"> |
||
| + | LightningRodModU145.png|link=Lightning Rod |
||
| + | </gallery> |
||
==Media== |
==Media== |
||
| Line 192: | Line 222: | ||
</gallery> |
</gallery> |
||
| + | {{DamageNav}} |
||
| − | ==See also== |
||
| − | + | __NOTOC__ |
|
| ⚫ | |||
| + | [[es:Daño Eléctrico]] |
||
| + | [[fr:Dégâts/Dégâts_Électrique]] |
||
[[Category:Mechanics]] |
[[Category:Mechanics]] |
||
[[Category:Damage 2.0]] |
[[Category:Damage 2.0]] |
||
Revision as of 12:47, 27 December 2019
Script error: The function "Proc" does not exist. Damage is one of the four primary elemental damage types. It performs well against Script error: The function "Faction" does not exist. Machinery and Script error: The function "Faction" does not exist. Robotics, but is mitigated by the Alloy Armor worn by many high-level Grineer units.
Status Effects
Script error: The function "Proc" does not exist. damage's status effect is Tesla Chain, which sends an electrical surge dealing damage equal to Base Damage × (Electricity Mod Multiplier ÷ 2) as Script error: The function "Proc" does not exist. to all enemies within a 3-meter radius. If a proc occurs together with a headshot, stealth bonus, and/or critical hit, the damage is also affected by their respective multipliers. The Tesla Chain is able to hit heads and other body parts by itself, potentially allowing headshots' bonus to apply twice (which also affects the added headshot damage of some sniper rifles' zoom bonuses and ![]() Target Acquired). It should also be noted that due to the nature of Faction damage mods, their bonuses are applied twice during the calculation of Tesla Chain damage. For example, the Tesla Chain damage of a weapon with an innate 100 damage,
Target Acquired). It should also be noted that due to the nature of Faction damage mods, their bonuses are applied twice during the calculation of Tesla Chain damage. For example, the Tesla Chain damage of a weapon with an innate 100 damage, ![]() Serration,
Serration, ![]() Stormbringer, and
Stormbringer, and ![]() Bane of Grineer will be:
Bane of Grineer will be:
- Base Damage = 100 × (1 + 1.65) × (1 + 0.3) = 344.5
- Electricity Mod Multiplier = (1 + 0.9) × (1 + 0.3) = 2.47x
- Tesla Chain Damage = 344.5 × (2.47 ÷ 2) = 425.4575
Shocked enemies will also be standing up stunned, exposing them from cover and preventing them from attacking for about 3 seconds (though Ospreys, Bosses, and Tenno are immune to this). Note that only the original target will be stunned, and others around it will only take damage. The target will have electricity running through their body over the duration, which disappears after 6 seconds.
Type Effectiveness
| Script error: The function "Faction" does not exist. Health | Script error: The function "Proc" does not exist. Modifier | Script error: The function "Faction" does not exist. Health | Script error: The function "Proc" does not exist. Modifier | Script error: The function "Faction" does not exist. Health | Script error: The function "Proc" does not exist. Modifier |
|---|---|---|---|---|---|
| Cloned Flesh | Flesh | Infested | |||
| Ferrite Armor | Shield | Infested Flesh | |||
| Alloy Armor | –50% | Proto Shield | Fossilized | ||
| Machinery | +50% | Robotic | +50% | Sinew |
Elemental Combinations
Script error: The function "Proc" does not exist. damage mods can be combined with other elemental mods to create a new elemental damage type.
- Script error: The function "Proc" does not exist. + Script error: The function "Proc" does not exist. = Script error: The function "Proc" does not exist.
- Script error: The function "Proc" does not exist. + Script error: The function "Proc" does not exist. = Script error: The function "Proc" does not exist.
- Script error: The function "Proc" does not exist. + Script error: The function "Proc" does not exist. = Script error: The function "Proc" does not exist.
Electricity Sources
Weapons
")
")
")
")
")
")
")
")
")
")
Enemies
")
")
")
")
")
")
")
")
")
")
")
")
")
")
")
")
Mods
")
")
")
")
")
")
")
")
")
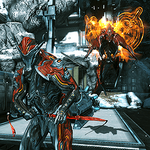
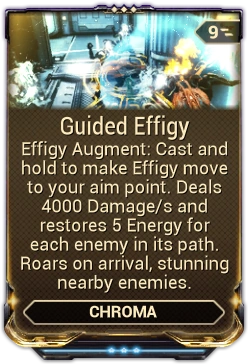
Abilities
|
 1 +3/s |
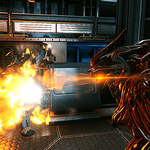
Spectral Scream Exhale a deep breath of elemental destruction. Chroma's energy color determines the element. Introduced in Update 16.0 (2015-03-19) |
|
|
Misc:
100% (status chance) |
|
 2 |
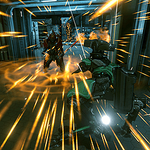
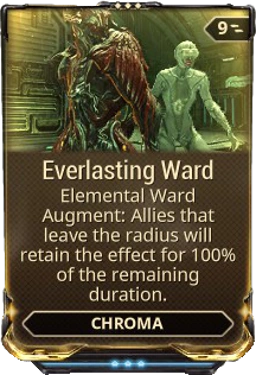
Elemental Ward Depending on Chroma's elemental alignment, an offensive area-of-effect is created. Chroma and his nearby allies are imbued with defensive energy. Introduced in Update 16.0 (2015-03-19) |
| ||||||||||||||
| Subsumable to Helminth |
|
 4 +10/s |
Effigy Chroma turns his pelt into a massive sentry that strengthens nearby allies and engulfs enemies in elemental attacks. Introduced in Update 16.0 (2015-03-19) |
| ||||

|
 1 |
Tesla Launches a grenade that holds an electrical charge, zapping enemies that come within range. Introduced in Update 7.11 (2013-05-17) |
15 (contact damage) |
|
Misc: 40 s (duration) 10% (uncharged status) 100% (charged status) |
|
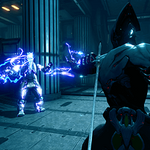
 1 |
Shock Launches a shocking projectile. It stuns and deals high damage to a single target and chains damage to nearby enemies. Introduced in Update 5.3 (2013-01-10) |
|
|
Misc:
∞ (cast range) | |||
| Subsumable to Helminth |

|
 3 |
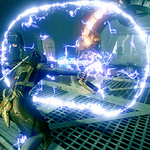
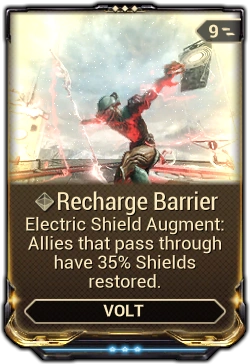
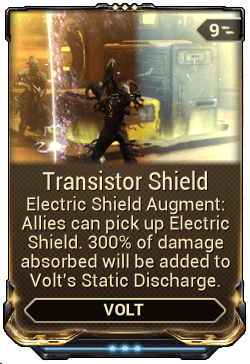
Electric Shield Volt deploys an obstacle of energy, providing cover in any situation. Introduced in Update 5.3 (2013-01-10) |
|
|
Misc:
+50% (damage bonus) |
|
 4 |
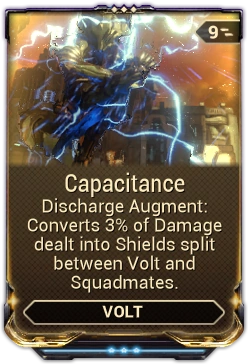
Discharge Paralyze nearby hostiles with a damaging electric charge, this also shocks approaching enemies. Introduced in Update 18.13 (2016-05-27) |
|
8 m (electric arc radius) | |||
|
Misc:
3 / 3 / 4 / 4 s (electric pulse duration) |

|
 1 |
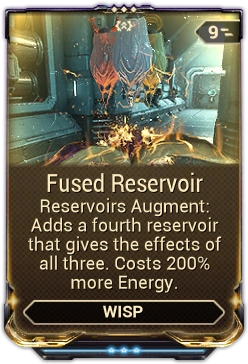
Reservoirs Choose and summon a Reservoir filled with Motes that attach to and aid Wisp and her allies. Haste Mote grants increased movement and attack speed. Vitality Mote increases maximum health and heals over time. Shock Mote stuns nearby enemies. Introduced in Update 25.0 (2019-05-22) |
| ||||
|
 4 |
Fighter Escort Deploys drones that fight alongside the Warframe, each detonating in a destructive blast when killed. Introduced in Hotfix 15.7.2 (2014-12-19) |
1000 / 1500 / 2000 / 2500 (explosion |
80 m (beam range) |
Sources of Electricity Resistances
Mods
Media
")
 (21 KB)")