Aucun résumé des modifications Balise : rte-wysiwyg |
Aucun résumé des modifications Balise : rte-source |
||
| Ligne 2 : | Ligne 2 : | ||
{{Quote|Tenno are out for vengeance, and Grineer [[Councilor Vay Hek]] has nowhere left to hide. Hot on his trail after the assault on Relays during [[Operation Eyes of Blight|Eyes of Blight]], the Lotus will guide a precision strike force to hunt down and put an end to Vay Hek once and for all. Be wary Tenno. Numbers alone will not protect you when diving into the heart of Grineer military power.}} |
{{Quote|Tenno are out for vengeance, and Grineer [[Councilor Vay Hek]] has nowhere left to hide. Hot on his trail after the assault on Relays during [[Operation Eyes of Blight|Eyes of Blight]], the Lotus will guide a precision strike force to hunt down and put an end to Vay Hek once and for all. Be wary Tenno. Numbers alone will not protect you when diving into the heart of Grineer military power.}} |
||
| − | Le Droit de |
+ | Le '''Droit de Rétribution''' est la première [[mission]] de type [[Epreuve]] disponible dans [[WARFRAME]], ajoutée lors de l'[[Update 16]]. Cette mission est significativement plus difficile et complexe que les autres types de missions, incluant des mécaniques uniques, des variations de missions spéciales et des obstacles qui n'existent pas dans d'autres missions. |
| − | Son schéma est disponible à l'achat au |
+ | Son schéma est disponible à l'achat au [[Marché]] pour {{cc|100,000}}. Cette mission peut être complétée avec un minimum de quatre Tennos pour un défi plus important. L'épreuve se déroule sur [[Terre]] et est divisée en trois phases qui sont respectivement des missions de [[Sabotage]], d'[[Espionnage]] et d'[[Assassinat]], chacune avec leurs propres défis et puzzles qui doivent être accomplis. |
==Accès== |
==Accès== |
||
Version du 12 mai 2015 à 12:15
 |
Données incomplètes -Ordis |
| Tenno are out for vengeance, and Grineer Councilor Vay Hek has nowhere left to hide. Hot on his trail after the assault on Relays during Eyes of Blight, the Lotus will guide a precision strike force to hunt down and put an end to Vay Hek once and for all. Be wary Tenno. Numbers alone will not protect you when diving into the heart of Grineer military power. |
Le Droit de Rétribution est la première mission de type Epreuve disponible dans WARFRAME, ajoutée lors de l'Update 16. Cette mission est significativement plus difficile et complexe que les autres types de missions, incluant des mécaniques uniques, des variations de missions spéciales et des obstacles qui n'existent pas dans d'autres missions.
Son schéma est disponible à l'achat au Marché pour ![]() 100,000. Cette mission peut être complétée avec un minimum de quatre Tennos pour un défi plus important. L'épreuve se déroule sur Terre et est divisée en trois phases qui sont respectivement des missions de Sabotage, d'Espionnage et d'Assassinat, chacune avec leurs propres défis et puzzles qui doivent être accomplis.
100,000. Cette mission peut être complétée avec un minimum de quatre Tennos pour un défi plus important. L'épreuve se déroule sur Terre et est divisée en trois phases qui sont respectivement des missions de Sabotage, d'Espionnage et d'Assassinat, chacune avec leurs propres défis et puzzles qui doivent être accomplis.
Accès

Screen of The Law of Retribution as seen from the Market.
| Vay Hek's Fomorian assault on our Relays was devastating, but he failed to break us. Now we take the fight back to him. Now we exact justice.
This is a key for a TRIAL mission that has been designed to be challenging for 8-players, and can be initiated from Earth. |
Les joueurs peuvent accèder à l'épreuve du Droit de rétribution en fabricant le schéma correspondant. La clé associée est à usage unique mais le schéma est réutilisable.
| Préréquis de Fabrication | |||||
|---|---|---|---|---|---|
5,000 |
500 |
9 000 |
1 |
Temps : 6 hrs | |
| Accélération : | |||||
Mission Overview
Stage 1: Tritium Sabotage
The first stage transports players into a Grineer Forest. The objective is to destroy all the nearby Toxin Injectors with a charged Tritium Battery.


Cooperative Door, along with a pair of pad to unlock it.
From the initial spawn point, head to the center of the map to encounter a door with two sets of pressure pad doors. These doors require two players to step on two different pressure pads in order to open it. Be sure to coordinate the squad, as all the doors in this mission use this mechanism. Upon entering, the players will gradually lose contact to the Lotus, with Lotus barely being able to warn them of the poisonous gas interfering with her connection before the transmission cuts off, blocking any indicative objective HUD and ultimately leaving the cell to figure out the puzzles by themselves. It is soon revealed by Councilor Vay Hek that the Grineer Forest is essentially being polluted by the poisonous gas produced by nearby Toxin Injectors, which will constantly drain the players' health with Erreur de script : la fonction « Proc » n’existe pas. damage.


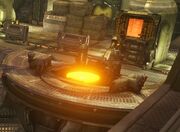
A Tritium Battery Dispenser with the two associated consoles.
The objective is to destroy all four Toxin Injectors in order to stop the pollution by detonating a charged Tritium Battery. A Tritium Battery can be obtained from a Tritium Battery Dispenser in the middle of the map connecting to the four Toxin Injectors. A battery can be dispensed by hacking the two Grineer Consoles next to it. Once dispensed, the battery will need a large energy source from a Warframe in order to charge it, which can be done by carrying it (X ). The carrier's energy will be drained by 25s-1 when charging and they will be unable to use any abilities. If the holder's energy reserve runs out, the battery will be automatically dropped and another player must substitute before it destabilize and explodes. If left uncharged long enough, it will eventually explode prematurely, sending players back to square one. Once the battery is charged, carry with care and do not engage in combat as rough movement such as sprinting and knockdown can reduce its stability.


A Toxin Injector connected to pipelines which leads to their associated consoles.
There are four Toxin Injectors in total. To destroy them, players have to hack up to four different consoles spread across the area in order to disable the Toxin Injector's protection field, making it vulnerable to the Tritium Battery. Each console is connected to the injector via an orange pipeline cable, which serves as a visual clue which leads to the associated consoles. After hacking all four consoles, the Injector will be vulnerable for a short period of time, during which the Tritium bomb must be detonated (by destabilizing it) next to it to destroy the Toxin Injector. After destroying all four, the stage is considered complete and will end with the end mission UI. The players are then transferred to the next stage.
Stage 2: Infiltration Mission
The second stage transports the players into a Grineer Shipyard. In this stage, the objective is to infiltrate into the heart of the Grineer Military in order to uncover Councilor Vay Hek's location for the Lotus to track.
Section 1: Decode

One of the eight input panels, plastered with their own letter.
The mission starts out in the said tileset, with the players ordered to infiltrate further. On the way, the players will encounter a vast room with a sophisticated lock system, hindering progress. There are a total of eight large orange buttons, with four being on each of the two parallel wings platforms, separated by a pool of Erreur de script : la fonction « Proc » n’existe pas. waste. Next to these buttons are large red symbols. Situated in the middle between the two parallel platforms is a large screen with a row of eight circles underneath it, as well as a large door. Finally, there are four hacking consoles (called panic buttons in this instance) at each of the four corners of the large room.


The screen where the letters will be displayed once its respective console have been hacked.
To begin the cycle and security decryption process, one of the four consoles (with the designated console glowing in yellow) at the four corners of the room must be hacked to decrypt the password. Once hacked, the large screen in the middle of the room will emit a siren and display a Grineer symbol. The objective is to find the symbol that corresponds with it at one of the eight panels and step on the button. Once the correct button is pressed, it will turn from orange to blue, and one of the eight circles underneath the large screen will glow blue to indicate this. Upon completing the cycle, and one of the four consoles will now have to be hacked to begin another cycle. To open the security door underneath the screen, all players will need to continue the decryption process until all the respective panels are pressed in the proper order, failing to do otherwise (by stepping on the wrong panel or getting off a panel) will siren the security system and damage every players on the panels with a lethal Erreur de script : la fonction « Proc » n’existe pas. damage, restarting the encryption.
Section 2: Hijack


Short-circuited railing, which will zap the core and nearby players upon contact.

Inside the locked area, players are faced with a Fomorian Core, which they must Hijack in order to lure out Councilor Vay Hek. Instead of hacking consoles, the mission introduces short circuited railing, which will stop and damage the core on contact and zaps nearby players with continuous Erreur de script : la fonction « Proc » n’existe pas. damage. Should this happen, move away from the core for the tram to move the core backwards, away from the railing. In order to deactivate the railing, players have to step up to three different pressure panels to progress, with at least one player present to move the core. As the players progress, The Grustrag Three and Councilor Vay Hek, both at level 100 will eventually interfere the mission, serving as a reinforcement to the Grineer force. While it is possible to defeat the three, attacking Counculor Vay Hek will eventuallly lead him to escape, much like the first phase of his boss pattern. Upon transferring the Fomorian Core to the Liset, the stage will be considered complete and will end with the mission UI. The players are then transferred to the next stage.
Stage 3: Vay Hek Assassination
The third and final stage transports players into a Grineer Settlement. The objective is to assasinate Councilor Vay Hek and end his reign against the Tenno once and for all.
The mission will directly lead players to a boss room, where they will encounter Councilor Vay Hek inserting himself into his Terra Frame, ready to fight head-on. Unlike the encounter on Oro, Earth, Councilor Vay Hek is immune to all damage due to the five power plants surrounding the area granting him invincibility.


One of the five power plants, plastered with its own label.
In order to disable his protective field, players will need to light all five power plants on fire by detonating a charged Tritium Battery inside the structure. A Tritium Battery will occasionally be brought in by the enemies, which the players have to kill in order to obtain the bomb. Similar to the first stage, a Warframe needs to charge it by carrying it (X ), although the battery will drain energies twice as fast by 50s-1 in order to charge it much faster. Once charged, the plant entrance can be opened by stepping up to two different pads, connected via pipelines to the door. Once inside, carrier must drop the battery into the vent and escapes before it detonates the building. Repeat this step on the rest of the plants to wear off his protective field in order to defeat him.


One of the pressure pads, plastered with the matching label.
In addition, the Lotus will warn the players of the prescence of a Balor Fomorian in the system interfering the boss battle. Fortunately, the Grinner have to send a laser signal to the Fomorian to signify the exact location coordinate before it can directly fire, which is done if the four terminals in the center are activated by the Grineer. If the players fail to prevent so, Councilor Vay Hek will command the Fomorian to fire its laser cannon at the players, which will down any players that fail to take cover from the cannon. In addition, this attack will extinguish all the burning plants, sending the players back to square one.
Once he is defeated, Councilor Vay Hek will be forced to escape the Tenno and the stage will be considered complete, fully completing the trial. If this is the player's first completion, the Lotus will award them a Sevahti Sekhara badge for completing it.
Rewards


Sevhati Sekhara event badge
The rewards for completion of the trial are as follows:
- An
 Arcane Enhancement
- 195,800 Credits
- Stage 1 - 7,900 Credits
- Stage 2 - 8,900 Credits
- Stage 3 - 179,000 Credits
- Stage 1 -
- 3-D Animated Badge : "Sevhati Sekhara"
- Only upon first completion of the trial.
Notes
- Players will not be eligible for another reward for 23 hours after completion.
- Players can recieve another reward if the completion time is past 23 hours. (Starting 25 minutes before eligible again but taking longer than 25 minutes)
- Enemies will not scale down in difficulty with fewer players present in the mission.
- The number of buttons that are to be held down in the second stage of the trial will be adjusted to the number of players. This means if one of the players in the squad disconnected, the number of buttons required will be reduced.
- Players in the Rift Plane can't activate buttons, and entering the rift will count as leaving a button.
- Being in a bleedout state while lying on a pressure panel in all stages of the trial will not deactivate the button, as long as you remain on it. Dying on a pad, however, will deactivate the button.
- Loki's Decoy can activate pressure panel in Hijack part of Stage 2.
Tips
- General
- Crowd Control is especially an important factor in this Trial, and as such, it is advised to have some Warframes which boast plenty of Crowd Control capabilities such as Loki's Irradiating Disarm or Nova's Molecular Prime.
- Four Corrosive Projections can be useful to strip all existing armors, and proves to be a very effective tactic when dealing with the enemies, as their highly scaled armor can prove to be a very difficult protection to bypass.
- Rare Containers
- Rare Grineer Containers and Reinforced Grineer Containers have a significantly increased spawn chance in the Trial. It is common to find at least 1 in every Trial.
- Multiple rare containers can spawn in every stage.
- Tritium Sabotage
- Battery should reach 100% charge. To detonate faster, shoot it after dropping, be cautious to take some distance from battery before detonating as it can kill.
- Infiltration Mission
- Section 1: Decode
- In the Security Room, it is advised for all players use any crowd control capabilities they possess, as the vast range of the room can prove difficult for any one Warframe to neutralize enemy threats alone.
- A classic and simple tip when doing the Security Room is to determine orders of players stepping firsthandedly with priorities in mind. For example, frames with least amount of crowd control capabilities like Trinity should go first, whilst frames with most crowd control capabilities like Banshee or Loki should go last.
- Know that the label plastered to the panels are actually Grineer Numerical Alphabets, and that they are fixed to their location. In the right wing, from bottom to top are: , , and which means 2, 3, 4 and 5 in english. Whilst in the left wing, from top to bottom are: , , and which means 6, 7, 8 and 9 in english.
- Notice the pattern of the label to easily identify the respective wings, the left wing (, , , ) sports a cut on the upper half of the letter; while the right wing (, , , ) sports a cut on the lower half of the letter.
- Notice the pattern of the label to easily identify the respective wings, the left wing (
- Section 1: Decode